Python CloudScraper: Scrape Cloudflare Protected Websites
CloudScraper is a simple Python library designed to help you bypass Cloudflare's anti-bot page (also known as "I'm Under Attack Mode", or IUAM).
So in this guide we're going to walk through:
- What Is CloudScraper?
- Installing CloudScraper
- Using CloudScraper To Scrape Cloudflare Protected Websites
- Changing CloudScraper's Browser Profiles & User-Agents
- Using Proxies With CloudScraper
- Using CAPTCHA Solvers With CloudScraper
- Alternatives To CloudScraper
For other method of bypassing Cloudflare then check out our How to Bypass Cloudflare guide.
Cloudflare is continously changing and upgrading their anti-bot protection systems, making it harder for web scrapers and libraries like CloudScraper to bypass their detection methods. As a result, open source anti-bot bypassing libraries like CloudScraper can often go out of date and stop working.
UPDATE: As of now, there are a lot of report of CloudScraper not working for all Cloudflare situations. So give it a try but if it isn't working for your target website then check out this guide.
Need help scraping the web?
Then check out ScrapeOps, the complete toolkit for web scraping.
What Is CloudScraper?
CloudScraper is a Python library built ontop of Python Requests that enables you to bypass Cloudflare's anti-bot protection systems so you can scrape data from websites who have deployed their content on Cloudflare's CDN.
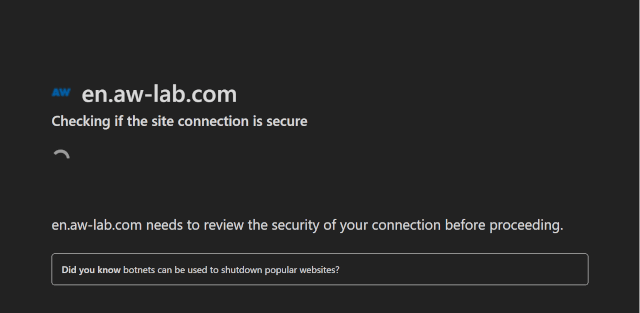
Cloudflare allows your scrapers to bypass Cloudflare's anti-bot pages like the one below:
Cloudflare uses numerous browser fingerprinting challenges & checks (more detail here) to determine if a request is coming from a real user or a scraper/bot.
CloudScraper is designed to solve Cloudflares Javascript and browser fingerprinting challenges by impersonating a real web browser.
To do so CloudScraper uses optimized browser headers and a JavaScript Engine/interpreter to solve Javascript challenges without having to explicitly deobfuscate and parse Cloudflare's Javascript challenges.
Cloudflare uses other scraper detection techniques like IP address profiling to detect scrapers so CloudScraper isn't a silver bullet. To scrape Cloudflare protected websites reliably you will only need to use high quality proxies and optimize your requests so that look like they are coming from real users.
Installing CloudScraper
To get started with CloudScraper we just need to install it using pip:
pip install cloudscraper
Once installed then we can integrate CloudScraper into our scrapers.
Using CloudScraper To Scrape Cloudflare Protected Websites
CloudScraper is built ontop of Python Requests so it works identically to a Requests Session object only that it solves the Cloudflare challenges in the background too.
Like you would call requests.get() or requests.post() in Python Requests, with CloudScraper you call scraper.get() or scraper.post() to make requests. Below is an example:
import cloudscraper

## Create CloudScraper Instance
scraper = cloudscraper.create_scraper()

## Make Request
response = scraper.get("http://somesite.com")
The first time you visit a website protected by Cloudflare, CloudScraper will sleep for ~5 seconds to give time for it to bypass the Cloudflare challenge.
After CloudScraper has passed the Cloudflare challenge and has recieved a valid Cloudflare session then CloudScraper will use this session cookies on all subsequent requests to not trigger the Cloudflare challenge. As a result, the 5 second delay should only occur on the first request.
If you use CloudScraper on a website that doesn't have Cloudflare protection enabled then CloudScraper will detect the absense of Cloudflare and not wait 5 seconds to solve the Cloudflare challenge.
So you can use CloudScraper for all your target websites and CloudScraper will activate itself only when it needs to.
Changing CloudScraper's Browser Profiles & User-Agents
CloudScraper allows you to define which type of browser and device you want it to emulate when accessing Cloudflare protected websites.
You can do so using the browser attribute when creating your scraper.
Here we will create a CloudScraper session that pretends to be a Windows device, running on a desktop and using a Chrome browser:
import cloudscraper

## Create CloudScraper Instance -> Chrome browser // Windows OS // Desktop
scraper = cloudscraper.create_scraper(
    browser={
        'browser': 'chrome',
        'platform': 'windows',
        'desktop': True,
        'mobile': False,
    }
)

## Make Request
response = scraper.get("http://somesite.com")
Or in this case, we will configure our CloudScraper session to pretend to be a iOS device, running on a mobile and using a Chrome browser:
import cloudscraper

## Create CloudScraper Instance -> Chrome browser // Windows OS // Desktop
scraper = cloudscraper.create_scraper(
    browser={
        'browser': 'chrome',
        'platform': 'ios',
        'desktop': False,
        'mobile': True,
    }
)

## Make Request
response = scraper.get("http://somesite.com")
The following are the parameters you can pass into the browser attribute:
| Parameter | Type | Values | Default |
|---|---|---|---|
browser | (string) | chrome or firefox | None |
mobile | (boolean) | True or False | True |
desktop | (boolean) | True or False | True |
platform | (string) | linux, windows, darwin, android, ios | None |
custom | (string) | None |
Setting Custom User-Agents
The custom parameter allows you to set your own custom user-agents.
import cloudscraper

## Create CloudScraper Instance -> Custom User-Agent
scraper = cloudscraper.create_scraper(
    browser={
        'custom': 'ScraperBot/1.0',
    }
)

## Make Request
response = scraper.get("http://somesite.com")
By setting a custom value, CloudScraper will try and find the user-agent string in the browsers.json (file in library).
If the custom user-agent you defined matches at known device/OS/browers combination then it will set the other headers and ciphers to match this user-agent setting.
If that user-agent doesn't match any known device/OS/browers combination in the browsers.json file then it will set a generic set of headers and ciphers.
Using Proxies With CloudScraper
You can use proxies with CloudScraper like you would with Python Requests in general using the proxies attribute when making a get() or post() request.
import cloudscraper

## Create CloudScraper Instance
scraper = cloudscraper.create_scraper()

## Proxy Details
proxies = {
   'http': 'http://proxy.example.com:8080',
   'https': 'http://proxy.example.com:8081',
}

## Make Request
response = scraper.get("http://somesite.com", proxies=proxies)
For more details on using proxies with Python Requests then check out our guide here.
If you use proxies with CloudScraper then you must use the same proxy with the same CloudScraper instance/session.
Cloudflare requires that the IP address that solved the challenge and the visitor IP stay the same, otherwise it will show the challenge again or ban the IP address.
Using CAPTCHA Solvers With CloudScraper
CloudScraper also has built in integrations for 3rd party CAPTCHA solvers should you require them.
For the most up to date list of supported CAPTCHA solvers then check out the docs here, however, here is the current list:
To use these CAPTCHA solvers with CloudScraper is very simple. Here is an exampe on how to integrate 2Captcha:
import cloudscraper

## Create CloudScraper Instance
scraper = cloudscraper.create_scraper(
  captcha={
    'provider': '2captcha',
    'api_key': 'your_2captcha_api_key'
  }
)

## Make Request
response = scraper.get("http://somesite.com")
Check out the documentation to see the integration methods for every CAPTCHA solver.
Alternatives To CloudScraper
CloudScraper is a powerful library, however, open source solutions like CloudScraper often go out of date and stop working due to Cloudflare updates.
Cloudflare and other anti-bots providers monitor the web for open source anti-bot bypassing tools and often develop fixes for them in a couple months that detect/block them.
So if you are thinking of using CloudScraper to relibaly bypass Cloudflare on a website then an alternative is to use smart proxies that develop and maintain their own private anti-bot bypasses.
These are typically more reliable as it is harder for anti-bot companies like Cloudflare to develop detections for, as they are developed by proxy companies who are financially motivated to stay 1 step ahead of anti-bot companies and fix their bypasses the very minute they stop working.
One of the best options is the ScrapeOps Proxy Aggregator as it integrates over 20 smart proxy providers into the same proxy API, and finds the best/cheapest proxy provider for your target domains.
You can activate ScrapeOps' Anti-Bot Bypasses by simply using the bypass flag to your API request.
For example, the the below code we will use the Cloudflare bypass by adding bypass=cloudflare_level_1 to the request:
import requests

response = requests.get(
  url='https://proxy.scrapeops.io/v1/',
  params={
      'api_key': 'YOUR_API_KEY',
      'url': 'http://example.com/', ## Cloudflare protected website
      'bypass': 'cloudflare_level_1',
  },
)

print('Body: ', response.content)
Cloudflare is the most common anti-bot system being used by websites today, and bypassing it depends on which security settings the website has enabled.
To combat this, we offer 3 different Cloudflare bypasses designed to solve the Cloudflare challenges at each security level.
| Security Level | Bypass | API Credits | Description |
|---|---|---|---|
| Low | cloudflare_level_1 | 10 | Use to bypass Cloudflare protected sites with low security settings enabled. |
| Medium | cloudflare_level_2 | 35 | Use to bypass Cloudflare protected sites with medium security settings enabled. On large plans the credit multiple will be increased to maintain a flat rate of $3.50 per thousand requests. |
| High | cloudflare_level_3 | 50 | Use to bypass Cloudflare protected sites with high security settings enabled. On large plans the credit multiple will be increased to maintain a flat rate of $4 per thousand requests. |
The advantage of taking this approach is that you can use your normal HTTP client and don't have to worry about:
- Fortifying headless browsers
- Managing numerous headless browser instances & dealing with memory issues
- Reverse engineering the anti-bot protection systems
As this is all managed within the ScrapeOps Proxy Aggregator.
You can get a ScrapeOps API key with 1,000 free API credits by signing up here.
More Web Scraping Tutorials
So that's how you can use CloudScraper to scrape websites that are protected by Cloudflare.
If you would like to learn more about Web Scraping, then be sure to check out The Web Scraping Playbook.
Or check out one of our more in-depth guides: