Scrapy Beginners Series Part 5: Deploying & Scheduling Spiders
So far in this Python Scrapy 5-Part Beginner Series we learned how to:
-
Part 1: Basic Scrapy Spider - We will go over the basics of Scrapy, and build our first Scrapy spider. (Part 1)
-
Part 2: Cleaning Dirty Data & Dealing With Edge Cases - Web data can be messy, unstructured, and have lots of edge cases. In this tutorial we will make our spider robust to these edge cases, using Items, Itemloaders and Item Pipelines. (Part 2)
-
Part 3: Storing Our Data - There are many different ways we can store the data that we scrape from databases, CSV files to JSON format, and to S3 buckets. We will explore several different ways we can store the data and talk about their Pro's, Con's and in which situations you would use them. (Part 3)
-
Part 4: User Agents & Proxies - Make our spider production ready by managing our user agents & IPs so we don't get blocked. (Part 4)
In this tutorial, Part 5: Beginners guide to Deployment, Monitoring, Alerting and Scheduling with Scrapy we're going to cover:
- How to Monitor Your Running Spiders
- Getting Our Project Ready for Deployment Onto a Server
- Creating a Server on Digital Ocean
- Connect the Server to ScrapeOps
- Deploy Your Scrapy Spider to Your Server
- Running & Scheduling a Job
- Save the data to Digital Ocean Postgres
If you're just joining us for this tutorial - you can fork the ScrapeOps Part 5 code from Github and follow along. If you already have your own repo setup in Github then there is no need to clone the ScrapeOps one! :)
To use this Github Repo you will need to get a free ScrapeOps API key here.
With the intro out of the way let's get down to business.
Need help scraping the web?
Then check out ScrapeOps, the complete toolkit for web scraping.
How to Monitor Your Running Spiders
When scraping in production it is vital that you can see how your scrapers are doing so you can fix problems early.
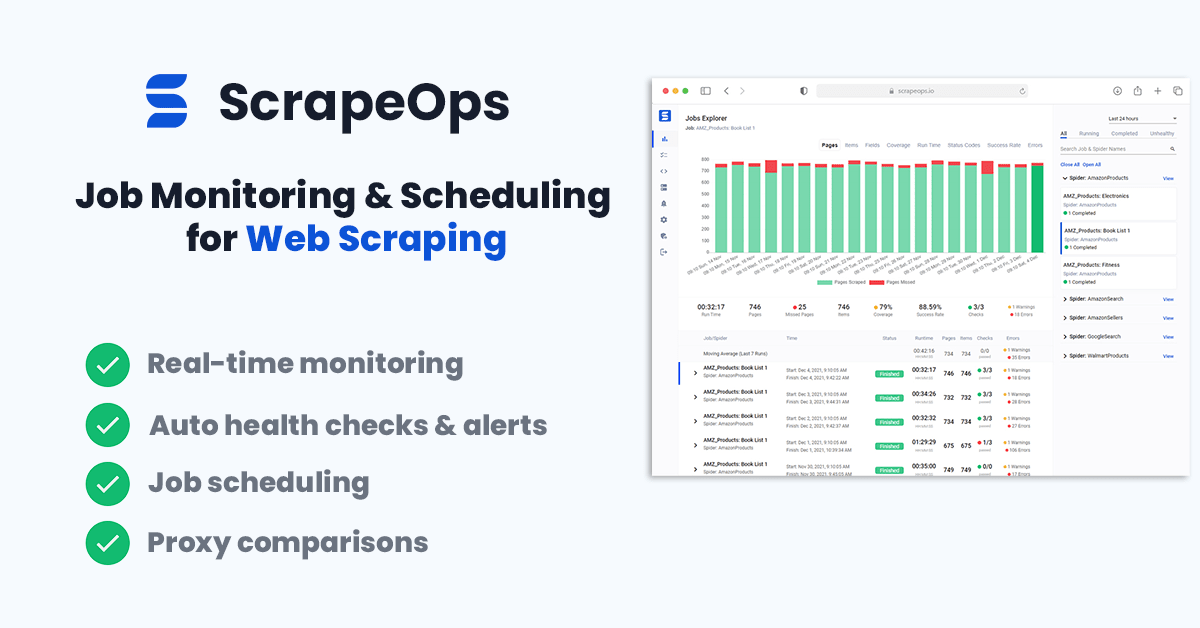
You could see if your jobs are running correctly by checking the output in your file or database but the easier way to do it would be to install the ScrapeOps Monitor.
ScrapeOps give you a simple to use, yet powerful way to see how your jobs are doing, run your jobs, schedule recurring jobs, setup alerts and more. All for free!
Live demo here: ScrapeOps Demo
You can create a free ScrapeOps API key here.
We'll just need to run the following to install the ScrapeOps Scrapy Extension:
pip install scrapeops-scrapy
Once that is installed you need to add the following to your Scrapy projects settings.py file if you want to be able to see your logs in ScrapeOps:
# Add Your ScrapeOps API key

SCRAPEOPS_API_KEY = 'YOUR-API-KEY-HERE'


# Add In The ScrapeOps Extension
EXTENSIONS = {
'scrapeops_scrapy.extension.ScrapeOpsMonitor': 500,
}


# Update The Download Middlewares
DOWNLOADER_MIDDLEWARES = {
'scrapeops_scrapy.middleware.retry.RetryMiddleware': 550,
'scrapy.downloadermiddlewares.retry.RetryMiddleware': None,
}
Every time we run a spider (scrapy crawl chocolatespider), the ScrapeOps SDK will monitor the performance and send the data to ScrapeOps dashboard.
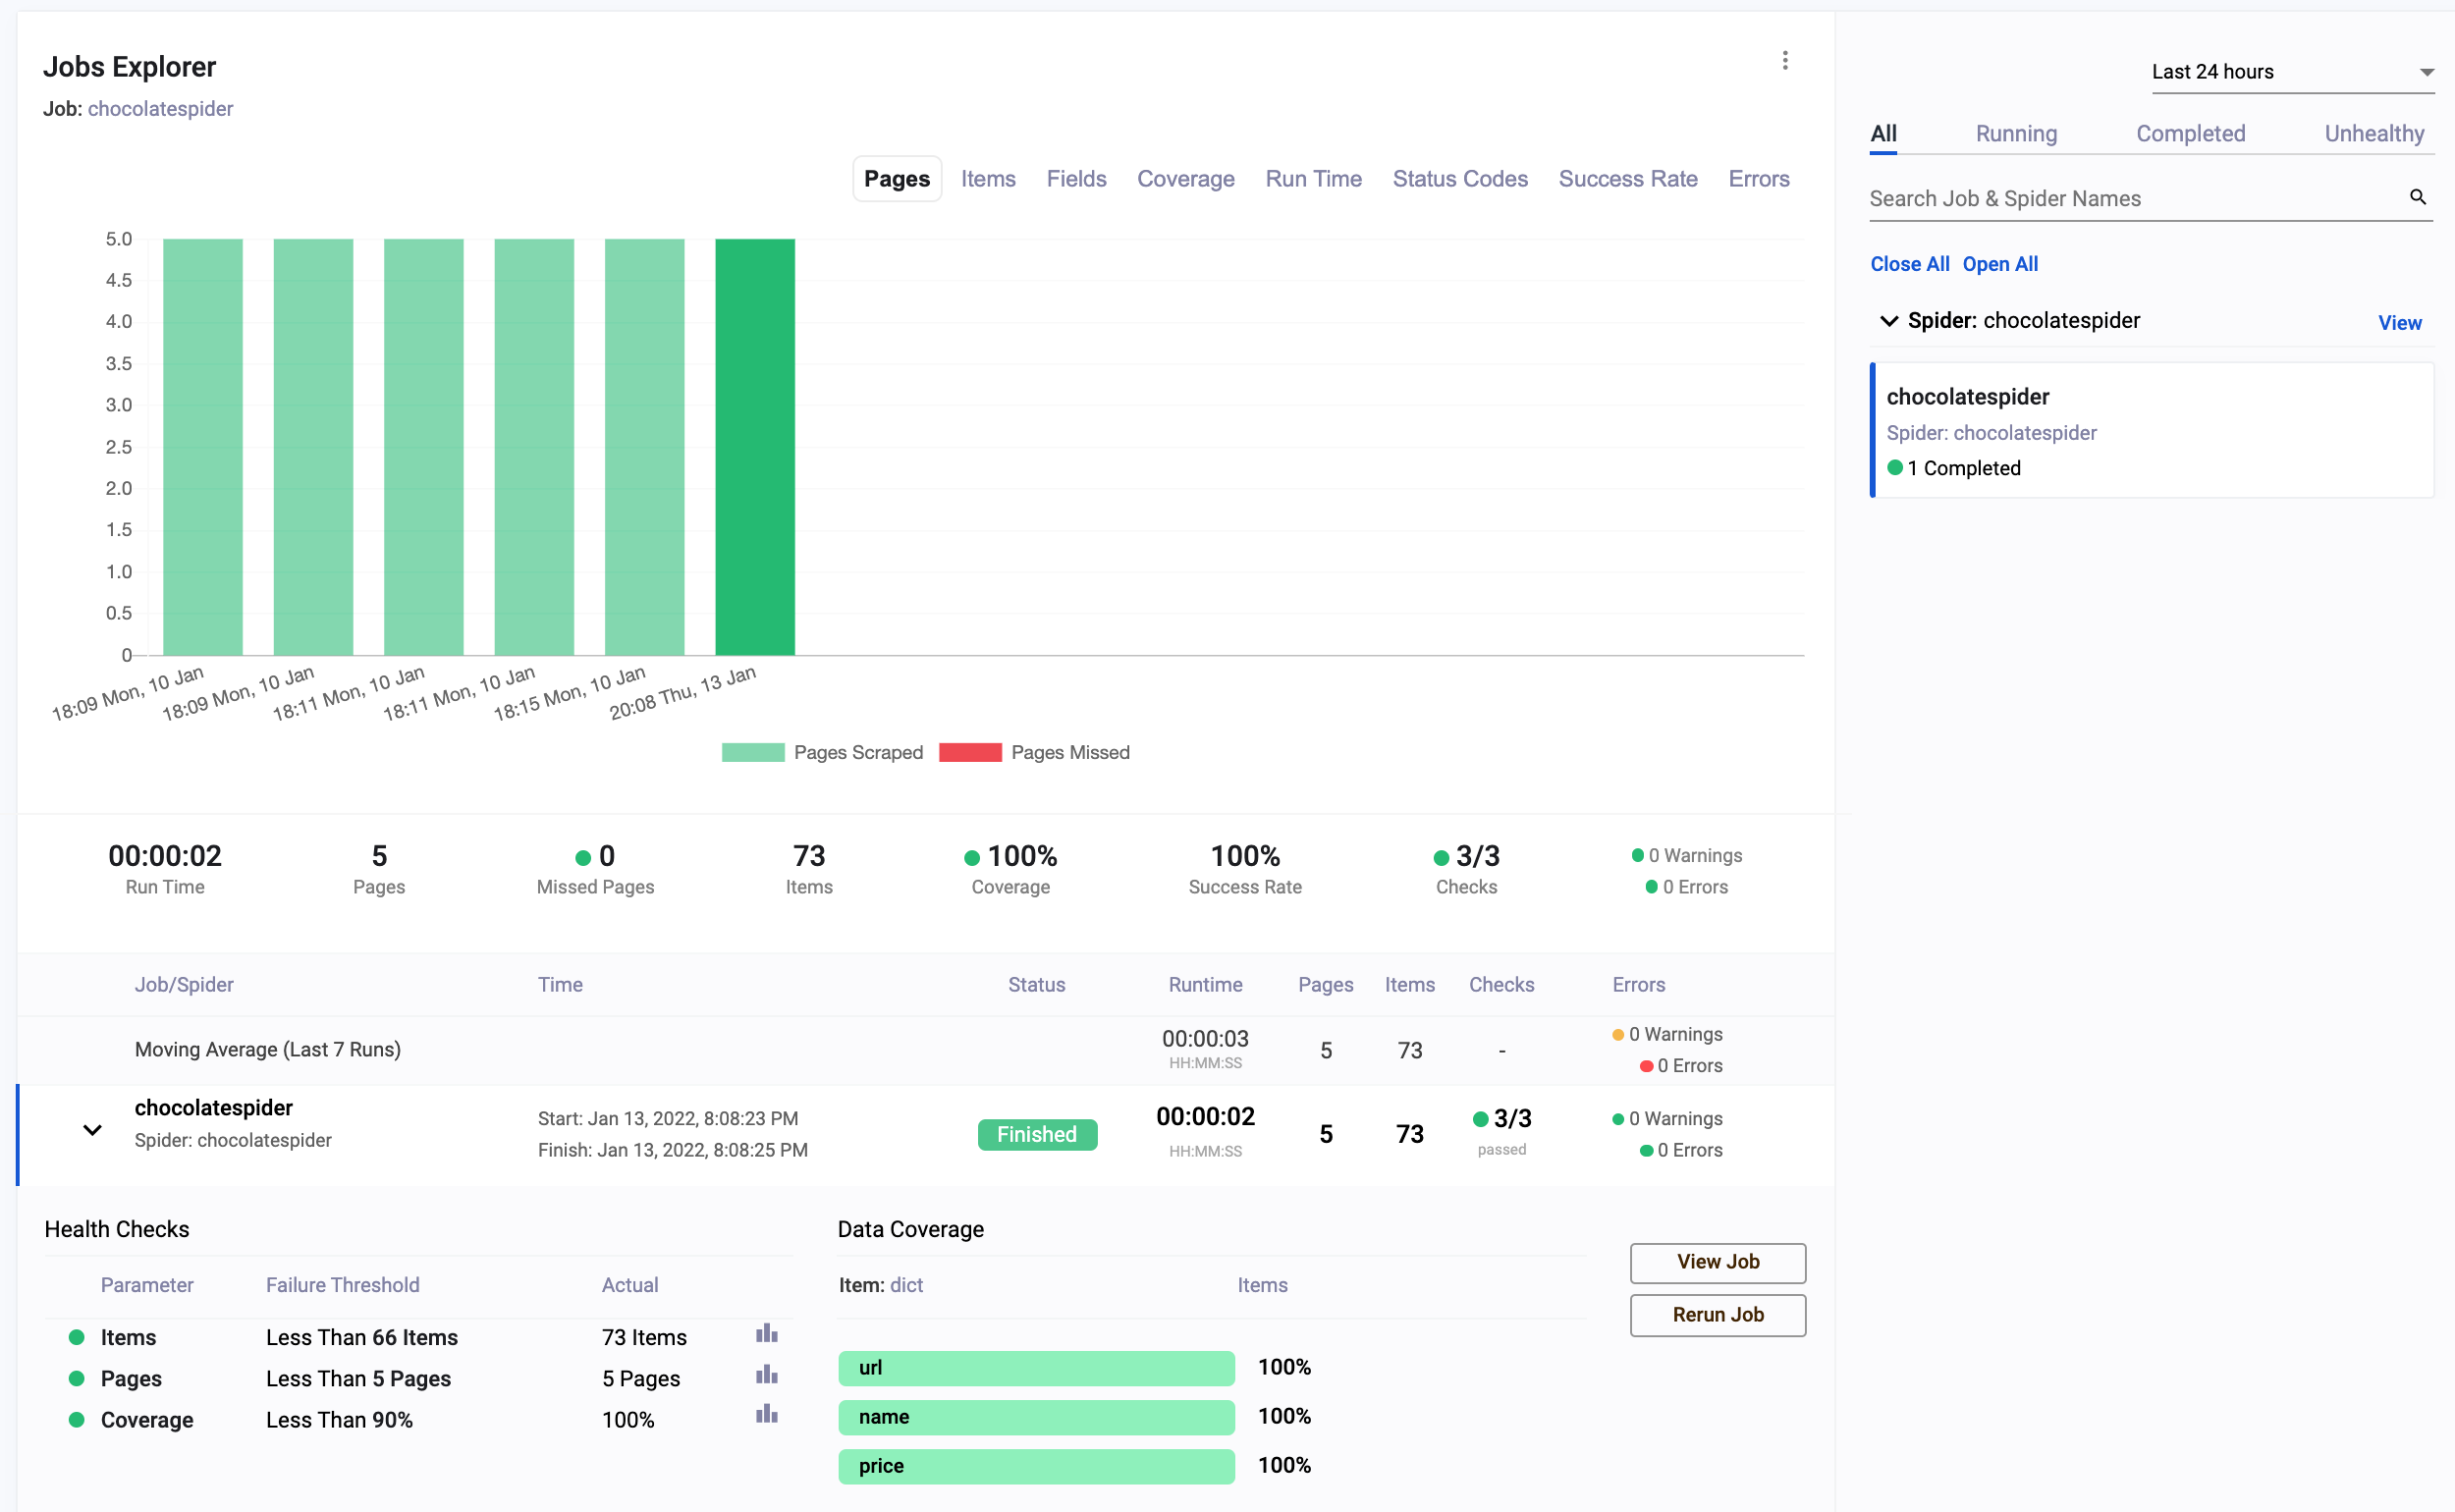
The dashboard will give you data like:
-
Scrapy Job Stats & Visualisation
- 📈 Individual Job Progress Stats
- 📊 Compare Jobs versus Historical Jobs
- 💯 Job Stats Tracked
- ✅ Pages Scraped & Missed
- ✅ Items Parsed & Missed
- ✅ Item Field Coverage
- ✅ Runtimes
- ✅ Response Status Codes
- ✅ Success Rates & Average Latencies
- ✅ Errors & Warnings
- ✅ Bandwidth
-
Health Checks & Alerts
- 🔍 Custom Spider & Job Health Checks
- 📦 Out of the Box Alerts - Slack (More coming soon!)
- 📑 Daily Scraping Reports
Getting Our Project Ready for Deployment Onto a Server
Now that we have our monitoring working, we need to make sure our Scrapy project is ready to be put onto the server with ScrapeOps.
To do this we need to create a requirements.txt file and add the following requirements:
scrapeops-scrapy==0.4.6
Scrapy==2.6.1
scrapy-proxy-pool==0.1.9
scrapy-user-agents==0.1.1
Alternatively, if you don't know all the packages your project needs you can run the following command in your projects root folder:
pip freeze requirements.txt > requirements.txt
Which will create a requirements.txt file with all the packages installed in your virtual environment.
This has already been created in the example project.
Creating a Server on Digital Ocean
Next we will create a server on Digital Ocean that we can deploy our spider too.
Why Do We Need a Server?
Unless you want to leave your home computer running every 24/7, we need to have a remote server which will all us to run our spiders in the cloud. VPS (Virtual Private Servers) are the most commonly used as they are cheap and easy to setup/access.
There a number of different providers, many of which you will probably have heard of before such as, Digital Ocean, Vultr, Amazon Web Services(AWS), etc.
For this tutorial we're going to use Digital Ocean's cheapest offering which is only $4 a month - they also offer $100 in free credit which you can use while you do this tutorial. AWS also offer free plans for up to 12 months on some of their VPS's.
Setting Up The Server
First signup for a Digital Ocean account here.
Click the "Create" dropdown at the top of the page and then the "Droplets" button.

The operating system to select is Ubuntu 22.04. Select the cheapest $4 server, which is under the shared CPU, regular SSD plan options.
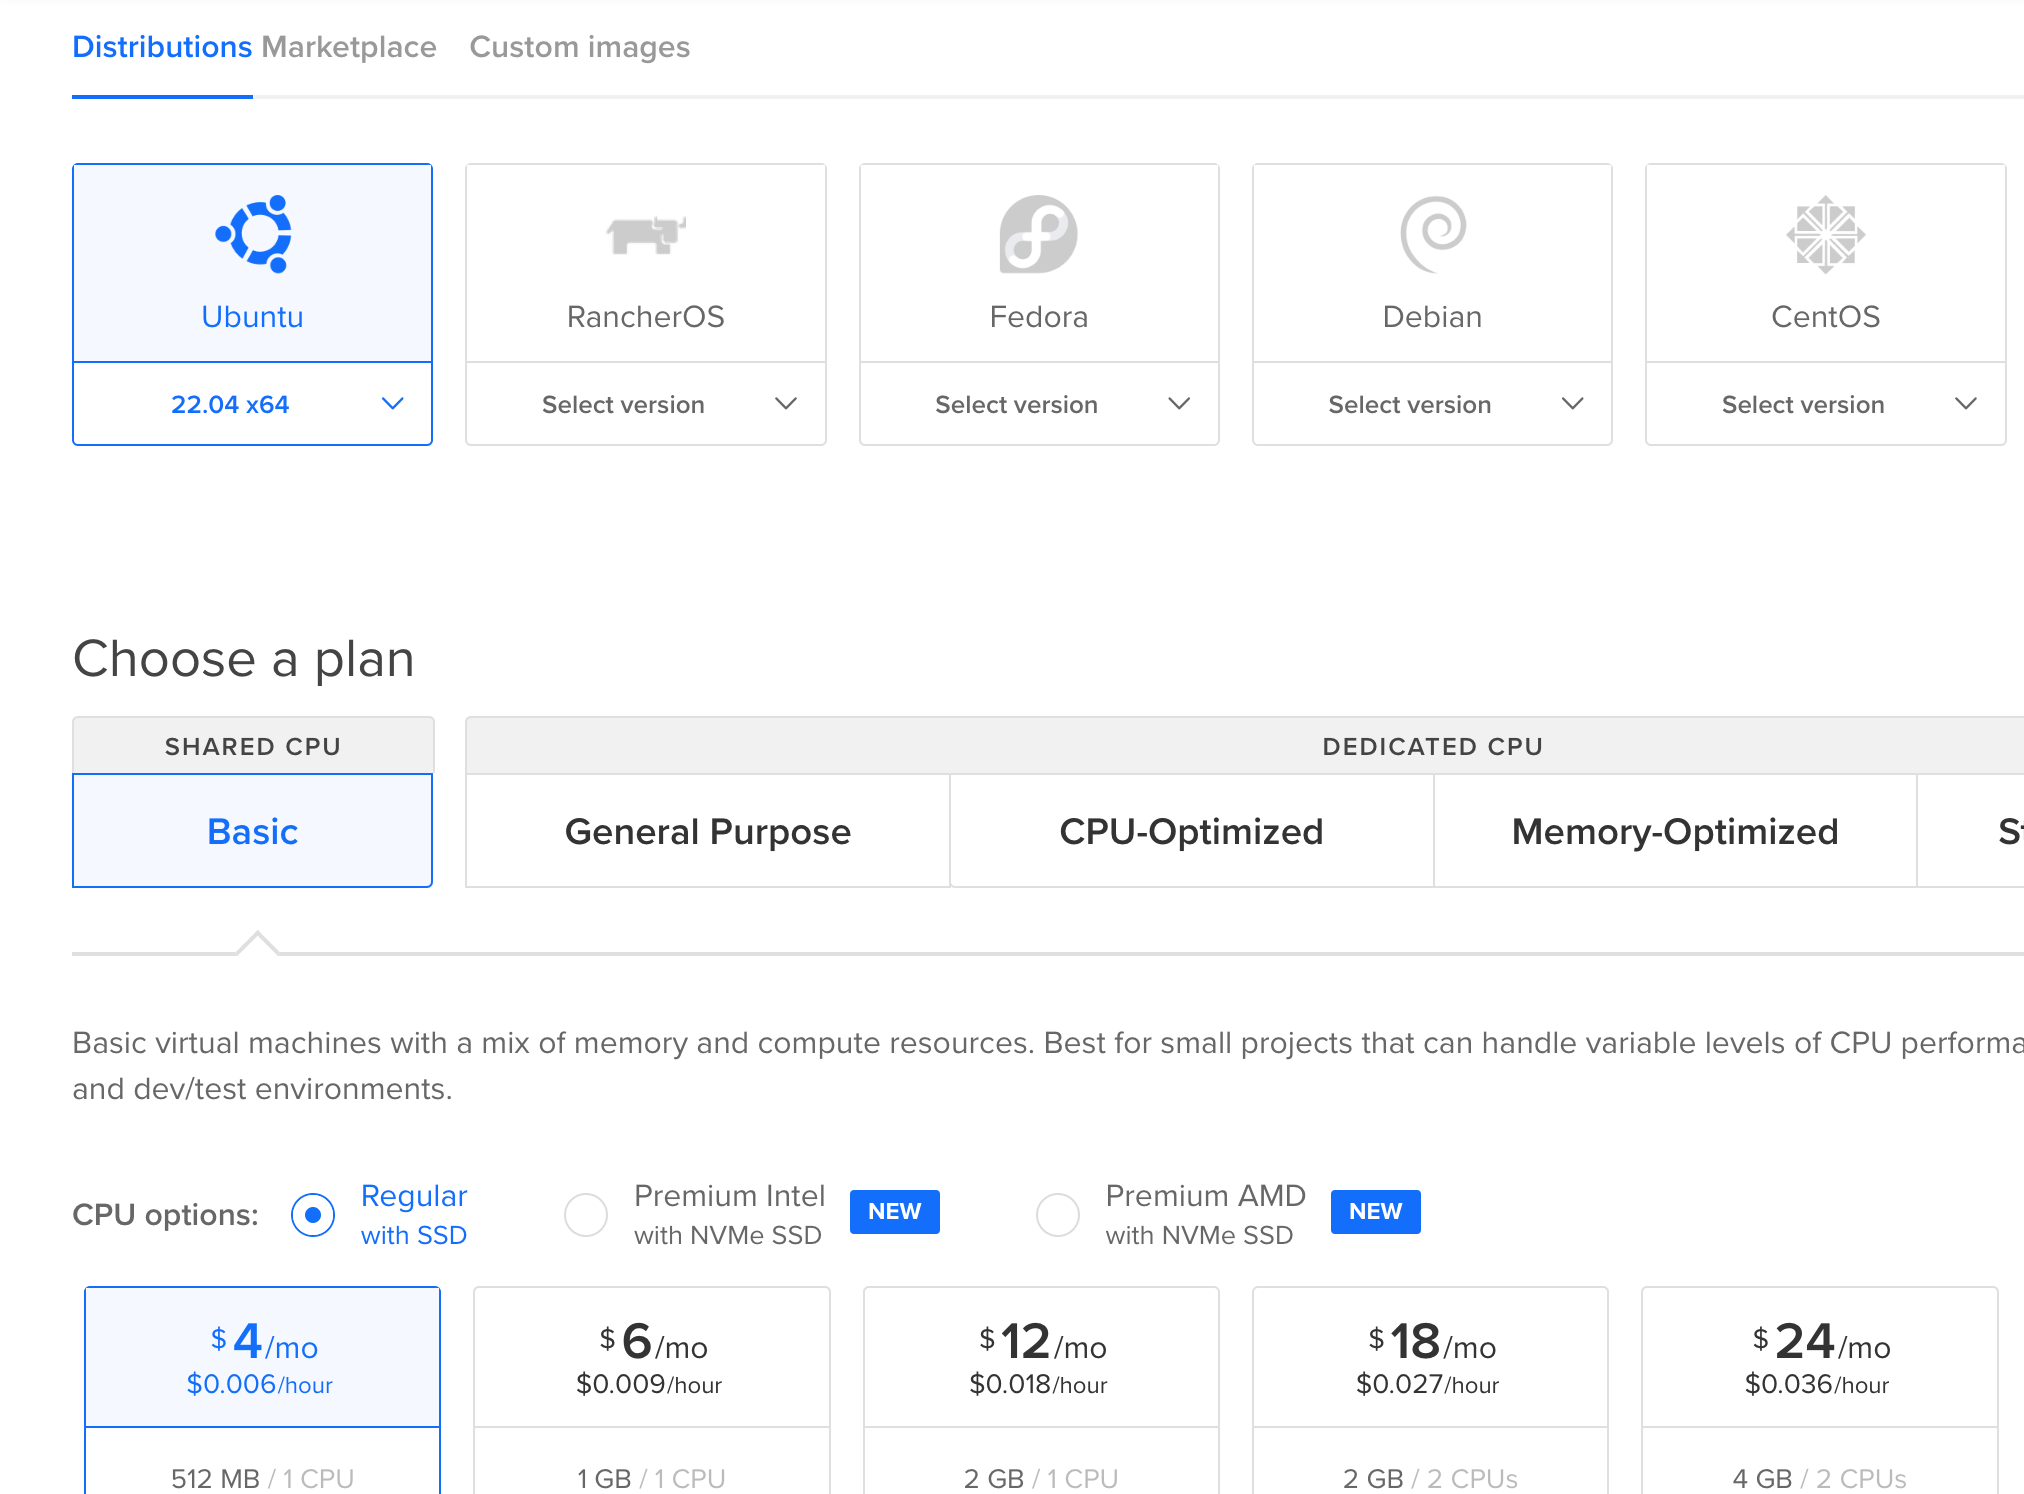
The location (datacenter region) of the server can be anywhere but it makes sense to choose the location closest to where you are based.
For the SSH key/password - you can select either. For this tutorial we are going to select the password option as we are not going to cover how to create an SSH key now.
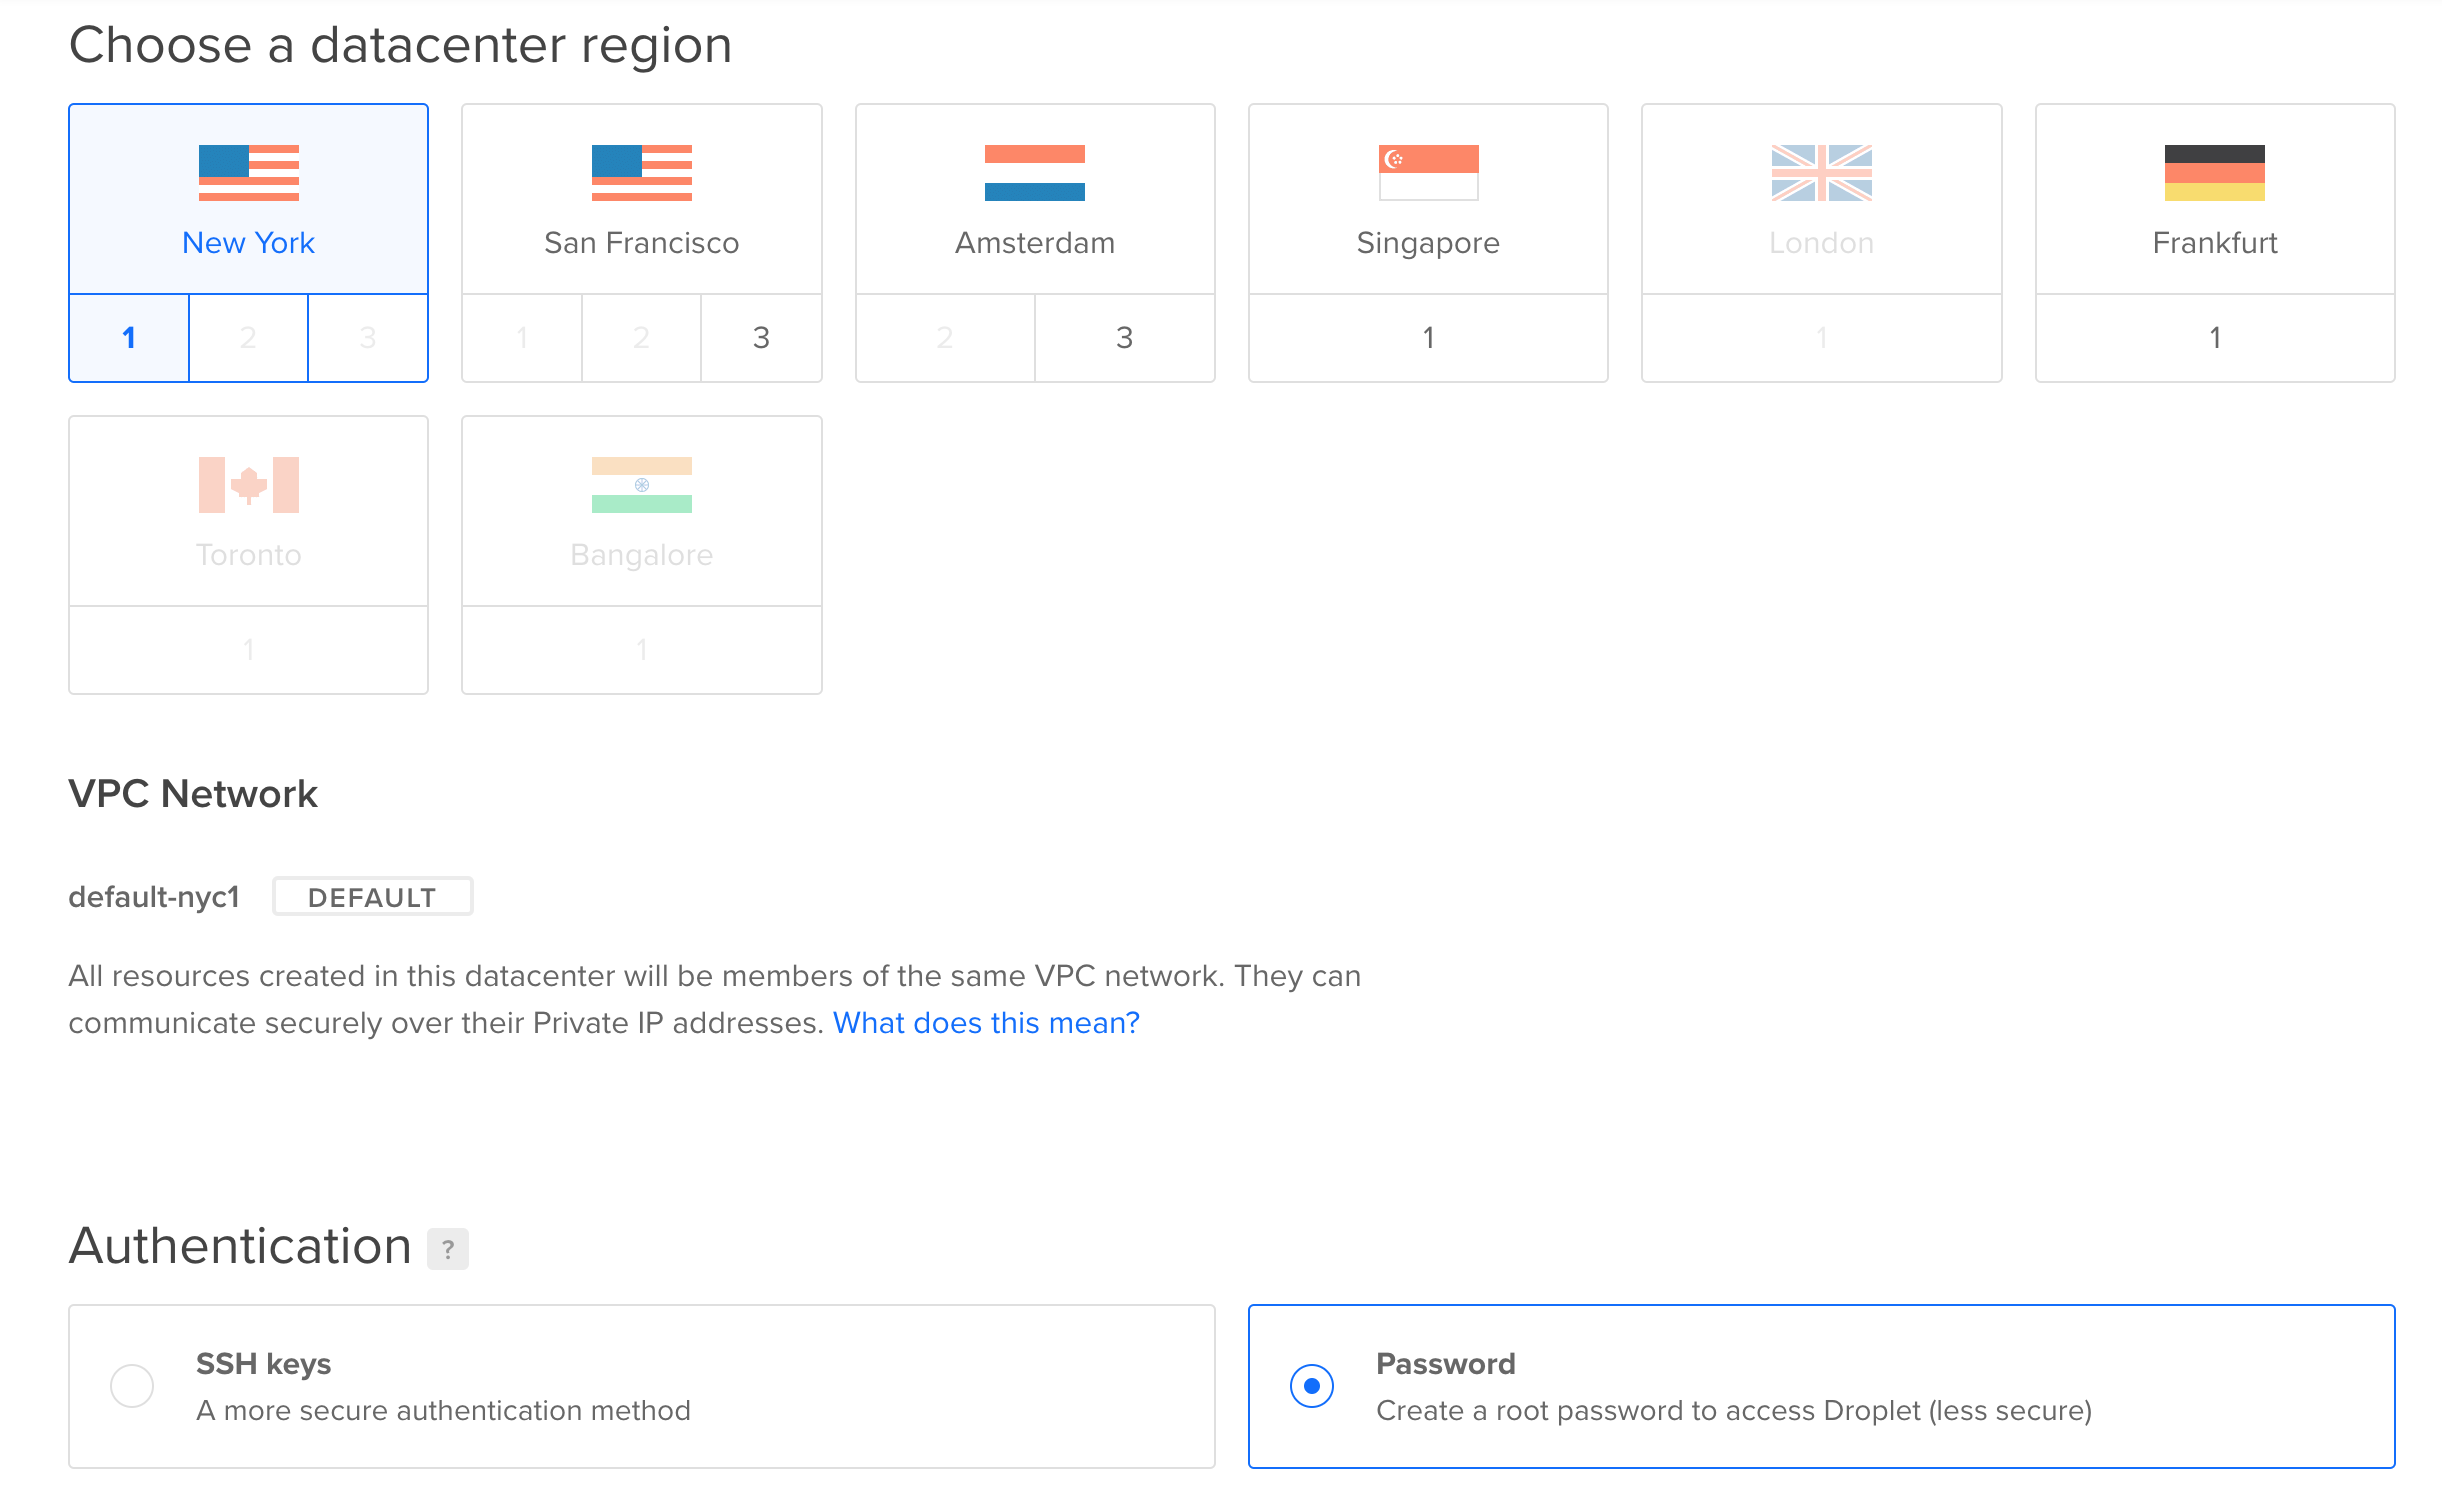
Once those options are selected simply click the "Create Droplet" button at the bottom of the and wait a minute or two for the droplet to be created.
Connect the Server to ScrapeOps
Now our scrapy project is ready to be deployed to our server and we have our server setup.
We could manually SSH into our server and run git clone to copy our project onto our server but there are easier ways of doing this.
ScrapeOps allows you to connect your server to the ScrapeOps dashboard and directly download any Github repos onto your server. No command line needed!
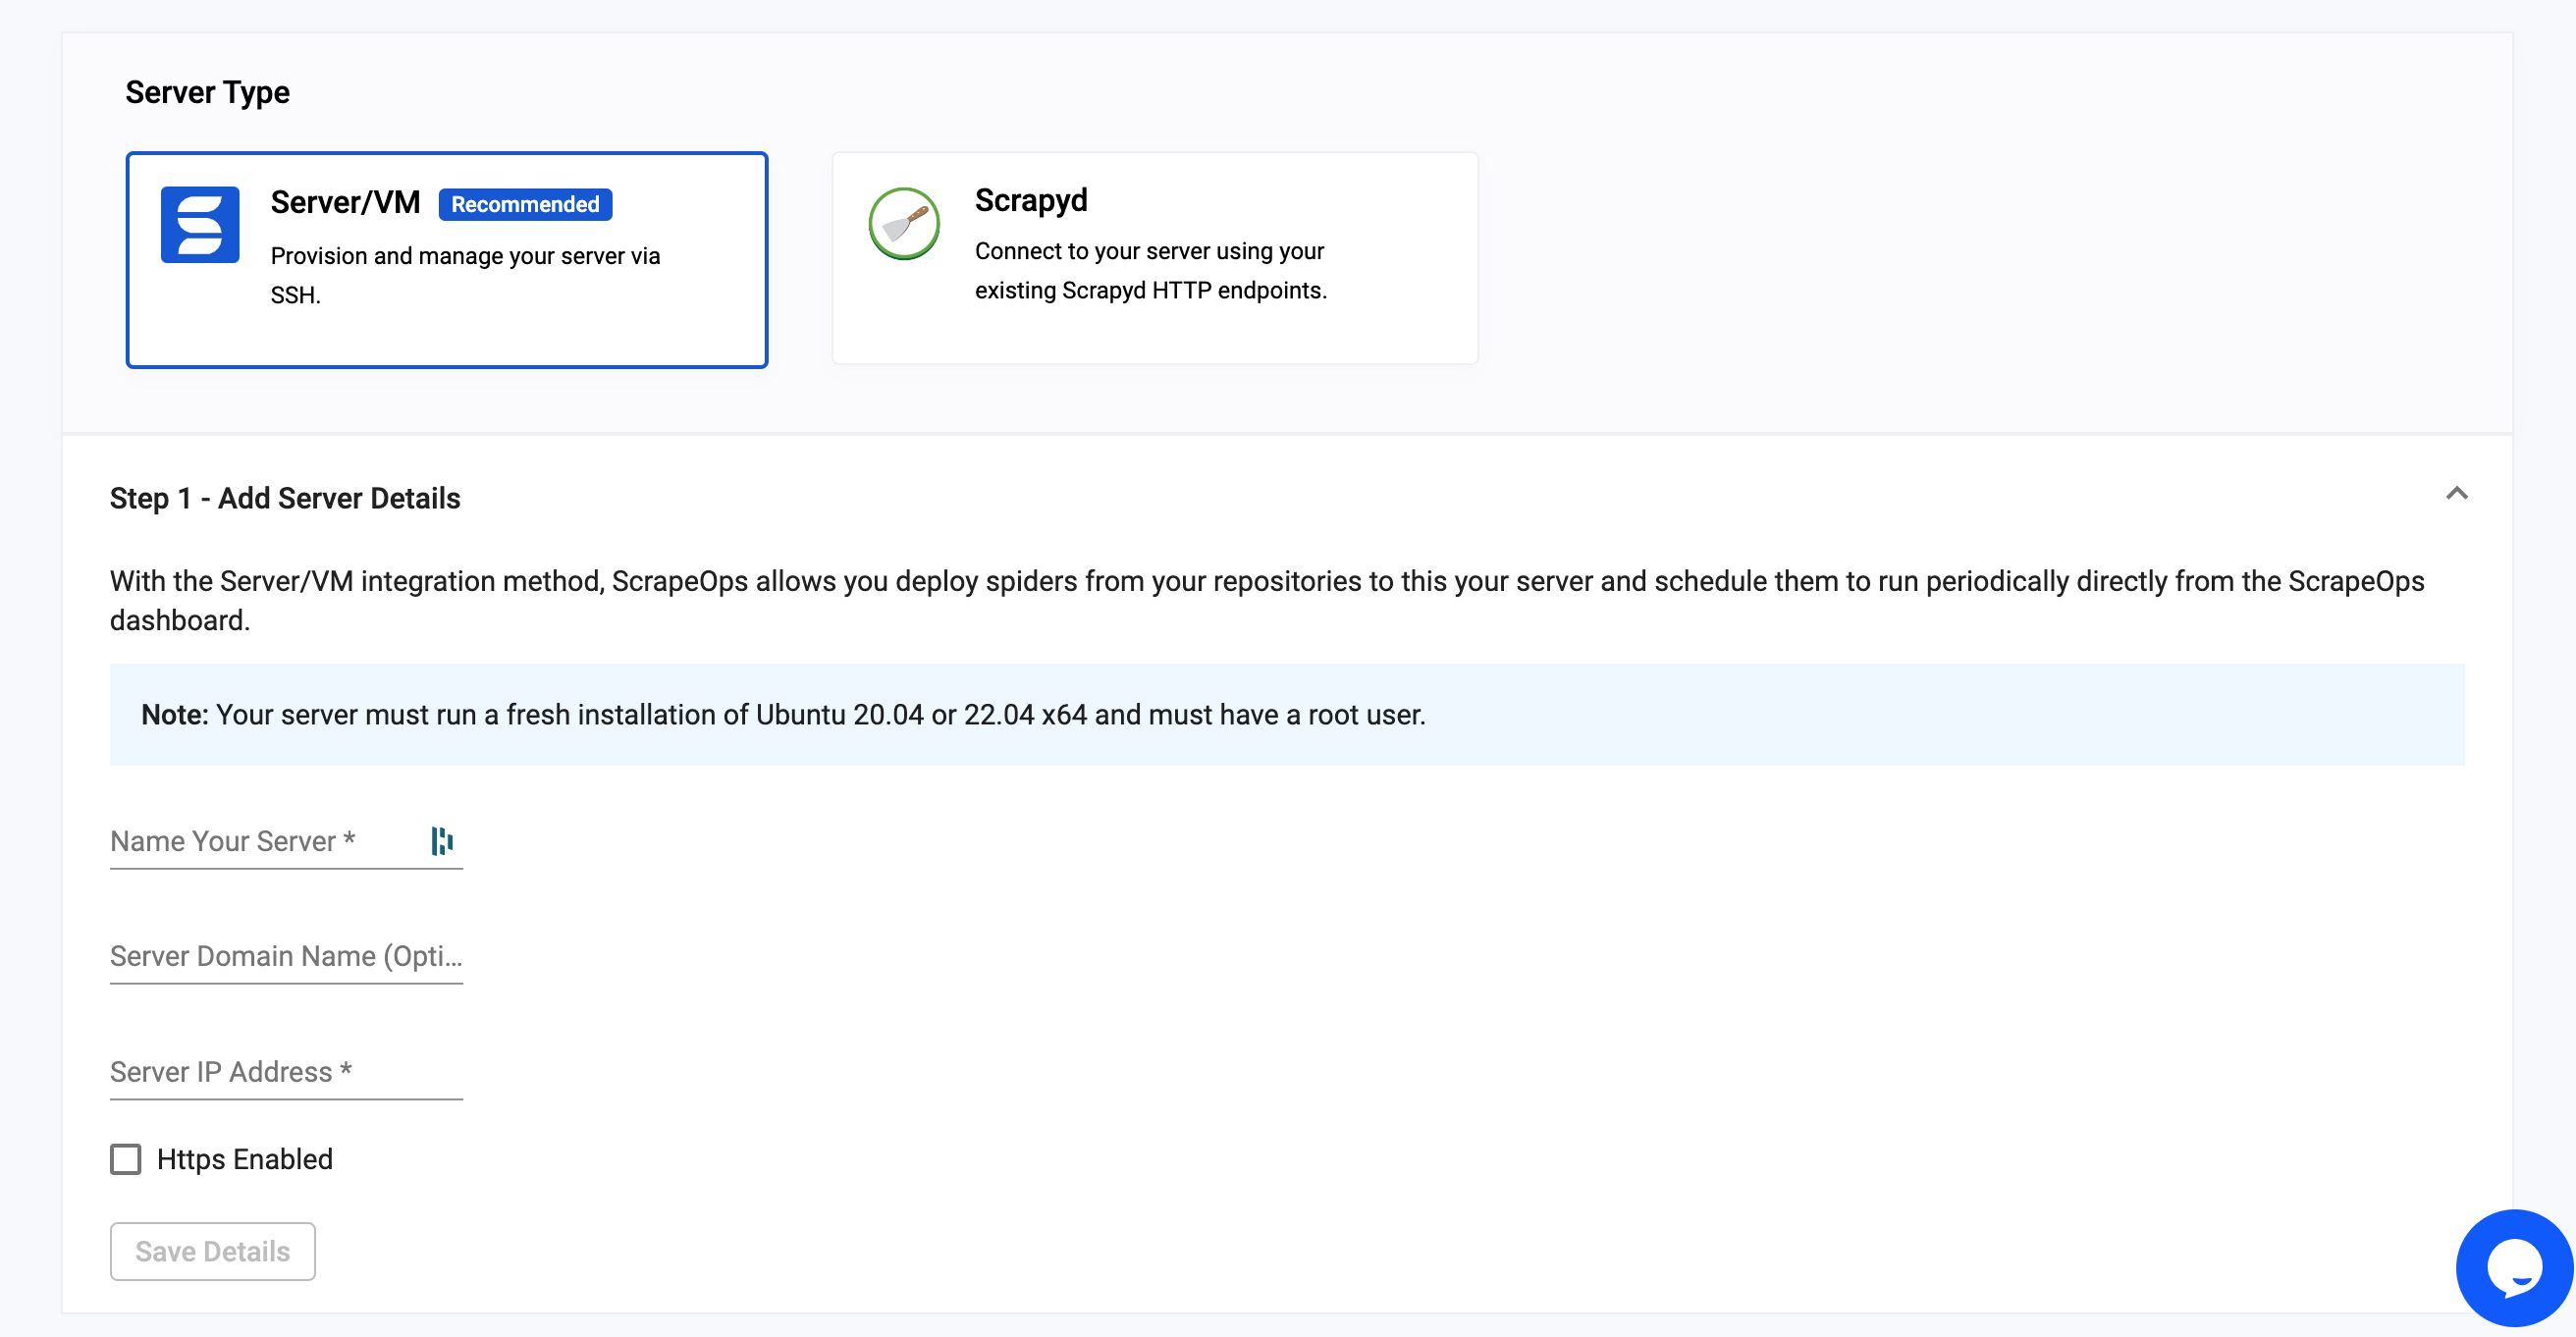
To add the server just go to the Servers & Deployments page on your ScrapeOps dashboard and click the "Add Server" button.
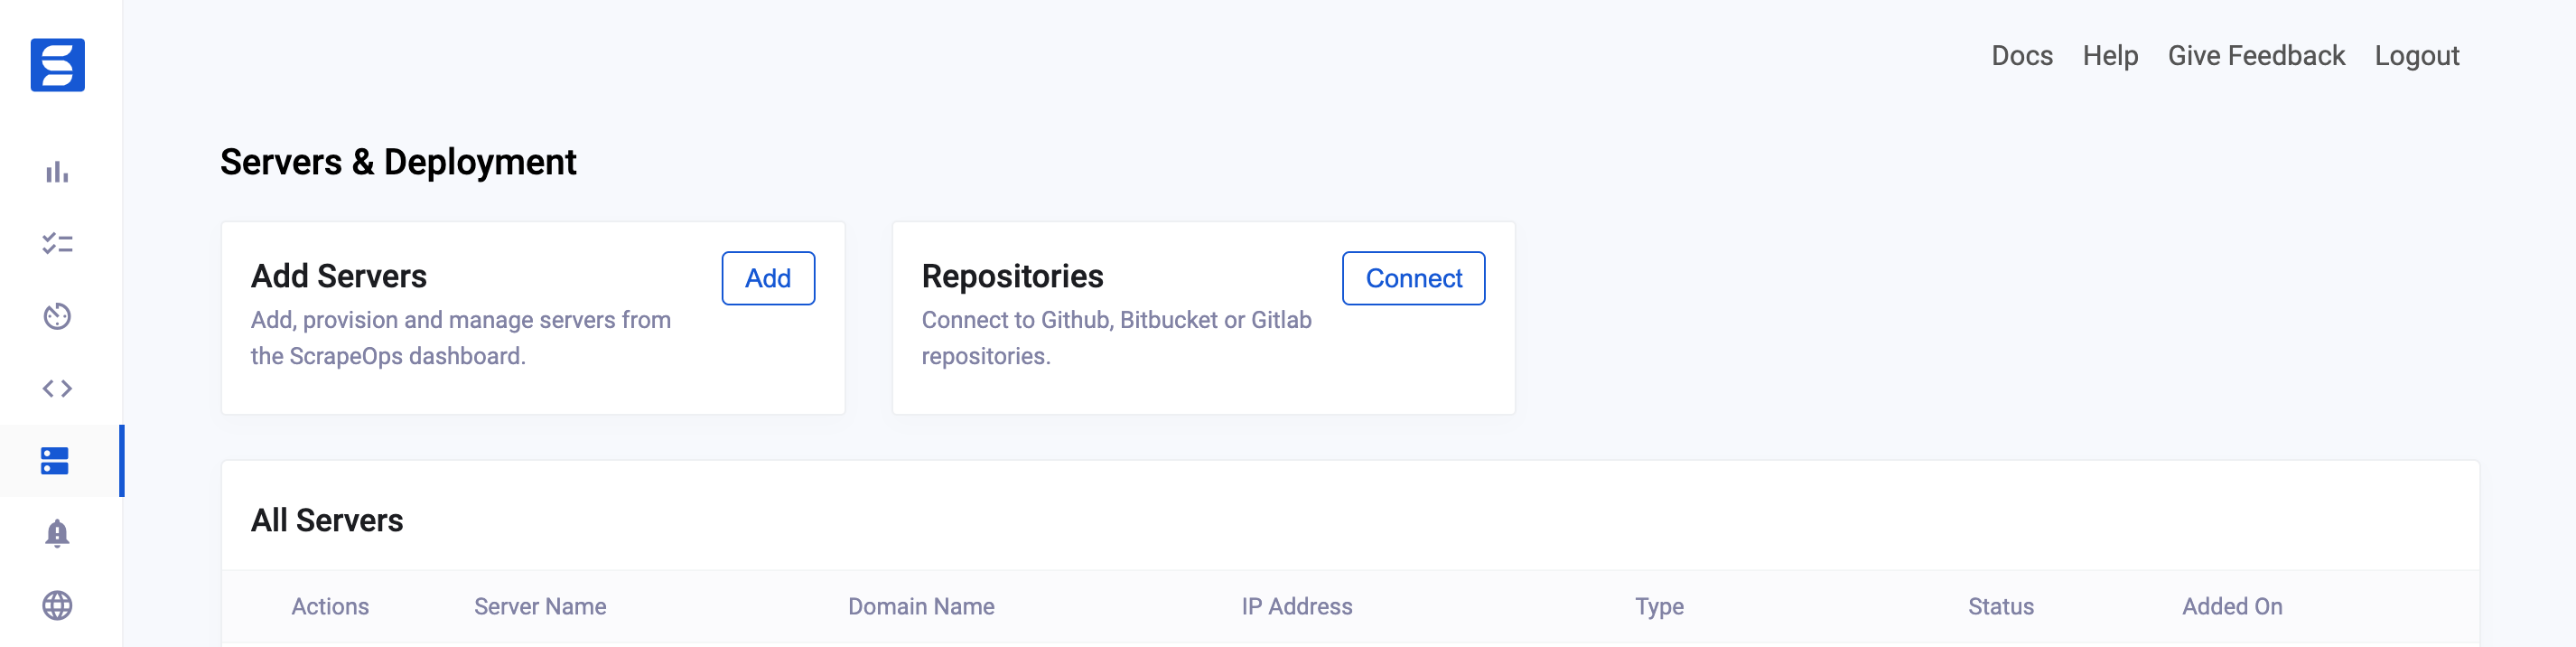
On this section we just need to add a server name (this can be anything we want) and then the server IP address. Which we can get from our Digital Ocean server page.
The server domain name can be left blank.
Once that's done the following screen will be displayed.

Next, we need to now open a console terminal on our Digital Ocean Server page, and wait for the server terminal to finish connecting.
Then copy and paste the wget command code block from the ScrapeOps server page, and run it in our Digital Ocean terminal.
The server will then go through the steps of installing the required libraries, creating a seperate user and account for security purposes and installing an SS key so that you can interact with your server using scrapeops.
When the steps are completed you will be brought to the server page automatically.
Deploy Your Scrapy Spider to Your Server
Now we're ready to deploy our spider to our server.
To do this we just click the "Clone Repository" button. This will open a modal where we can then enter our Repo details.
We first need to copy and paste the URL from our Github repository. If your repository is private when we click the clone repo button it will ask us to provide access to the repository.
You need to add the branch name which is the same as the name of the main branch of your repository - this is usually master or main.
The language and framework are preselected as Python & Scrapy as those are the most popular language/framework combination we have using ScrapeOps at the moment - for the purpose of this tutorial you can leave those as they are since they are already correct!
The install script will do the following after cloning the repo:
- Install a python virtual environment
- Activate the python virtual environment
- Install any python modules specified in the requirements.txt file
We can leave this script as is for this tutorial.
Now click "Clone Repo".
ScrapeOps will now:
- Install the repository from your Github repository
- Run the install script
- Run "scrapy list" to find your scrapy spiders
If any errors occur during this process they will be displayed to you now.
This could be anything such as a missing Python module which needs to be installed for Scrapy to work or the branch name being incorrect. If those occur you will need to fix those and try to clone the repo again.
If the install process works correctly then you will see the repo in the "Cloned Repo" table and the Spider in the "Spiders" table. (Like in the below screenshot)
Running & Scheduling a Job
The next step is to run and schedule our jobs via ScrapeOps so that we don't have to manually run scrapy crawl from the Digital Ocean terminal page or SSH into our server and run the command locally.
In your ScrapeOps account go to the Scheduler page. Then click on "Schedule" button.
Here you can see the server/repo/spider which you can select and then you have two options, either you can run the crawl straight away or schedule a recurring job.
We can schedule our spider to run a "job" we can do either a once off run or run the spider at a specific time on a specific day of the week or month.
You can easily set the spider to run a crawl once a week by selecting the time/day of week using the dropdowns. Just be sure to take note that the job is being scheduled in UTC time as it is being saved to your server's cron file which uses UTC.
The scheduled jobs then appear on the scheduled jobs page where you can update/delete them as needed! Simple!
More Scrapy Tutorials
We hope you now have a good understanding of how to setup a Scrapy project, scrape the data you need and schedule the spider jobs so that your data is up to date! If you have any questions leave them in the comments below and we'll do our best to help out!
If you would like the code from this example please check out our Github!
If you would like to see more in-depth articles such as the ones in the list below you can check out the rest of the Python Scrapy Playbook
Need a Proxy to stop your spiders being blocked? Then check out our Proxy Comparison Tool that allows to compare the pricing, features and limits of every proxy provider on the market so you can find the one that best suits your needs. Including the best free plans.