
Scrapy Beginners Series Part 1: How To Build Your First Production Scraper
Whether you are a developer, data scientist or marketer, being able to develop web scrapers is a hugely valuable skill to have. And there is no better web scraping framework than Python Scrapy.
There are lots of articles online, showing you how to make your first basic Scrapy spider. However, there are very few that walk you through the full process of building a production ready Scrapy spider.
To address this, we are doing a 5-Part Scrapy Beginner Guide Series, where we're going to build a Scrapy project end-to-end from building the scrapers to deploying on a server and run them every day.
Python Scrapy 5-Part Beginner Series
-
Part 1: Basic Scrapy Spider - We will go over the basics of Scrapy, and build our first Scrapy spider. (This Tutorial)
-
Part 2: Cleaning Dirty Data & Dealing With Edge Cases - Web data can be messy, unstructured, and have lots of edge cases. In this tutorial we will make our spider robust to these edge cases, using Items, Itemloaders and Item Pipelines. (Part 2)
-
Part 3: Storing Our Data - There are many different ways we can store the data that we scrape from databases, CSV files to JSON format, and to S3 buckets. We will explore several different ways we can store the data and talk about their Pro's, Con's and in which situations you would use them. (Part 3)
-
Part 4: User Agents & Proxies - Make our spider production ready by managing our user agents & IPs so we don't get blocked. (Part 4)
-
Part 5: Deployment, Scheduling & Running Jobs - Deploying our spider on a server, and monitoring and scheduling jobs via ScrapeOps. (Part 5)
For this beginner series, we're going to be using one of the simplest scraping architectures. A single spider, being given a start URL which will then crawl the site, parse and clean the data from the HTML responses, and store the data all in the same process.
This architecture is suitable for the majority of hobby and small scraping projects, however, if you are scraping business critical data at larger scales then we would use different scraping architectures. We will cover these in other Scrapy series.
The code for this project is available on Github here!
If you prefer video tutorials, then check out the video version of this article.
Need help scraping the web?
Then check out ScrapeOps, the complete toolkit for web scraping.
Part 1: Basic Scrapy Spider
In this tutorial, Part 1: Basic Scrapy Spider we're going to cover:
- What is Scrapy?
- How to Setup Our Python Environment
- How to Setup Our Scrapy Project
- Creating Our Scrapy Spider
- Using Scrapy Shell To Find Our CSS Selectors
- How to Run Our Scrapy Spider, Plus Output Data in CSV or JSON
- How to Navigate Through Pages
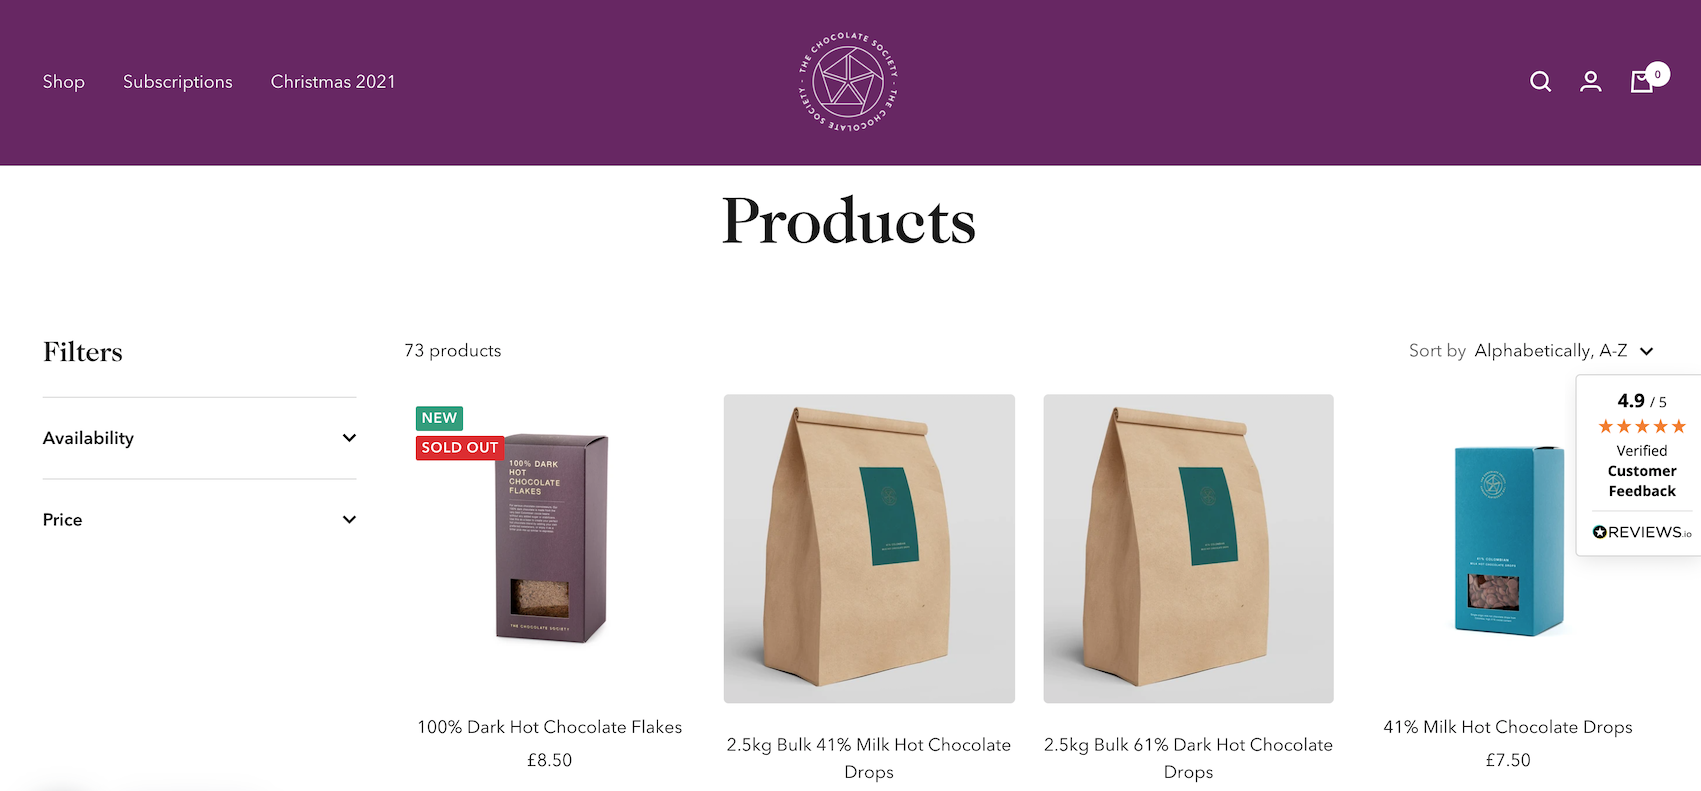
For this series, we will be scraping the products from Chocolate.co.uk as it will be a good example of how to approach scraping a e-commerce store. Plus, who doesn't like Chocolate!
What Is Scrapy?
Developed by the co-founders of Zyte, Pablo Hoffman and Shane Evans, Scrapy is a Python framework specifically designed for web scraping.
Using Scrapy you can easily build highly scalable scrapers that will retrieve a pages HTML, parse and process the data, and store it the file format and location of your choice.
Why & When Should You Use Scrapy?
Although, there are other Python libraries also used for web scraping:
-
Python Requests/BeautifulSoup: Good for small scale web scraping where the data is returned in the HTML response. Would need to build you own spider management functionality to manage concurrency, retries, data cleaning, data storage.
-
Python Request-HTML: Combining Python requests with a parsing library, Request-HTML is a middle-ground between the Python Requests/BeautifulSoup combo and Scrapy.
-
Python Selenium: Use if you are scraping a site if it only returns the target data after the Javascript has rendered, or you need to interact with page elements to get the data.
Python Scrapy has lots more functionality and is great for large scale scraping right out of the box:
- CSS Selector & XPath Expressions Parsing
- Data formating (CSV, JSON, XML) and Storage (FTP, S3, local filesystem)
- Robust Encoding Support
- Concurrency Managment
- Automatic Retries
- Cookies and Session Handling
- Crawl Spiders & In-Built Pagination Support
You just need to customise it in your settings file or add in one of the many Scrapy extensions and middlewares that developers have open sourced.
The learning curve is initially steeper than using the Python Requests/BeautifulSoup combo, however, it will save you a lot of time in the long run when deploying production scrapers and scraping at scale.
Beginners Scrapy Tutorial
With the intro out of the way, let's start developing our Spider. First, things first we need to setup up our Python environment.
Step 1 - Setup your Python Environment
To avoid version conflicts down the raod it is best practice to create a seperate virtual environment for each of your Python projects. This means that any packages you install for a project are kept seperate from other projects, so you don't inadverently end up breaking other projects.
Depending on the operating system of your machine these commands will be slightly different.
MacOS or Linux
Setup a virtual environment on MacOS or any Linux distro.
First, we want to make sure we've the latest version of our packages installed.
$ sudo apt-get update
$ apt install tree
Then install python3-venv if you haven't done so already
$ sudo apt install -y python3-venv
Next, we will create our Python virtual environment.
$ cd /scrapy_tutorials
$ python3 -m venv venv
$ source venv/bin/activate
Finally, we will install Scrapy in our virtual environment.
$ apt-get install python3-pip
$ sudo pip3 install scrapy
Windows
Setup a virtual environment on Windows.
Install virtualenv in your Windows command shell, Powershell, or other terminal you are using.
pip install virtualenv
Navigate to the folder you want to create the virtual environment, and start virtualenv.
cd /scrapy_tutorials
virtualenv venv
Activate the virtual environment.
source venv\Scripts\activate
Finally, we will install Scrapy in our virtual environment.
pip install scrapy
Test Scrapy Is Installed
To make sure everything is working, if you type the command scrapy into your command line you should get an output like this:
$ scrapy

Usage:
  scrapy <command> [options] [args]

Available commands:
  bench         Run quick benchmark test
  check         Check spider contracts
  commands
  crawl         Run a spider
  edit          Edit spider
  fetch         Fetch a URL using the Scrapy downloader
  genspider     Generate new spider using pre-defined templates
  list          List available spiders
  parse         Parse URL (using its spider) and print the results
  runspider     Run a self-contained spider
Step 2 - Setup Our Scrapy Project
Now that we have our environment setup, we can get onto the fun stuff. Building our first Scrapy spider!
Creating Our Scrapy Project
The first thing we need to do is create our Scrapy project. This project will hold all the code for our scrapers.
The command line synthax to do this is:
scrapy startproject <project_name>
So in this case, as we're going to be scraping a chocolate website we will call our project chocolatescraper. But you can use any project name you would like.
scrapy startproject chocolatescraper
Understanding Scrapy Project Structure
To help us understand what we've just done, and how Scrapy structures it projects we're going to pause for a second.
First, we're going to see what the scrapy startproject chocolatescraper just did. Enter the following commands into your command line:
$ cd /chocolatescraper
$ tree
You should see something like this:
├── scrapy.cfg
└── chocolatescraper
    ├── __init__.py
    ├── items.py
    ├── middlewares.py
    ├── pipelines.py
    ├── settings.py
    └── spiders
        └── __init__.py
When we ran the scrapy startproject chocolatescraper command, Scrapy automatically generated a template project for us to use.
We won't be using most of these files in this beginners project, but we will give a quick explanation of each as each one has a special purpose:
- settings.py is where all your project settings are contained, like activating pipelines, middlewares etc. Here you can change the delays, concurrency, and lots more things.
- items.py is a model for the extracted data. You can define a custom model (like a ProductItem) that will inherit the Scrapy Item class and contain your scraped data.
- pipelines.py is where the item yielded by the spider gets passed, it’s mostly used to clean the text and connect to file outputs or databases (CSV, JSON SQL, etc).
- middlewares.py is useful when you want to modify how the request is made and scrapy handles the response.
- scrapy.cfg is a configuration file to change some deployment settings, etc.
Step 3- Creating Our Spider
Okay, we’ve created the general project structure. Now, we’re going to create our spider that will do the scraping.
Scrapy provides a number of different spider types, however, in this tutorial we will cover the most common one, the generic Spider. Here are some of the most common ones:
- Spider - Takes a list of start_urls and scrapes each one with a
parsemethod. - CrawlSpider - Designed to crawl a full website by following any links it finds.
- SitemapSpider - Designed to extract URLs from a sitemap
To create a new generic spider, simply run the genspider command:
# syntax is --> scrapy genspider <name_of_spider> <website>
$ scrapy genspider chocolatespider chocolate.co.uk
A new spider will now have been added to your spiders folder, and it should look like this:
import scrapy

class ChocolatespiderSpider(scrapy.Spider):
    name = 'chocolatespider'
    allowed_domains = ['chocolate.co.uk']
    start_urls = ['http://chocolate.co.uk/']

    def parse(self, response):
        pass
Here we see that the genspider command has created a template spider for us to use in the form of a Spider class. This spider class contains:
- name - a class attribute that gives a name to the spider. We will use this when running our spider later
scrapy crawl <spider_name>. - allowed_domains - a class attribute that tells Scrapy that it should only ever scrape pages of the
chocolate.co.ukdomain. This prevents the spider going rouge and scraping lots of websites. This is optional. - start_urls - a class attribute that tells Scrapy the first url it should scrape. We will be changing this in a bit.
- parse - the
parsefunction is called after a response has been recieved from the target website.
To start using this Spider we will have to do two things:
- Change the
start_urlsto the url we want to scrape https://www.chocolate.co.uk/collections/all. - Insert our parsing code into the
parsefunction.
Step 4 - Update Start Urls
This is pretty easy, we just need to replace the url in the start_urls array:
import scrapy

class ChocolatespiderSpider(scrapy.Spider):
    name = 'chocolatespider'
    allowed_domains = ['chocolate.co.uk']
    start_urls = ['https://www.chocolate.co.uk/collections/all']

    def parse(self, response):
        pass
Next, we need to create our CSS selectors to parse the data we want from the page. To do this, we will use Scrapy Shell.
Step 5 - Scrapy Shell: Finding Our CSS Selectors
To extract data from a HTML page, we need to use XPath or CSS selectors to tell Scrapy where in the page is the data. XPath and CSS selectors are like little maps for Scrapy to navigate the DOM tree and find the location of the data we require. In this guide, we're going to use CSS selectors to parse the data from the page. And to help us create these CSS selectors we will use Scrapy Shell.
One of the great features of Scrapy is that it comes with a built-in shell that allows you to quickly test and debug your XPath & CSS selectors. Instead of having to run your full scraper to see if your XPath or CSS selectors are correct, you can enter them directly into your terminal and see the result.
To open Scrapy shell use this command:
scrapy shell
Note: If you would like to use IPython as your Scrapy shell (much more powerful and provides smart auto-completion and colorized output), then make sure you have IPython installed:
pip3 install ipython
And then edit your scrapy.cfg file like so:
## scrapy.cfg
[settings]
default = chocolatescraper.settings
shell = ipython
With our Scrapy shell open, you should see something like this:
[s] Available Scrapy objects:
[s]   scrapy     scrapy module (contains scrapy.Request, scrapy.Selector, etc)
[s]   crawler    <scrapy.crawler.Crawler object at 0x0000025111C47948>
[s]   item       {}
[s]   settings   <scrapy.settings.Settings object at 0x0000025111D17408>
[s] Useful shortcuts:
[s]   fetch(url[, redirect=True]) Fetch URL and update local objects (by default, redirects are followed)
[s]   fetch(req)                  Fetch a scrapy.Request and update local objects
[s]   shelp()           Shell help (print this help)
[s]   view(response)    View response in a browser
In [1]:
Fetch The Page
To create our CSS selectors we will be testing them on the following page:
https://www.chocolate.co.uk/collections/all
The first thing we want to do is fetch the main products page of the chocolate site in our Scrapy shell.
fetch('https://www.chocolate.co.uk/collections/all')
We should see a response like this:
In [1]: fetch('https://www.chocolate.co.uk/collections/all')
2021-12-22 13:28:56 [scrapy.core.engine] INFO: Spider opened
2021-12-22 13:28:57 [scrapy.core.engine] DEBUG: Crawled (200) <GET https://www.chocolate.co.uk/robots.txt> (referer: None)
2021-12-22 13:28:57 [scrapy.core.engine] DEBUG: Crawled (200) <GET https://www.chocolate.co.uk/collections/all> (referer: None)
As we can see, we successful retrieve the page from chocolate.co.uk, and Scrapy shell has automatically saved the HTML response in the response variable.
In [2]: response
Out[2]: <200 https://www.chocolate.co.uk/collections/all>
Find Product CSS Selectors
To find the correct CSS selectors to parse the product details we will first open the page in our browsers DevTools.
Open the website, then open the developer tools console (right click on the page and click inspect).
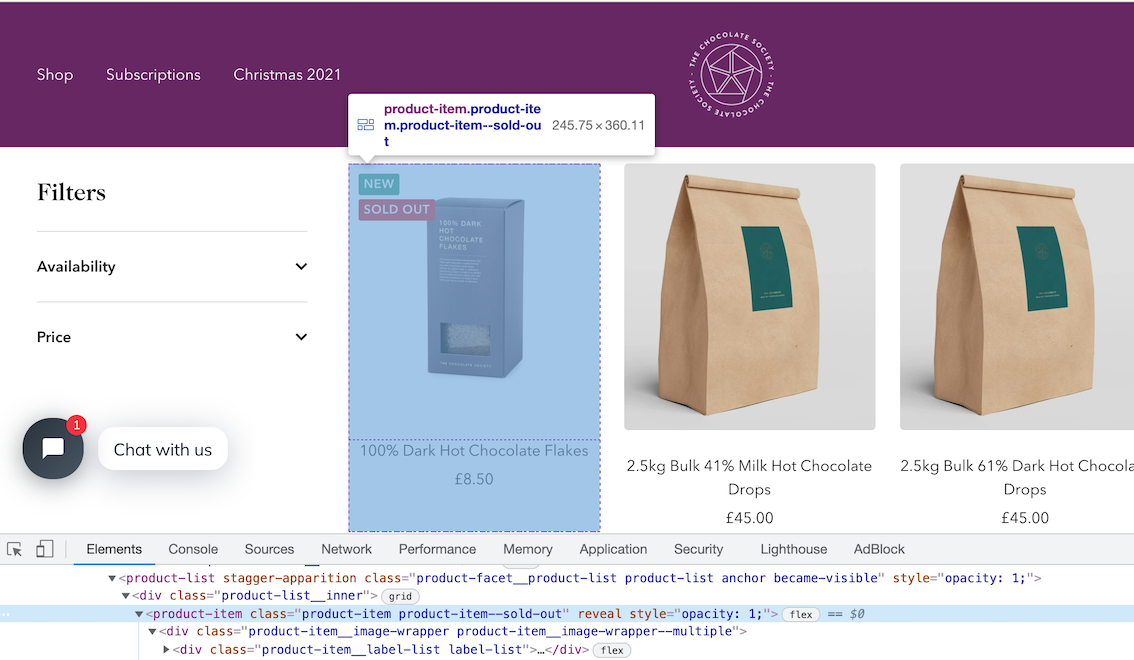
Using the inspect element, hover over the item and look at the id's and classes on the individual products.
In this case we can see that each box of chocolates has its own special component which is called product-item. We can just use this to reference our products (see above image).
Now using our Scrapy shell we can see if we can extract the product informaton using this class.
response.css('product-item')
We can see that it has found all the elements that match this selector.
In [3]: response.css('product-item')
Out[3]:
[<Selector xpath='descendant-or-self::product-item' data='<product-item class="product-item pro...'>,
 <Selector xpath='descendant-or-self::product-item' data='<product-item class="product-item " r...'>,
 <Selector xpath='descendant-or-self::product-item' data='<product-item class="product-item " r...'>,
 <Selector xpath='descendant-or-self::product-item' data='<product-item class="product-item " r...'>,
 <Selector xpath='descendant-or-self::product-item' data='<product-item class="product-item " r...'>,
 <Selector xpath='descendant-or-self::product-item' data='<product-item class="product-item pro...'>,
 ...
Get First Product
To just get the first product we use .get() appended to the end of the command.
response.css('product-item').get()
This returns all the HTML in this node of the DOM tree.
In [4]: response.css('product-item').get()
Out[4]: '<product-item class="product-item product-item--sold-out" reveal><div class="product-item__image-wrapper product-item__image-wrapper--multiple"><div class="product-item__label-list label-list"><span class="label label--custom">New</span><span class="label label--subdued">Sold out</span></div><a href="/products/100-dark-hot-chocolate-flakes" class="product-item__aspect-ratio aspect-ratio " style="padding-bottom: 100.0%; --aspect-ratio: 1.0">\n
...
Get All Products
Now that we have found the DOM node that contains the product items, we will get all of them and save this data into a response variable and loop through the items and extract the data we need.
So can do this with the following command.
products = response.css('product-item')
The products variable, is now an list of all the products on the page.
To check the length of the products variable we can see how many products are there.
len(products)
Here is the output:
In [6]: len(products)
Out[6]: 24
Extract Product Details
Now lets extract the name, price and url of each product from the list of products.
The products variable is a list of products. When we update our spider code, we will loop through this list, however, to find the correct selectors we will test the CSS selectors on the first element of the list products[0].
Single Product - Get single product.
product = products[0]
Name - The product name can be found with:
product.css('a.product-item-meta__title::text').get()
In [5]: product.css('a.product-item-meta__title::text').get()
Out[5]: '100% Dark Hot Chocolate Flakes'
Price - The product price can be found with:
product.css('span.price').get()
You can see that the data returned for the price has lots of extra HTML. We'll get rid of this in the next step.
In [6]: product.css('span.price').get()
Out[6]: '<span class="price">\n              <span class="visually-hidden">Sale price</span>▒8.50</span>'
To remove the extra span tags from our price we can use the .replace() method. The replace method can be useful when we need to clean up data.
Here we're going to replace the <span> sections with empty quotes '':
product.css('span.price').get().replace('<span class="price">\n <span class="visually-hidden">Sale price</span>','').replace('</span>','')
In [7]: product.css('span.price').get().replace('<span class="price">\n              <span class="visually-hidden">Sale price</span>','').replace('</span>','')
Out[7]: '8.50'
Product URL - Next lets see how we can extract the product url for each individual product. To do that we can use the attrib function on the end of products.css('div.product-item-meta a')
product.css('div.product-item-meta a').attrib['href']
In [8]: product.css('div.product-item-meta a').attrib['href']
Out[8]: '/products/100-dark-hot-chocolate-flakes'
Updated Spider
Now, that we've found the correct CSS selectors let's update our spider. Exit Scrapy shell with the exit() command.
Our updated Spider code should look like this:
import scrapy

class ChocolatespiderSpider(scrapy.Spider)

    #the name of the spider
    name = 'chocolatespider'

    #the url of the first page that we will start scraping
    start_urls = ['https://www.chocolate.co.uk/collections/all']

    def parse(self, response):

        #here we are looping through the products and extracting the name, price & url
        products = response.css('product-item')
        for product in products:
            #here we put the data returned into the format we want to output for our csv or json file
            yield{
                'name' : product.css('a.product-item-meta__title::text').get(),
                'price' : product.css('span.price').get().replace('<span class="price">\n              <span class="visually-hidden">Sale price</span>','').replace('</span>',''),
                'url' : product.css('div.product-item-meta a').attrib['href'],
            }
Here, our spider does the following steps:
- Makes a request to
'https://www.chocolate.co.uk/collections/all'. - When it gets a response, it extracts all the products from the page using
products = response.css('product-item'). - Loops through each product, and extracts the name, price and url using the CSS selectors we created.
- Yields these items so they can be stored in a CSV, JSON, DB, etc.
Step 5 - Running Our Spider
Now that we have a spider we can run it by going to the top level in our scrapy project and running the following command.
scrapy crawl chocolatespider
It will run, and you should see the logs on your screen. Here are the final stats:
2021-12-22 14:43:54 [scrapy.statscollectors] INFO: Dumping Scrapy stats:
{'downloader/request_bytes': 707,
 'downloader/request_count': 2,
 'downloader/request_method_count/GET': 2,
 'downloader/response_bytes': 64657,
 'downloader/response_count': 2,
 'downloader/response_status_count/200': 2,
 'elapsed_time_seconds': 0.794875,
 'finish_reason': 'finished',
 'finish_time': datetime.datetime(2021, 12, 22, 13, 43, 54, 937791),
 'httpcompression/response_bytes': 268118,
 'httpcompression/response_count': 2,
 'item_scraped_count': 24,
 'log_count/DEBUG': 26,
 'log_count/INFO': 10,
 'response_received_count': 2,
 'robotstxt/request_count': 1,
 'robotstxt/response_count': 1,
 'robotstxt/response_status_count/200': 1,
 'scheduler/dequeued': 1,
 'scheduler/dequeued/memory': 1,
 'scheduler/enqueued': 1,
 'scheduler/enqueued/memory': 1,
 'start_time': datetime.datetime(2021, 12, 22, 13, 43, 54, 142916)}
2021-12-22 14:43:54 [scrapy.core.engine] INFO: Spider closed (finished)
We can see from the above stats that our spider scraped 24 Items: 'item_scraped_count': 24.
If we want to save the data to a JSON file we can use the -O option, followed by the name of the file.
scrapy crawl chocolatespider -O myscrapeddata.json
If we want to save the data to a CSV file we can do so too.
scrapy crawl chocolatespider -O myscrapeddata.csv
Step 6 - Navigating to the "Next Page"
So far the code is working great but we're only getting the products from the first page of the site, the url which we have listed in the start_url variable.
So the next logical step is to go to the next page if there is one and scrape the item data from that too! So here's how we do that.
First, lets open our Scrapy shell again, fetch the page and find the correct selector to get the next page button.
scrapy shell
Then fetch the page again.
fetch('https://www.chocolate.co.uk/collections/all')
And then get the href attribute that contains the url to the next page.
response.css('[rel="next"] ::attr(href)').get()
In [2]: response.css('[rel="next"] ::attr(href)').get()
Out[2]: '/collections/all?page=2'
Now, we just need to update our spider to request this page after it has parsed all items from a page.
import scrapy

class ChocolateSpider(scrapy.Spider):

   #the name of the spider
   name = 'chocolatespider'

   #these are the urls that we will start scraping
   start_urls = ['https://www.chocolate.co.uk/collections/all']

   def parse(self, response):

       products = response.css('product-item')
       for product in products:
           #here we put the data returned into the format we want to output for our csv or json file
           yield{
               'name' : product.css('a.product-item-meta__title::text').get(),
               'price' : product.css('span.price').get().replace('<span class="price">\n              <span class="visually-hidden">Sale price</span>','').replace('</span>',''),
               'url' : product.css('div.product-item-meta a').attrib['href'],
           }

       next_page = response.css('[rel="next"] ::attr(href)').get()

       if next_page is not None:
           next_page_url = 'https://www.chocolate.co.uk' + next_page
           yield response.follow(next_page_url, callback=self.parse)
Here we see that our spider now, finds the URL of the next page and if it isn't none it appends it to the base URL and makes another request.
Now in our Scrapy stats we see that we have scraped 5 pages, and extracted 73 items:
2021-12-22 15:10:45 [scrapy.statscollectors] INFO: Dumping Scrapy stats:
{'downloader/request_bytes': 2497,
 'downloader/request_count': 5,
 'downloader/request_method_count/GET': 5,
 'downloader/response_bytes': 245935,
 'downloader/response_count': 5,
 'downloader/response_status_count/200': 5,
 'elapsed_time_seconds': 2.441196,
 'feedexport/success_count/FileFeedStorage': 1,
 'finish_reason': 'finished',
 'finish_time': datetime.datetime(2021, 12, 22, 14, 10, 45, 62280),
 'httpcompression/response_bytes': 986800,
 'httpcompression/response_count': 5,
 'item_scraped_count': 73,
 'log_count/DEBUG': 78,
 'log_count/INFO': 11,
 'request_depth_max': 3,
 'response_received_count': 5,
 'robotstxt/request_count': 1,
 'robotstxt/response_count': 1,
 'robotstxt/response_status_count/200': 1,
 'scheduler/dequeued': 4,
 'scheduler/dequeued/memory': 4,
 'scheduler/enqueued': 4,
 'scheduler/enqueued/memory': 4,
 'start_time': datetime.datetime(2021, 12, 22, 14, 10, 42, 621084)}
2021-12-22 15:10:45 [scrapy.core.engine] INFO: Spider closed (finished)
Next Steps
We hope you have enough of the basics to get up and running scraping a simple ecommerce site with the above tutorial.
If you would like the code from this example please check out on Github here!
In Part 2 of the series we will work on Cleaning Dirty Data & Dealing With Edge Cases. Web data can be messy, unstructured, and have lots of edge cases so will make our spider robust to these edge cases, using Items, Itemloaders and Item Pipelines.
Need a Free Proxy? Then check out our Proxy Comparison Tool that allows to compare the pricing, features and limits of every proxy provider on the market so you can find the one that best suits your needs. Including the best free plans.