Node Unblocker: Build Your Own Proxy Server
If you want to browse in private, scrape the web without getting blocked or access geo-restricted content you will inevitably run into the issue of needing a web proxy that you can route your requests through.
You can either buy an off-the-shelf web proxy that can be expensive, and overkill depending on your use case.
Or you could build your own with a web proxy library like node-unblocker, a web proxy for evading internet censorship and web scraping.
In this guide, we're going to give you a rundown of:
- What Is Node-Unblocker?
- How to Setup A Node-Unblocker Server
- Deploy Node-Unblocker Proxy Server
- Create Node Unblocker Proxy Network
- Customising Our Node-Unblocker Server
So let's get started...
Need help scraping the web?
Then check out ScrapeOps, the complete toolkit for web scraping.
What is Node-Unblocker?
Node-Unblocker is a general-purpose library for proxying and rewriting remote webpages, allowing you to:
- Hide your real identity when browsing a website
- Scrape data from a website without getting blocked
- Access geo-restricted content on a website.
Node-Unblocker is a Node.js library, that has been built ontop of the popular Express framework. Making it very familar and easy to use for any Node.js developer who's used Express in the past.
Your scrapers or browsers interact with Node-Unblocker via the REST API endpoints it exposes.
Simply append the url of the page you want to retrieve to the /proxy/ endpoint and the Node-Unblocker server will retrieve the content using the IP address of the machine it is running on.
curl http://localhost:8080/proxy/https://www.amazon.com
All the data is processed and relayed to the client on-demand without unnecessary buffering, making Node-Unblocker a very fast and streamlined proxy option.
How to Setup A Node-Unblocker Server
Getting a Node-Unblocker server setup is pretty straightforward, especially if you've used Express before.
Step 1: Install Node-Unblocker & Express
The first step is to install our dependancies.
npm init -y
npm install unblocker express
- Express is a very popular minimalist web framework commonly used for creating servers with Node.js.
- unblocker is the package name for node-unblocker
Step 2: Create Our Node-Unblocker Server
In our folder, create an app.js file with the following code:
// app.js

var express = require('express')
var Unblocker = require('unblocker');

// Create Express Server
var app = express();

// Create Unblocker Instance, and Configure Our Express Server to Use It
var unblocker = new Unblocker({prefix: '/proxy/'});
app.use(unblocker);


// Launches Server on Port 8080
app.listen(process.env.PORT || 8080).on('upgrade', unblocker.onUpgrade);
console.log("Node Unblocker Server Running On Port:", process.env.PORT || 8080)
This simple server will run on localhost:8080 or the PORT environment variable you define when launched.
Additionally, we added the .on('upgrade', unblocker.onUpgrade) event handler to our app.listen(). This is used to tell our proxy if the connection protocol changes, say from HTTP to WebSocket.
Step 3: Start & Test Our Server
To start our server, we just need to run:
node app.js
And we can test our Node-Unblocker server by sending requests through it using the following URL format:
http://localhost:8080/proxy/https://www.amazon.com
You can test it in your terminal using the curl command:
curl http://localhost:8080/proxy/https://www.amazon.com
Or in your browser by just entering this URL into your URL bar:
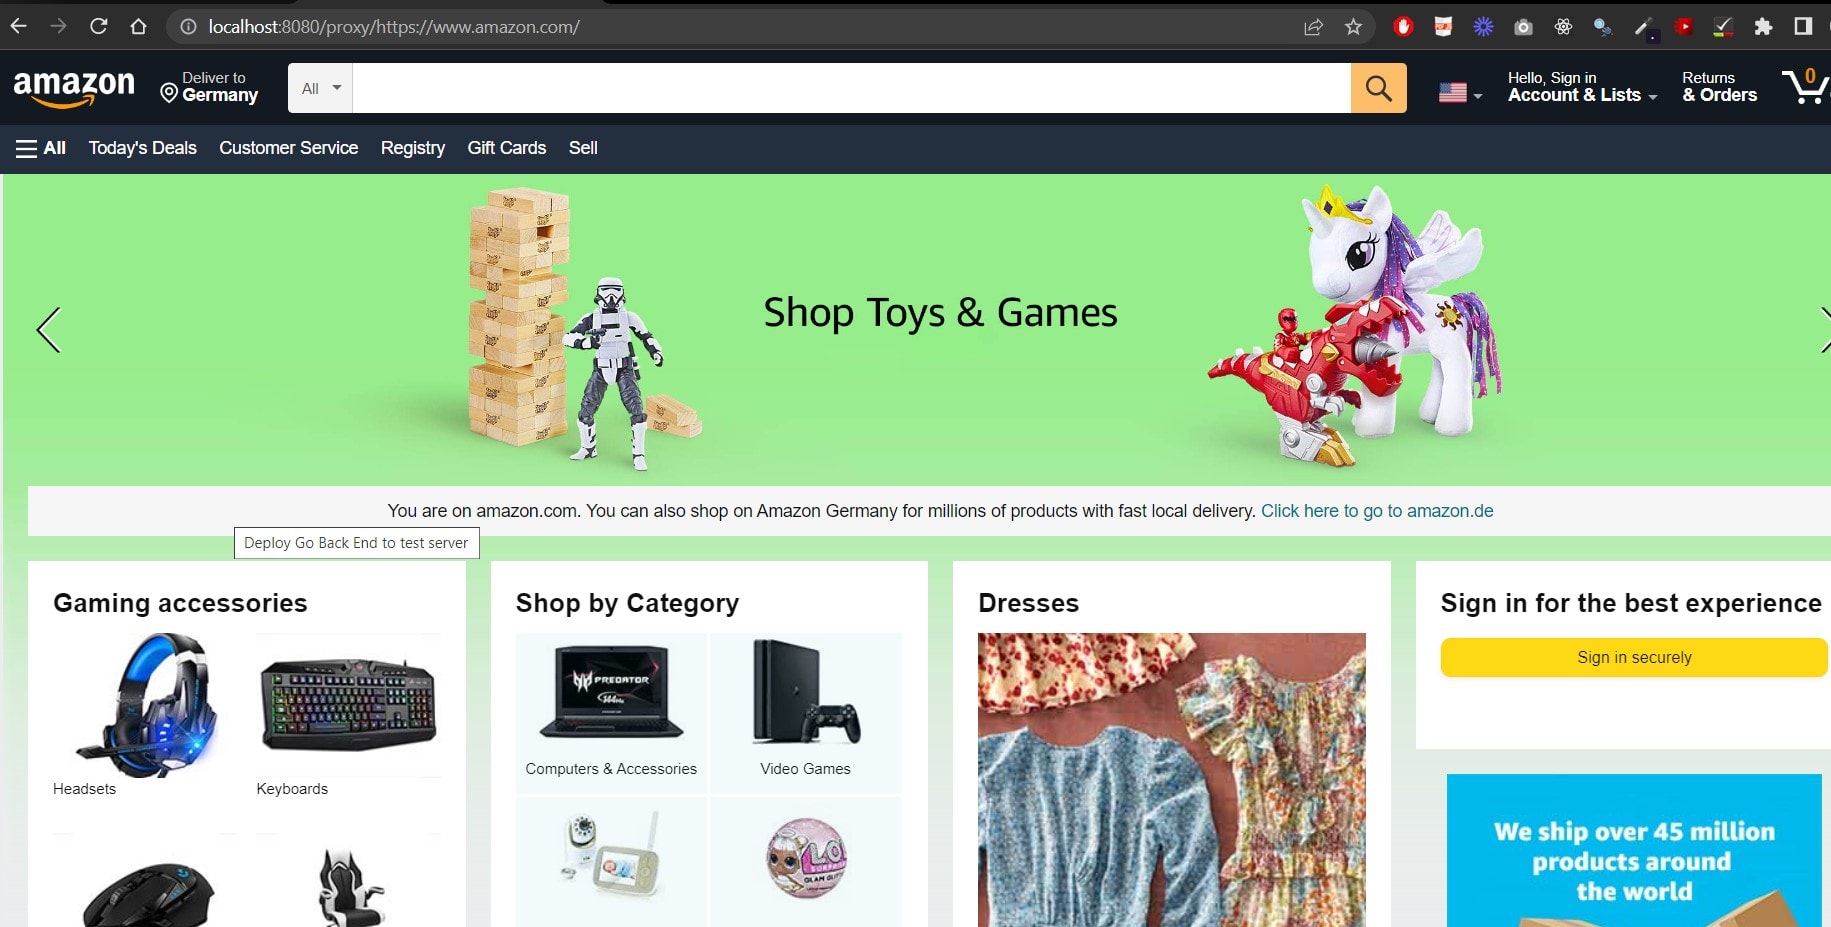
Now, when you send the request through your Node-Unblocker server the request will be made with the IP address of the machine the server is running on.
In the above example, the IP address won't change as you are running the node-unblocker server locally.
To change your IP address you will need to deploy your unblocker server to a remote server which we will see next.
Deploy Node-Unblocker Proxy Server
With our basic node-unblocker server built we can now start using it as a proxy to route our web scraping/browser traffic through.
To do so, we simply need to deploy our server on a remote server and send requests to it.
You can deploy your proxy server anywhere, however, one of the simplest options is Heroku as you can use their free plan.
Configure Our Server For Deployment
To deploy our proxy server to Heroku (or any other hosting provider), so we can use the IP address of the Heroku machine, we first need to update our package.json file to include the setup details of the server:
{
  "name": "proxy-server",
  "version": "1.0.0",
  "main": "app.js",
  "private": true,
  "engines": {
    "node": "16.x"
  },
  "dependencies": {
    "express": "^4.17.1",
    "unblocker": "^2.3.0"
  },
  "scripts": {
    "start": "node app.js"
  }
}
Here we include:
- engines - so that Heroku knows which version of Node.js to use.
- start script - which tells Heroku how to start our proxy server.
We also need to create a .gitignore file so that we avoid pushing unnecessary files and dependancies to our Github repos and Heroku server.
# Dependencies
node_modules

# yarn error logs
yarn-error.log

# Environment varibales
.env*
!.env*.example

# Code coverage
coverage
Deploy to Heroku
If you haven't already, first create a free Heroku account, install the Heroku CLI Tool, and create a new App in the Heroku dashboard.
Then log into your Heroku account via the command line and follow the prompts to create a new SSH public key.
$ heroku login
Next, initalize Git in the directory you have created your node-unblocker server, and set the heroku remote as the app you just created in the Heroku dashboard.
In this examples case, we called the app node-unblocker-demo.
$ git init
$ heroku git:remote -a node-unblocker-demo
Finally, we just need to deploy our code to Heroku using Git.
$ git add .
$ git commit -am "first deploy"
$ git push heroku master
Now, with the node-unblocker deployed when we go to https://node-unblocker-demo.herokuapp.com/proxy/https://www.amazon.com we will route our request through our Heroku server and Amazon's server will see a Heroku IP address when it recieves the request.

We can see from the image above that the location Amazon thinks we are in has switched from Germany to the USA because the request now uses the US IP address of the Heroku server instead of my machines IP address.
Create Node Unblocker Proxy Network
Using the above example, we can scale this up and create your own proxy network if you deploy node-unblocker servers on multiple machines.
Simply, deploy the node-unblocker server code on numerous Heroku servers or rent cheap remote servers like Vultr (servers starting at $2.50 each) and then configure your web scrapers or bots to use a random server from this proxy network with each request:
For example, here is how you could do it with Python Request scraper:
import requests
from itertools import cycle

## Node Unblocker Proxies
list_proxy = [
  "https://100.200.30.30:8080",
  "https://100.200.30.31:8080",
  "https://100.200.30.32:8080",
  ]

proxy_cycle = cycle(list_proxy)
proxy = next(proxy_cycle)

for i in range(1, 10):
    proxy = next(proxy_cycle)
    print(proxy)
    proxies = {
      "http": proxy,
      "https":proxy
    }
    r = requests.get(url='https://www.amazon.com', proxies=proxies)
    print(r.text)
Customising Our Node-Unblocker Server
Okay, by now you know how to setup and deploy a simple Node-Unblocker proxy server.
However, with Node-Unblocker middlewares we can unlock a lot more functionality we can use to make our proxy servers more powerful and useful when web scraping or using bots.
Node-Unblocker Middlewares
Unblocker "middlewares" are small functions that allow us to modify requests and responses as our proxy server recieves them.
Most of Unblockers functionality is implemented through middlewares, however, it also allows us to easily configure our own custom middlewares to replace or augment the default middlewares.
We can add our own custom Request or Response middlewares by adding them to the requestMiddleware or responseMiddleware array:
// app.js

var express = require('express')
var Unblocker = require('unblocker');

// Create Express Server
var app = express();

// Create Unblocker Instance, and Configure Our Express Server to Use It
var unblocker = new Unblocker(
  {
    prefix: '/proxy/',
    requestMiddleware: [] // Custom request middlewares go here
    responseMiddleware: [] // Custom response middlewares go here
  });

app.use(unblocker);


// Launches Server on Port 8080
app.listen(process.env.PORT || 8080).on('upgrade', unblocker.onUpgrade);
console.log("Node Unblocker Server Running On Port:", process.env.PORT || 8080)
To change the default middlewares used by Unblocker we need to set standardMiddleware: false and then only activate the default middlewares you want.
Advantage Of Node Unblocker Middlewares
The advantage to using Requests & Responses Middlewares with Unblocker is that you can easily abstract a lot of your proxy configuration details to your proxy server and then just let your scrapers and browsers send requests to.
Instead of having to maintain and manage proxy header and user-agent settings in each of your scrapers, your proxy server would contain this logic and apply it to every request it recieves from your scrapers.
Making your proxy infrastructure much more maintainable.
Example Request Middleware
A common use case for the Request Middlewares functionality would be to add custom headers and user-agents to requests.
We could add a user-agent to every request like this:
// app.js

var express = require('express')
var Unblocker = require('unblocker');

// Create Express Server
var app = express();


// Our User-Agent Middleware
function setUserAgent(data) {
    data.headers["user-agent"] = "Mozilla/5.0 (iPad; CPU OS 12_2 like Mac OS X) AppleWebKit/605.1.15 (KHTML, like Gecko) Mobile/15E148";
}

// Create Unblocker Instance
var unblocker = new Unblocker(
  {
    prefix: '/proxy/',
    requestMiddleware: [
      setUserAgent  // Enable User Agent Middleware
    ]
  });

// Configure Our Express Server to Use It
app.use(unblocker);


// Launches Server on Port 8080
app.listen(process.env.PORT || 8080).on('upgrade', unblocker.onUpgrade);
console.log("Node Unblocker Server Running On Port:", process.env.PORT || 8080)
You could also configure it to specific headers when requesting certain URLs, as that domain might need custom headers.
function setUserAgent(data) {
  if (data.url.match(/^https?:\/\/google.com\//)) {
    data.headers["user-agent"] = "Mozilla/5.0 (iPad; CPU OS 12_2 like Mac OS X) AppleWebKit/605.1.15 (KHTML, like Gecko) Mobile/15E148";
  }
}
Example Response Middleware
An example of a response middleware would be editing the response you get from the target website.
In this example, we will search for and replace a piece of text from the HTML response it exists:
// app.js

var express = require('express')
var Unblocker = require('unblocker');

// Create Express Server
var app = express();

// Our Response Middleware
function replaceSnippet(data) {
    if (config.processContentTypes.includes(data.contentType)) {
      data.stream = data.stream.pipe(
        new Transform({
          decodeStrings: false,
          transform: function (chunk, encoding, next) {
            const updated = chunk
              .toString()
              .replace(config.searchFor, config.replaceWith);
            this.push(updated, "utf8");
            next();
          },
        })
      );
    }
  }


// Create Unblocker Instance
var unblocker = new Unblocker(
  {
    prefix: '/proxy/',
    responseMiddleware: [
      replaceSnippet({
        processContentTypes: ["text/html"],
        searchFor: /<script type="text\/javascript">\s*BrowserCheck.testForCookies\(\);\s*<\/script>/i,
        replaceWith: "",
      }),
    ],
  });


// Configure Our Express Server to Use It
app.use(unblocker);


// Launches Server on Port 8080
app.listen(process.env.PORT || 8080).on('upgrade', unblocker.onUpgrade);
console.log("Node Unblocker Server Running On Port:", process.env.PORT || 8080)
More Web Scraping Guides
This was a high-level overview of Node Unblocker and how you can use it to scrape websites whilst hiding your IP address..
If you would like to learn more about web scraping in general, then be sure to check out The Web Scraping Playbook, or check out one of our more in-depth guides: