
How To Optimize Puppeteer for Web Scraping
Puppeteer is a robust web scraping tool that can effectively handle complex dynamic pages and scrape thousands of pages in a matter of minutes when properly optimized. However, if not optimized, Puppeteer scrapers can consume excessive time, memory, and CPU resources, resulting in inefficient scraping.
In this comprehensive guide, we delve into the:
- Why Optimize Puppeteer For Web Scraping?
- Bypassing Anti-Bot Detection
- Rotating IP Addresses
- Rotating User-Agents
- Optimizing Page Load and Navigation Speed
- Efficient Element Selection and Interactions
- Managing Memory Usage and Resource Consumption
- Implementing Error Handling and Retry Mechanisms
- Utilizing Caching and Request Interception
- Scalability and Parallel Processing with Puppeteer
- Measuring and Monitoring Performance
- More Web Scraping Guides
Need help scraping the web?
Then check out ScrapeOps, the complete toolkit for web scraping.
Why Optimize Puppeteer For Web Scraping?
Web scraping can be error-prone and resource-intensive, especially when dealing with complex and dynamic web pages. However, by optimizing your Puppeteer script, you can ensure smooth and efficient operation with accurate and consistent results.
Here are some of the key reasons why you should optimize the performance of Puppeteer:
- Performance Improvement: Reduce unnecessary resource consumption, making the scraping process more efficient.
- Reduced Detection Risk: Minimize the risk of detection by making scraping activities less conspicuous.
- Resource Management: Help in managing memory and CPU usage effectively which can improve the overall performance of your scraping script.
- Bandwidth Efficiency: Minimize the amount of data transferred between the browser and the server, reducing bandwidth usage and making the scraping process more lightweight.
- Robust Error Handling: Better equipped to handle errors gracefully which ensures that your results are accurate and consistent.
Common Puppeteer Issues When Web Scraping
While scraping the pages, you might face some common issues that can be a big problem for your scraping task. Here are some common challenges and performance bottlenecks faced during web scraping with Puppeteer.
- Anti-Bot Detection: By default, Puppeteer scrapers leak a lot of fingerprints that can be used to detect them. Therefore, you need to fortify your Puppeteer scraper. There are many ways to do this, such as fixing browser leaks, optimizing headers, or using plugins like puppeteer-extra-plugin-stealth.
- Rotating IP Addresses: Websites can track the number of requests that are coming from a particular IP address and block scrapers that make a large number of requests. To avoid detection by websites, web scrapers need to rotate their IP addresses.
- Rotating Fake User-Agents: Websites can detect and block bots that send requests using the same user agent every time. Therefore, when web scraping at scale, it is important to rotate user agents to avoid being blocked by websites. This can be achieved by maintaining a pool of user agents and randomly selecting one for each request.
- Page Load Times: Slow page loading can significantly impact the scraping speed, especially when dealing with websites with heavy content or complex structures. Identifying slow-loading pages and optimizing the page load times can improve the overall efficiency of the scraping process.
- Resource Intensive Operations: Some operations, such as rendering dynamic content, handling multiple requests, and processing large datasets, can consume a lot of resources and slow down your system. Identifying and optimizing these resource-intensive operations can help reduce resource consumption and improve overall performance.
- Network Latency and Delays: Network latency, slow responses, and intermittent connectivity disruptions can delay fetching data from a target website. Identifying network-related bottlenecks and taking steps to address network failures and delays can improve scraping efficiency, especially for websites with fluctuating network conditions.
- Inefficient Element Selection and Interaction: Poor selection and interaction with DOM elements can slow down your scraping process and consume more resources. Identifying and improving inefficient element selection and interaction patterns can streamline the process and improve performance.
- Memory Leaks and Unreleased Resources: Memory leaks and unreleased resources can slowly use up system resources, causing performance to slow down and your system to crash. Identifying memory leaks and using good memory management techniques can prevent resources from being depleted and ensure the scraping process is stable.
- Scaling Puppeteer Scrapers: To scale Puppeteer scrapers, you can use browser contexts and the Puppeteer-cluster library. Browser contexts let you create multiple, separate browser instances within a single Puppeteer instance. Puppeteer Cluster lets you run multiple Puppeteer instances at the same time.
Bypassing Anti-Bot Detection
It is important to fortify your Puppeteer scraper when using it for web scraping because it reveals many fingerprints that can be used to identify it.
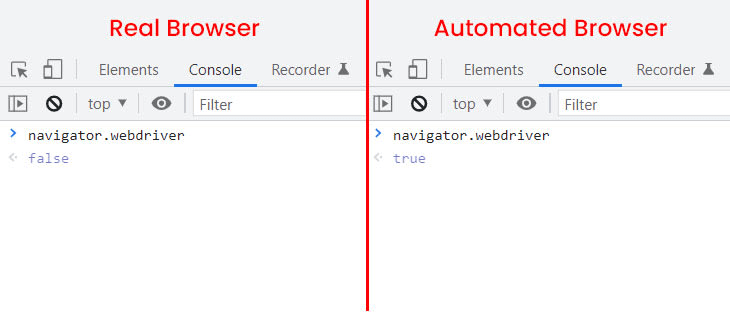
One well-known leak found in headless browsers such as Puppeteer, Playwright, and Selenium is the value of navigator.webdriver. This value is false in regular browsers, but it is true in unfortified headless browsers.
There are over 200 known headless browser leaks, but anti-bot companies often keep some of these leaks secret. Here are some manual ways to fortify your headless browser:
- Use proxies to avoid being detected.
- Rotate user agents to prevent websites from blocking your scraper.
- Use ad blockers or browser extensions that block image loading to reduce the number of tracking pixels and marketing content.
The easiest way to fortify your headless browser is to use the stealth plugin. Developers have released several fortified headless browsers that fix the most important leaks, and the stealth plugin for Puppeteer is one of them.
To use the puppeteer-stealth plugin, install it with npm install puppeteer-extra-plugin-stealth, and then integrate it into your Puppeteer instance with puppeteer.use(StealthPlugin()).
The following example shows how to use Puppeteer Extra with the Stealth plugin:
// Import Puppeteer and the Puppeteer Extra Stealth plugin
const puppeteer = require('puppeteer-extra');
const stealthPlugin = require('puppeteer-extra-plugin-stealth');

// Enable the Stealth plugin with all evasions
puppeteer.use(stealthPlugin());

// Main function to take a screenshot of a webpage
(async () => {
    // Launch the browser in headless mode
    const browser = await puppeteer.launch({
        args: ['--no-sandbox'],
        headless: true
    });

    // Create a new page instance
    const page = await browser.newPage();

    // Navigate to the specified webpage
    const targetUrl = 'https://quotes.toscrape.com/';
    await page.goto(targetUrl);

    // Save a screenshot of the current page
    const screenshotPath = 'screenshot.png';
    await page.screenshot({
        path: screenshotPath
    });

    // Log a message indicating that the screenshot has been saved
    console.log('Screenshot saved at:', screenshotPath);

    // Close the browser
    await browser.close();
})();
The puppeteer-stealth plugin applies various techniques to make the detection of Puppeteer harder. Websites can easily detect Puppeteer, and the goal of this plugin is to avoid detection. If Puppeteer is detected, your requests will be flagged as coming from a bot.
Rotating IP Addresses
Websites can track the number of requests coming from a particular IP address and block scrapers that make a lot of requests. Some websites limit the number of requests a single IP address can make within a certain period. To avoid detection, web scrapers need to rotate their IP addresses.
There are many different types of proxies, and you need to integrate them with Puppeteer in different ways.
The first and simplest type of proxy to integrate with Node.js Puppeteer is a simple HTTP proxy (in the form of an IP address) that does not require authentication. For example:
// Import Puppeteer
const puppeteer = require('puppeteer');

// Specify the proxy URL
const proxyUrl = '11.456.448.110:8080';

// Configure launch options with proxy settings
const launchOptions = {
    args: [
        `--proxy-server=${proxyUrl}`
    ]
};

// Main function to launch Puppeteer, open a page with a proxy, and display the IP
(async () => {
    // Launch the browser with specified launch options
    const browser = await puppeteer.launch(launchOptions);

    const page = await browser.newPage();

    await page.goto('https://httpbin.org/ip');

    // Extract the page content (IP information)
    const pageContent = await page.evaluate(() => document.body.innerText);

    console.log('IP Address:', pageContent);

    await browser.close();
})();
The next method is to use authenticated proxies with Puppeteer. For this method, you need to provide a username and password for authentication. This method is similar to using proxies without authentication, as shown in the above example.
const puppeteer = require('puppeteer');

// ScrapeOps Residential Proxy Credentials
const SCRAPEOPS_API_KEY = 'YOUR_API_KEY'; // Replace with actual API key
const PROXY_HOST = 'residential-proxy.scrapeops.io';
const PROXY_PORT = 8181;

// Configure launch options with the residential proxy
const launchOptions = {
    args: [`--proxy-server=http://${PROXY_HOST}:${PROXY_PORT}`]
};


(async () => {
    const browser = await puppeteer.launch(launchOptions);
    const page = await browser.newPage();


    await page.authenticate({
        username: 'scrapeops',
        password: SCRAPEOPS_API_KEY
    });

    await page.goto('https://httpbin.org/ip');

    // Extract the IP address from the page content
    const pageContent = await page.evaluate(() => document.body.innerText);

    console.log('IP Address:', pageContent);

    await browser.close();
})();
Puppeteer has an authenticate() method that accepts a username and password and uses them to perform basic HTTP authentication. If the credentials are wrong, the proxy server will return a 407 Proxy Authentication Required error, and the script will fail.
The other method is to integrate proxy APIs. Choose proxy providers that offer smart proxy solutions, which handle all the proxy rotation, header selection, ban detection, and retries.
For example, the ScrapeOps Proxy Aggregator offers a proxy port integration. The proxy port integration is a light front-end for the API and has all the same functionality and performance as sending requests to the API endpoint but allows you to integrate our proxy aggregator as you would with any normal proxy.
The following is an example of how to integrate the ScrapeOps Proxy Aggregator into your Puppeteer scraper:
// Import Puppeteer
const puppeteer = require('puppeteer');

// Set ScrapeOps API key and proxy details
const SCRAPEOPS_API_KEY = 'YOUR_API_KEY';
const proxyUrl = 'proxy.scrapeops.io:5353';

// Configure launch options with proxy settings
const launchOptions = {
    args: [`--proxy-server=${proxyUrl}`]
};

// Main function to launch Puppeteer, authenticate with ScrapeOps, and display the IP
(async () => {
    // Launch the browser with specified launch options
    const browser = await puppeteer.launch(launchOptions);

    const page = await browser.newPage();

    // Authenticate with ScrapeOps using the provided API key
    await page.authenticate({
        username: 'scrapeops',
        password: SCRAPEOPS_API_KEY
    });

    // Navigate to a test URL to display the IP using the authenticated proxy
    await page.goto('https://httpbin.org/ip');

    // Extract the page content (IP information) using JavaScript in the context of the page
    const pageContent = await page.evaluate(() => document.body.innerText);

    console.log('IP Address:', pageContent);

    await browser.close();
})();
Puppeteer Extra also provides a plugin for proxies. The puppeteer-extra-plugin-proxy plugin adds proxy support to Puppeteer Extra, which can help avoid rate limiting in web scraping.
The following code uses the puppeteer-extra-plugin-proxy plugin to use a proxy server when launching Puppeteer:
// Import Puppeteer and the Puppeteer Extra Proxy plugin
const puppeteer = require('puppeteer-extra');
const pluginProxy = require('puppeteer-extra-plugin-proxy');

// Use the Proxy plugin with the specified proxy address and port
puppeteer.use(pluginProxy({
    address: '35.236.207.242',
    port: 33333
}));

// Launch Puppeteer in non-headless mode
puppeteer.launch({
    headless: false
}).then(async browser => {
    // Create a new page instance
    const page = await browser.newPage();

    // Navigate to the httpbin website
    await page.goto('https://httpbin.org/ip');

    // Wait for the body element to load.
    const body = await page.waitForSelector('body');

    // Get the IP address from the body element
    const ip = await body.getProperty('textContent');

    console.log(await ip.jsonValue());

    await browser.close();
});
Learn more about using proxies with NodeJS puppeteer here.
Rotating User-Agents
Websites can detect and block bots that send requests using the same user agent every time. Therefore, when scraping the web at scale, it is important to rotate user agents to avoid being blocked by websites.
Too many requests with the same HTTP headers are suspicious; an actual user would not visit 500 pages within two minutes. Rotate your headers to avoid attracting attention.
Puppeteer offers a couple of methods to rotate the user agent: The manual method involves collecting a pool of user agents and selecting one randomly for each request. You can find the latest web browser and operating system user agents here.
const puppeteer = require('puppeteer');

// Function to generate a random user agent
const generateRandomUA = () => {
    // Array of random user agents
    const userAgents = [
        'Mozilla/5.0 (Windows NT 10.0; Win64; x64) AppleWebKit/537.36 (KHTML, like Gecko) Chrome/109.0.0.0 Safari/537.36',
        'Mozilla/5.0 (Macintosh; Intel Mac OS X 10_15_7) AppleWebKit/537.36 (KHTML, like Gecko) Chrome/109.0.0.0 Safari/537.36',
        'Mozilla/5.0 (Windows NT 10.0; Win64; x64) AppleWebKit/537.36 (KHTML, like Gecko) Chrome/108.0.0.0 Safari/537.36',
        'Mozilla/5.0 (Macintosh; Intel Mac OS X 10_15_7) AppleWebKit/537.36 (KHTML, like Gecko) Chrome/108.0.0.0 Safari/537.36',
        'Mozilla/5.0 (X11; Linux x86_64) AppleWebKit/537.36 (KHTML, like Gecko) Chrome/108.0.0.0 Safari/537.36',
        'Mozilla/5.0 (Macintosh; Intel Mac OS X 10_15_7) AppleWebKit/605.1.15 (KHTML, like Gecko) Version/16.1 Safari/605.1.15',
        'Mozilla/5.0 (Macintosh; Intel Mac OS X 13_1) AppleWebKit/605.1.15 (KHTML, like Gecko) Version/16.1 Safari/605.1.15'
    ];
    // Get a random index based on the length of the user agents array
    const randomUAIndex = Math.floor(Math.random() * userAgents.length);
    // Return a random user-agent using the index above
    return userAgents[randomUAIndex];
};

// Main function to launch Puppeteer and retrieve user agent from a random page
(async () => {
    // Launch the browser
    const browser = await puppeteer.launch({
        headless: 'new',
    });

    // Open a new blank page
    const page = await browser.newPage();

    // Custom user agent from generateRandomUA() function
    const customUA = generateRandomUA();

    // Set custom user agent
    await page.setUserAgent(customUA);

    // Navigate the page to the target website
    await page.goto('https://httpbin.io/user-agent');

    // Get the text content of the page's body
    const content = await page.evaluate(() => document.body.textContent);

    console.log('HTTPbin User Agent:', content.trim());

    await page.close();

    await browser.close();
})();
Here, we've created a separate function that returns a different UA whenever it's called.
The best approach is to use the puppeteer-extra-plugin-anonymize-ua plugin, which anonymizes the user agent header sent by Puppeteer.
To use the puppeteer-extra-plugin-anonymize-ua plugin, install it using the following command:
npm install puppeteer-extra-plugin-anonymize-ua
After using the anonymizeUaPlugin() method, all requests made by Puppeteer will have their User-Agent (UA) strings anonymized.
// Import Puppeteer and the Puppeteer Extra Anonymize UA plugin
const puppeteer = require('puppeteer-extra');
const anonymizeUaPlugin = require('puppeteer-extra-plugin-anonymize-ua');

// Use the Anonymize UA plugin
puppeteer.use(anonymizeUaPlugin());

(async () => {
    // Launch the browser
    const browser = await puppeteer.launch();

    // Create a new page instance
    const page = await browser.newPage();

    // Navigate to the target website
    await page.goto('https://quotes.toscrape.com/');

    await page.screenshot({
        path: 'screenshot.png'
    });

    await browser.close();
})();
Optimizing Page Load and Navigation Speed
Slow page loading can have a significant impact on scraping speed, particularly when dealing with websites that contain a large amount of content or have complex structures.
Here are some important tips for optimizing page load and navigation speed:
- Implement page load optimizations: Disable images, CSS, or JavaScript that are not essential for data extraction.
- Use page.goto() options: Set a timeout and wait until the necessary elements are visible before proceeding with data extraction.
Disabling unnecessary images, CSS, and JavaScript ultimately reduces the amount of data that needs to be loaded, thereby improving the efficiency of the scraping process.
The following code disables the CSS and images from the website, which in turn improves page loading and navigation speed.
const puppeteer = require('puppeteer');

async function run() {
    // Launch Puppeteer in non-headless mode
    let browser = await puppeteer.launch({ headless: false });

    // Create a new page instance
    let page = await browser.newPage();

    // Set viewport size to 1920x1080
    await page.setViewport({ width: 1920, height: 1080 });

    // Enable request interception
    await page.setRequestInterception(true);

    // Intercept requests and block certain resource types
    page.on('request', (req) => {
        if (req.resourceType() === 'stylesheet' || req.resourceType() === 'font' || req.resourceType() === 'image') {
            req.abort();
        } else {
            req.continue();
        }
    });

    // Navigate to the eBay website
    await page.goto('https://www.ebay.com/');

    await page.close();

    await browser.close();
}

// Run the function
run();
This is how the website appears after blocking the CSS and images. By doing so, the website will load more quickly and navigation will be more responsive.

Other methods include using the page.goto options to specify a timeout and waiting until the required elements are visible before proceeding with data extraction. Puppeteer needs to determine when to execute the next action when navigating to a URL.
In the following code, a 30-second timeout is set for page navigation. The script navigates to the specified URL with the specified timeout and waits for the domcontentloaded event, which indicates that the initial HTML content of the page has been fully loaded.
Subsequently, the script waits until an element with the CSS class .main-content becomes visible on the page. The visible: true option ensures that the script waits for the element to be both present in the DOM and visible.
const puppeteer = require('puppeteer');

async function run() {
    try {
        // Launch a headless browser
        const browser = await puppeteer.launch({ headless: false });

        // Open a new page
        const page = await browser.newPage();

        // Set a timeout for page navigation (e.g., 30 seconds)
        const navigationTimeout = 30000; // in milliseconds

        // Navigate to the target URL with a timeout
        await page.goto('https://www.ebay.com/', { timeout: navigationTimeout, waitUntil: 'domcontentloaded' });

        // Wait until the necessary elements are visible
        const targetElementSelector = '.main-content';
        await page.waitForSelector(targetElementSelector, { visible: true, timeout: navigationTimeout });

        // Close the browser
        await browser.close();
    } catch (err) {
        console.error(`An error occurred: ${err.message}`);
    }
}

// Run the function
run();
Efficient Element Selection and Interactions
Efficient element selection and interaction with DOM elements can ultimately lead to the optimization of Puppeteer.
Here are some of the most important tips for efficient element selection and interaction:
- As discussed in the previous section, wait for a complete page load using methods like
timeout,waitForSelector, orwaitUntil. - Opt for more efficient selectors like ID or class names over complex XPath expressions to improve the speed of element selection.
- Minimize the use of repetitive interactions by batching actions wherever possible to reduce the number of DOM interactions.
Using ID or class names over XPath expressions improves the speed of element selection. This approach is highly recommended because using ID or class names is slightly more optimized than XPath and is also easier to read and write.
In the following code, XPath appears to be more complex than the ID selector.
const puppeteer = require('puppeteer');

(async () => {
    try {
        // Launch Puppeteer and create a new page
        const browser = await puppeteer.launch();
        const page = await browser.newPage();

        // Navigate to the target URL
        await page.goto('http://the-internet.herokuapp.com/tables');

        // Extract values using $$eval with ID selector
        const idValue = await page.$$eval('#table2 tbody .dues', dues => {
            return dues.map(due => due.textContent);
        });

        // Extract values using evaluate and XPath
        const xpathValue = await page.evaluate(() => {
            const duesNodes = document.evaluate("//table[@id='table2']//tr/td[contains(@class,'dues')]", document, null, XPathResult.ORDERED_NODE_SNAPSHOT_TYPE, null);
            const values = [];

            for (let i = 0; i < duesNodes.snapshotLength; i++) {
                values.push(duesNodes.snapshotItem(i).textContent.trim());
            }

            return values;
        });

        // Log the results
        console.log('Result of ID Selector:', idValue);
        console.log('Result of XPath:', xpathValue);

        // Close the browser
        await browser.close();
    } catch (err) {
        console.error(`An error occurred: ${err.message}`);
    }
})();
To minimize the use of repetitive interactions, consider batching actions whenever possible to reduce the number of DOM interactions. This technique can significantly improve performance in Node.js scripts that interact with the Chromium browser.
By batching actions within a single evaluate() function, the number of round-trips between the Node.js process and the Chromium renderer process is reduced.
In cases where a large number of DOM manipulations are being performed, batching these manipulations into a single evaluate function can significantly reduce the time required to complete the manipulations.
const puppeteer = require('puppeteer');

async function scrapeData() {
    try {
        // Launch Puppeteer with headless mode set to false
        const browser = await puppeteer.launch({ headless: false });

        // Create a new page
        const page = await browser.newPage();

        // Navigate to the login page
        await page.goto("http://quotes.toscrape.com/login");

        // Fill in login credentials and submit the form
        await page.evaluate(() => {
            document.querySelector('#username').value = 'satyamtri';
            document.querySelector('#password').value = 'mypass';
            document.querySelector('.btn.btn-primary').click();
        });

        // Wait for navigation to complete
        await page.waitForNavigation();

        // Get the title of the page after login
        const pageTitle = await page.title();
        console.log(`Page title after login: ${pageTitle}`);

        // Close the browser
        await browser.close();
    } catch (err) {
        console.error(`An error occurred: ${err.message}`);
    }
}

// Run the scraping function
scrapeData();
Managing Memory Usage and Resource Consumption
When using Puppeteer for web scraping, it is important to manage memory usage and reduce resource consumption to avoid issues such as memory leaks and excessive CPU usage.
Here are a few easy and effective tips for efficient memory and CPU management when using Puppeteer for web scraping:
- Regularly close and dispose of unnecessary pages, frames, and browser instances. This helps prevent memory leaks and ensures that resources are used efficiently.
- Implement proper error handling and cleanup procedures. This helps ensure that resources are properly released after each scraping operation, even if an error occurs.
To effectively manage resources and prevent memory leaks when using Puppeteer, it's crucial to close and dispose of unnecessary pages and browser instances. Additionally, ensure that resources are properly released after each scraping operation.
In the following code, we've three URLs to visit. Visit each URL one by one. Once the scraping of the first page is complete, close the instance of this page and move on to the subsequent pages. Error handling is also included, so even if any error occurs, the browser instance will be closed to prevent unnecessary pages from remaining open.
const puppeteer = require('puppeteer');

async function scrapeData() {
    let browser;

    try {
        // Launch Puppeteer browser
        browser = await puppeteer.launch();

        // Define a function to perform scraping on a page
        const scrapePage = async (url) => {
            const page = await browser.newPage();

            try {
                // Navigate to the specified URL
                await page.goto(url, { waitUntil: 'domcontentloaded' });

                // Extract JSON data using Puppeteer
                const jsonData = await page.evaluate(() => {
                    const preElement = document.querySelector('pre');
                    return preElement.textContent;
                });

                // Log the extracted JSON data
                console.log(jsonData);

            } finally {
                // Close the page to free up resources
                await page.close();
            }
        };

        // Scraping multiple pages
        const pagesToScrape = ['https://httpbin.dev/json', 'https://httpbin.dev/ip', 'https://httpbin.dev/hostname'];

        // Loop through the URLs and perform scraping
        for (const url of pagesToScrape) {
            await scrapePage(url);
        }

    } catch (error) {
        console.error('An error occurred:', error);

    } finally {
        // Close the browser instance, even if an error occurs
        if (browser) {
            await browser.close();
        }
    }
}

// Run the scraping and closing function
scrapeData();
Implementing Error Handling and Retry Mechanisms
Another way to optimize your Puppeteer scraper is to use robust error handling and retry mechanisms, as your script might throw errors and crash. When running the script, you might face network failures and intermittent issues, so implementing error handling helps ensure that your script runs smoothly.
A very common method is to use try/catch blocks. This can help you catch any possible errors and handle them more gracefully. For example, if you're trying to navigate to a webpage and encounter an error, you can use a try-catch block to handle the error and prevent your code from crashing.
In the following code, we are also trying to capture specific errors, such as network errors or timeout errors.
const puppeteer = require('puppeteer');

async function scrapeData() {
    let browser;

    try {
        // Launch Puppeteer browser
        browser = await puppeteer.launch();

        // Create a new page in the browser
        const page = await browser.newPage();

        // Navigate to the specified URL
        await page.goto('https://httpbin.dev/ip');

        // Wait for the specified selector to appear on the page
        await page.waitForSelector('#pre'); // This will throw a TimeoutError as selector is not found

        // Extract JSON data using Puppeteer
        const jsonData = await page.evaluate(() => {
            const preElement = document.querySelector('pre');
            return preElement.textContent;
        });

        // Log the extracted JSON data
        console.log(jsonData);

        // Close the browser
        await browser.close();

    } catch (error) {
        if (error.name === 'TimeoutError') {
            // Handle TimeoutError
            console.error('Timeout Error:', error);
        } else if (error.name === 'NetworkError') {
            // Handle NetworkError
            console.error('Network Error:', error);
        } else {
            // Handle other errors
            console.error('An unexpected error occurred:', error);
        }

        // Close the browser if it's still open after an error
        if (browser) {
            await browser.close();
        }
    }
}

// Run the scraping and closing function
scrapeData();
In the above code, the TimeoutError will occur as the #pre selector is not present. It will keep searching for it, and ultimately, it will throw the TimeoutError, which your script will catch.
Puppeteer provides a page.setDefaultNavigationTimeout() function that allows you to set a default timeout for page navigation operations. This can be useful for handling slow-loading pages that might otherwise cause your script to hang. The default timeout in Puppeteer is 30 seconds. To use custom timeouts, you can use the setDefaultNavigationTimeout function.
const page = await browser.newPage();
await page.setDefaultNavigationTimeout(60000); //timeout 60 seconds now
Utilizing Caching and Request Interception
In a web scraping scenario, it's crucial to avoid unnecessary requests, particularly when you've already retrieved and stored the desired data. The setRequestInterception allows you to check if a requested URL is already present in your cache (previously fetched and stored data). If so, you can serve the response from your cache instead of making a new request.
By selectively permitting or blocking requests, you can considerably enhance the performance of your web scraping script.
In the following code, we are trying to scrape the author names of all the quotes from the website. Here, we've used caching and request interception. This code will first check if the cache file exists, if it does, then it will read all the data and parse it for further use.
After that, you've to make two interceptions: Request and Response. You set up a request interception to check if the requested URL is in the cache. If it is, you respond with the cached data, otherwise, you continue with the original request.
For each response, you check if the URL is not in the cache and if the response is OK. If both conditions are met, you cache the response and update the cache file.
If you try to make the request again to access the resource, the cache will come into action. This time, you'll retrieve your resources from the cache file that was created with the name cache.json.
const puppeteer = require('puppeteer');
const fs = require('fs');
const path = require('path');

// Define the path for the cache file
const cachePath = path.join(__dirname, 'cache.json');

async function scrapeQuotes(url) {
    // Launch Puppeteer browser
    const browser = await puppeteer.launch();
    // Create a new page in the browser
    const page = await browser.newPage();

    // Check if the cache file exists
    let cache = {};
    if (fs.existsSync(cachePath)) {
        // Read cache data from the file
        const cacheData = fs.readFileSync(cachePath, 'utf-8');
        cache = JSON.parse(cacheData);
    }

    // Enable request interception
    await page.setRequestInterception(true);

    // Intercept requests
    page.on('request', (request) => {
        const url = request.url();
        console.log('Request URL', url);
        if (cache[url]) {
            // Serve request from the cache if available
            request.respond(cache[url]);
        } else {
            // Continue with the original request
            request.continue();
        }
    });

    // Intercept responses to update the cache
    page.on('response', async (response) => {
        const url = response.url();
        console.log('Response URL', url);
        if (!cache[url] && response.ok()) {
            // Cache the response
            cache[url] = {
                status: response.status(),
                contentType: response.headers()['content-type'],
                body: await response.text(),
            };

            // Update the cache file
            fs.writeFileSync(cachePath, JSON.stringify(cache));
        }
    });

    // Navigate to the specified URL
    await page.goto(url);

    // Extract quotes from the page
    const quotes = await page.evaluate(() => {
        const quoteElements = document.querySelectorAll('.quote small.author');
        const quotes = [];
        quoteElements.forEach((quoteElement) => {
            quotes.push(quoteElement.textContent.trim());
        });
        return quotes;
    });

    // Log the extracted quotes
    console.log(quotes);

    // Close the browser
    await browser.close();
}

// URL to scrape quotes from
const url = 'http://quotes.toscrape.com/';
// Run the scraping function
scrapeQuotes(url);
Scalability and Parallel Processing with Puppeteer
Performing web scraping tasks sequentially is not recommended since one process must wait for the other process to complete before continuing. To overcome this problem, we'll execute these actions in parallel, where the processes will run concurrently in order to achieve a faster execution time.
puppeteer-cluster allows you to create a cluster of Puppeteer workers, which means that you can perform multiple tasks simultaneously. To start using Puppeteer Cluster you should start by installing dependencies, for example, via NPM.
npm install puppeteer-cluster
Then, initialize the cluster with the custom Puppeteer instance, and define the task handler using the cluster.task() function, and queue the tasks using cluster.queue().
The following code will launch two concurrent Puppeteer workers, each of which will take screenshots from the URLs in the queue. Once both workers have finished taking screenshots, the script will exit.
const { Cluster } = require("puppeteer-cluster");

(async () => {
    // Launch a Puppeteer cluster
    const cluster = await Cluster.launch({
        concurrency: Cluster.CONCURRENCY_CONTEXT,
        maxConcurrency: 2,
    });

    let i = 0;

    // Define a task for each page to be scraped
    await cluster.task(async ({ page, data: url }) => {
        // Navigate to the specified URL
        await page.goto(url);

        // Capture a screenshot and save it
        const screen = await page.screenshot({
            path: `screenshot${i++}.png`,
            fullPage: true,
        });
    });

    // Queue URLs for scraping
    cluster.queue("http://www.google.com/");
    cluster.queue("http://www.wikipedia.org/");

    // Wait for all tasks to complete
    await cluster.idle();

    // Close the Puppeteer cluster
    await cluster.close();

    console.log("Program is finished!");
})();
Measuring and Monitoring Performance
Effectively monitoring and measuring the performance of your Puppeteer scraping scripts is essential to identify and address potential performance bottlenecks. Several factors can impact the performance of web scraping with Puppeteer, including memory leaks, inefficient DOM manipulation, slow website response times, and more.
Here are some valuable tools to help you measure and monitor the performance of your Puppeteer scripts:
- Chrome DevTools: Chrome DevTools is an integrated tool within Chrome that provides comprehensive performance monitoring capabilities. It allows you to inspect network activity, analyze memory usage, and visualize performance timelines. Puppeteer enables you to activate DevTools during browser launch.
- Lighthouse: Lighthouse is a free and open-source tool that helps optimize website speed, performance, and overall user experience. It can be integrated with Puppeteer to evaluate various aspects of a web page's performance.
- Web Performance APIs: Modern browsers support a range of APIs for collecting web performance metrics and web vitals. The Navigation Timing API provides timestamps for key events in the page load process. A Navigation Timing entry includes metrics such as navigation response time, the used protocol, and document load time.
Performance metrics are invaluable for identifying bottlenecks and optimizing scraping workflows in Puppeteer.
Here's a step-by-step guide on how to utilize performance metrics effectively:
- Total Scraping Time: Measure the overall time it takes to scrape the desired data.
- Network Request Time: Measure the time it takes to fetch data from the target websites. T
- DOM Manipulation Time: Measure the time it takes to process and manipulate the extracted data.
- Memory Usage: Monitor the memory consumption of your scraping script to detect potential memory leaks.
More Web Scraping Tutorials
In this tutorial, you've learned how to optimize Puppeteer for web scraping. We covered various approaches to optimizing Puppeteer, such as rotating IP addresses, rotating user agents, efficient element selection and interaction, and so on. We also learned about managing memory usage and resource consumption, followed by implementing caching and parallel processing.
If you would like to learn more about Web Scraping with Puppeteer, then be sure to check out The Puppeteer Web Scraping Playbook.
Or check out one of our more in-depth guides: