Web Scraping With Celery & RabbitMQ: How to Run Thousands of Scrapers Without Losing Your Mind
Ever had your cron-scheduled scraper crash at 2 AM? Maybe you woke up to discover half your jobs had silently failed, or your IP got blocked.
That's the old way, constantly babysitting brittle scripts.
Let's talk about a hands-free approach: scheduling and running web scrapers at scale using Celery + RabbitMQ.
In this guide, you'll learn how to set up a robust task queue that can handle hundreds or even thousands of scraping jobs, without forcing you to burn the midnight oil.
- TLDR: Why Celery + RabbitMQ Is the Backbone of Scalable Scraping
- When to Use Cron vs. Celery + RabbitMQ
- Prerequisites
- Step 1: Setting Up the Environment
- Step 2: Installing and Configuring RabbitMQ
- Step 3: Creating a Celery Application
- Step 4: Defining Scraping Tasks
- Step 5: Running the Celery Worker
- Step 6: Scheduling Scraping Jobs with Celery Beat (Optional)
- Step 7: Executing Tasks from a Python Script
- Step 8: Monitoring and Debugging Celery Jobs
- Conclusion: Scale Your Scrapers Without Losing Your Mind
- Real-World Example: 50,000+ Daily Scrapes
- Common Pitfalls & Edge Cases
- Alternatives to Celery + RabbitMQ
- Further Reading / Next Steps
Need help scraping the web?
Then check out ScrapeOps, the complete toolkit for web scraping.
TLDR: Why Celery + RabbitMQ Is the Backbone of Scalable Scraping
In this article, we break down how to use Celery + RabbitMQ to build a robust scraper scheduling system. But let’s zoom out for a moment. If you’re managing scraping infrastructure at any real scale, here’s the bigger picture:
-
Stop Thinking in Scripts—Start Thinking in Tasks: Cron jobs are fine—until they’re not. They don’t retry, don’t tell you when they fail, and definitely don’t scale. A task queue model like Celery forces you to structure your scrapers as idempotent, observable, and retryable jobs—exactly what you need to scale reliably.
-
This Stack = Built-In Failure Recovery: Scrapers fail all the time. Captchas hit. IPs get banned. DOMs change. Celery + RabbitMQ gives you retries, backoff, dead letter queues, and monitoring out of the box. This isn’t just about scheduling—it’s scraping resilience engineering.
-
Real-Time Monitoring Isn’t Optional: With Flower, you get a live dashboard of what’s running, stuck, or retrying. If you’re running more than 10 spiders, this visibility is the difference between firefighting and flow.
-
Cron Can’t Keep Up With Complexity: As your scraping operation grows, hardcoded cron schedules become brittle. Celery Beat gives you dynamic, code-driven scheduling that can scale with your project.
-
This Architecture Unlocks Event-Driven Scraping: Want to scrape when a product goes out of stock? Or when a new URL hits your queue? This stack is your gateway to real-time, on-demand scraping flows.
Bottom line: If you’re managing scrapers via cron, this article shows the path to scraping like an engineer, not a sysadmin. The shift to task queues is the foundation for turning your scripts into a real scraping platform.

When to Use Cron vs. Celery + RabbitMQ
Cron Jobs:
- Great for: Simple, infrequent tasks (e.g., backups at midnight).
- Limitations:
- No built-in retries, if it fails, it fails silently.
- Minimal logging or monitoring without extra tooling.
- Hard to manage hundreds of tasks or high concurrency.
Celery + RabbitMQ:
- Great for: Large-scale or high-volume scrapers, real-time task dispatch, automatic retries, and distributed workloads.
- Advantages:
- Auto-Retries: If a scraper hits an error, Celery can retry automatically.
- Scalability: Spin up additional workers or containers when load increases.
- Centralized Monitoring: Tools like Flower give a real-time dashboard.
You can see the differences in a side-by-side comparison table:
| Feature | Cron Jobs | Celery + RabbitMQ |
|---|---|---|
| Best For | Simple, infrequent tasks (e.g., backups at midnight) | Large-scale or high-volume scrapers, real-time task dispatch, automatic retries, and distributed workloads |
| Retries | No built-in retries, if it fails, it fails silently | Auto-Retries: If a scraper hits an error, Celery can retry automatically |
| Logging & Monitoring | Minimal logging or monitoring without extra tooling | Centralized Monitoring: Tools like Flower provide a real-time dashboard |
| Scalability | Hard to manage hundreds of tasks or high concurrency | Spin up additional workers or containers when load increases |
Rule of Thumb:
If you're only running a few simple scripts that rarely fail, cron might be enough. But once you're scaling to dozens (or hundreds) of scraping tasks, Celery + RabbitMQ saves you from 2 AM restarts and gives you the flexibility to grow.
Prerequisites
You'll need familiarity with Python and the following tools:
- Python 3.7+
- Celery + RabbitMQ for task orchestration and queueing
- Requests + BeautifulSoup for web scraping
- Flower for monitoring (optional)
- Docker and Docker Compose (optional)
If you plan to scale to hundreds or thousands of scrapers, consider adding Kubernetes or serverless solutions for elasticity.

Step 1: Setting Up the Environment
You can create a virtual environment (optional but recommended) to keep dependencies clean.
Creating a Virtual Environment
python -m venv venv
source venv/bin/activate  # Linux/macOS
On Windows: venv\Scripts\activate
Installing Python Dependencies
pip install celery kombu requests beautifulsoup4
- Celery: Orchestrates tasks.
- Kombu: Communication layer between Celery & RabbitMQ.
- Requests: Fetch web pages.
- BeautifulSoup: Parses HTML.
Step 2: Installing and Configuring RabbitMQ
To handle scraping tasks asynchronously, we need a message broker—and RabbitMQ is a perfect fit. It acts as the middle layer between your application and the Celery workers, managing the queue of tasks and ensuring reliable delivery.
How RabbitMQ Fits into the Workflow
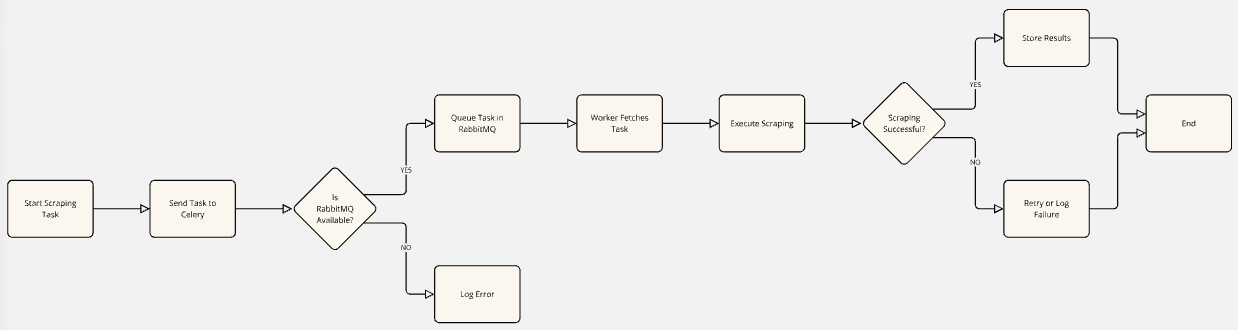
- Client Side: Your app sends a task to Celery (e.g., “scrape this URL”).
- Task Queuing: Celery passes the task to RabbitMQ, which queues it.
- Worker Pickup: A Celery worker listens to the queue and picks up the task.
- Task Execution: The worker runs the scraping job.
- Result Handling: The result is either returned or stored, depending on your backend setup.
Ubuntu / Debian-Based Systems
Install RabbitMQ with:
sudo apt-get install curl gnupg apt-transport-https -y
# (Add the RabbitMQ signing key and repository if not already added)
sudo apt-get update -y
sudo apt-get install rabbitmq-server -y --fix-missing
sudo systemctl start rabbitmq-server
macOS
Using Homebrew:
brew install rabbitmq
brew services start rabbitmq
Windows
Using Chocolatey:
choco install rabbitmq
rabbitmq-service.bat start
Verifying RabbitMQ is Running
Check if RabbitMQ is up and running with the appropriate command for your OS:
# Ubuntu
sudo systemctl status rabbitmq-server

# macOS
rabbitmqctl status

# Windows
rabbitmq-service.bat status
Once RabbitMQ is running successfully, your system is ready to queue and dispatch scraping tasks.

Step 3: Creating a Celery Application
Now that RabbitMQ is running, we need to create a Celery app that knows how to communicate with it and route our scraping tasks properly.
Create a file named celery_config.py and add the following:
from celery import Celery

app = Celery('scraper', broker='pyamqp://guest@localhost//', backend='rpc://')

# Force Celery to use 'scraping' as the default queue
app.conf.task_default_queue = 'scraping'

# Explicitly route the scrape task to the 'scraping' queue
app.conf.task_routes = {
    'tasks.scrape': {'queue': 'scraping'}
}

# Ensure the task module is loaded and registered
import tasks
app.autodiscover_tasks(['tasks'])
What this does:
- Creates a Celery app instance named
'scraper'and connects it to RabbitMQ via the AMQP protocol. - Specifies
rpc://as the backend, which allows you to fetch results from completed tasks. - Sets
'scraping'as the default queue, so all tasks will go there unless otherwise specified. - Adds a routing rule to ensure that the
tasks.scrapefunction is always sent to thescrapingqueue. - Autodiscovers and registers tasks from the
tasksmodule, so Celery knows what jobs it can execute.
This file acts as the central configuration for your scraping task system, tying together your worker processes, queue logic, and task registration.

Step 4: Defining Scraping Tasks
Our Celery workers need to know what tasks to execute. This is where we define those tasks—starting with a simple web scraping function. Create a file called tasks.py:
from celery_config import app
import requests
from bs4 import BeautifulSoup
from celery import shared_task

@shared_task
def scrape(url):
    response = requests.get(url)
    soup = BeautifulSoup(response.text, 'html.parser')
    return soup.title.text if soup.title else "No title found"
Let’s break down what this code is doing:
@shared_taskis a decorator that turns thescrapefunction into a Celery task. This means it can be called asynchronously by a worker.- The function accepts a URL, sends an HTTP GET request using
requests, and parses the response usingBeautifulSoup. - It returns the
<title>of the page if found, or a fallback message otherwise.
This is a very basic example to demonstrate how Celery can run background tasks. In real-world use cases, you can extend this to include:
- Proxy rotation to avoid IP bans.
- Custom headers or browser emulation to bypass bot protection.
- Retry logic for failed requests.
- Task chaining and grouping to coordinate complex workflows.
- Writing results to a database, cloud storage, or sending notifications.
By keeping your scraping logic in Celery tasks, you make your scraping system scalable, fault-tolerant, and easier to manage.

Step 5: Running the Celery Worker
With your task defined and your queue configured, it's time to start a Celery worker to process incoming jobs. You can do that with the following command:
celery -A celery_config worker --loglevel=info -Q scraping
Let’s break it down:
-A celery_configtells Celery to use the app defined in yourcelery_config.pyfile.workerstarts a worker process that listens for and executes tasks.--loglevel=infogives you informative logs about what the worker is doing—ideal for development and debugging.-Q scrapingrestricts the worker to only process tasks from thescrapingqueue (which we configured earlier).

Once the worker is up and running, you should see a "ready" message in your terminal. This means the worker is actively listening for tasks and is ready to process jobs from the queue.
Scaling Celery
Need to handle more URLs or increase throughput? Just spin up more workers:
celery -A celery_config worker --loglevel=info -Q scraping --concurrency=4
This runs the worker with 4 concurrent processes (or threads, depending on the pool setting), allowing it to process multiple tasks in parallel.
You can run multiple worker instances across machines too—this is how Celery scales horizontally to handle large workloads efficiently.

Step 6: Scheduling Scraping Jobs with Celery Beat (Optional)
If you want your scraping jobs to run automatically at set intervals—like every hour or every day—Celery Beat is your go-to tool. Think of it as a smarter, more flexible version of cron, but with the added benefits of:
- Centralized logging
- Auto-retries for failed jobs
- Seamless integration with your existing Celery workers
#1 Install the Required Packages
You'll need Redis as a message broker (if not already installed), along with the Celery Beat scheduler:
pip install celery[redis] django-celery-beat
You don’t need Django to use django-celery-beat, but if you already use Django, it integrates well.
#2 Add a Beat Schedule to Your Celery Config
Open your celery_config.py and define the periodic task schedule:
from celery.schedules import crontab

app.conf.beat_schedule = {
    'scrape-every-hour': {
        'task': 'tasks.scrape',
        'schedule': crontab(minute=16, hour='*'),  # Runs at HH:16 every hour
        'args': ('https://example.com',),
    },
}
Explanation:
'scrape-every-hour'is a unique name for the scheduled task.'task'points to the task you want to run.'schedule'usescrontab()to define the time—this example runs at 16 minutes past every hour.'args'contains the arguments passed to the task (in this case, a URL to scrape).
#3 Start the Beat Scheduler
Once your schedule is defined, start the Celery Beat service with:
celery -A celery_config beat --loglevel=info
This runs a lightweight scheduler process that triggers your tasks at the configured times.
If you make changes to the schedule, you may need to restart your workers to ensure everything syncs properly.

Once running, you’ll see logs each time a task is triggered. You now have a fully automated scraping job running on a schedule—perfect for hourly updates, daily checks, or recurring crawls.

Step 7: Running Scraping Tasks On-Demand
Sometimes you don’t need a recurring schedule—you just want to trigger a scrape on demand, whether it's from a script, an API, or a button click in a UI. Here’s how to do it using Celery.
#1 Create a Task Runner Script
Create a new file called task_runner.py:
from tasks import scrape

result = scrape.delay('https://example.com')
print(result.get())  # Retrieve result once completed
What’s happening here?
scrape.delay(...)is a shortcut to enqueue the task asynchronously.- This tells Celery: “Run the
scrapetask with this argument whenever a worker is available.” result.get()blocks until the result is ready, then prints the returned value (in this case, the page title).
If you don't need to wait for the result, just use .delay() without calling .get().
#2 Observe the Logs
When the script runs, you'll see output like this in your terminal:
-
Worker logs showing the task being received and executed:

-
Task runner output showing the returned result (the page title or fallback message):

Why Use Celery for On-Demand Tasks?
Traditionally, long-running scripts block your program until they finish. With Celery:
- Your code stays non-blocking and responsive.
- Tasks are handled in the background, making your app more scalable.
- You get retries, timeouts, and logging for free.
This setup is ideal for triggering scrapes from:
- Webhooks or APIs
- Dashboards or admin tools
- Other Python scripts or services
Step 8: Monitoring and Debugging Celery Jobs
Keeping an eye on your Celery tasks is essential for debugging issues, spotting performance bottlenecks, and ensuring everything runs smoothly. Here’s how to monitor your scraping jobs both via the command line and a web dashboard.
Checking the Task Queue
Use Celery's built-in inspection commands to see what tasks are currently in progress, scheduled, or waiting to be picked up:
celery -A celery_config inspect active
celery -A celery_config inspect scheduled
celery -A celery_config inspect reserved
active: Lists tasks currently being processed by workers.scheduled: Shows tasks scheduled to run in the future (e.g., from Celery Beat).reserved: Displays tasks that are queued and waiting to be processed.
These commands are super helpful for real-time debugging—allowing you to see whether tasks are stuck, delayed, or properly reaching your queue.

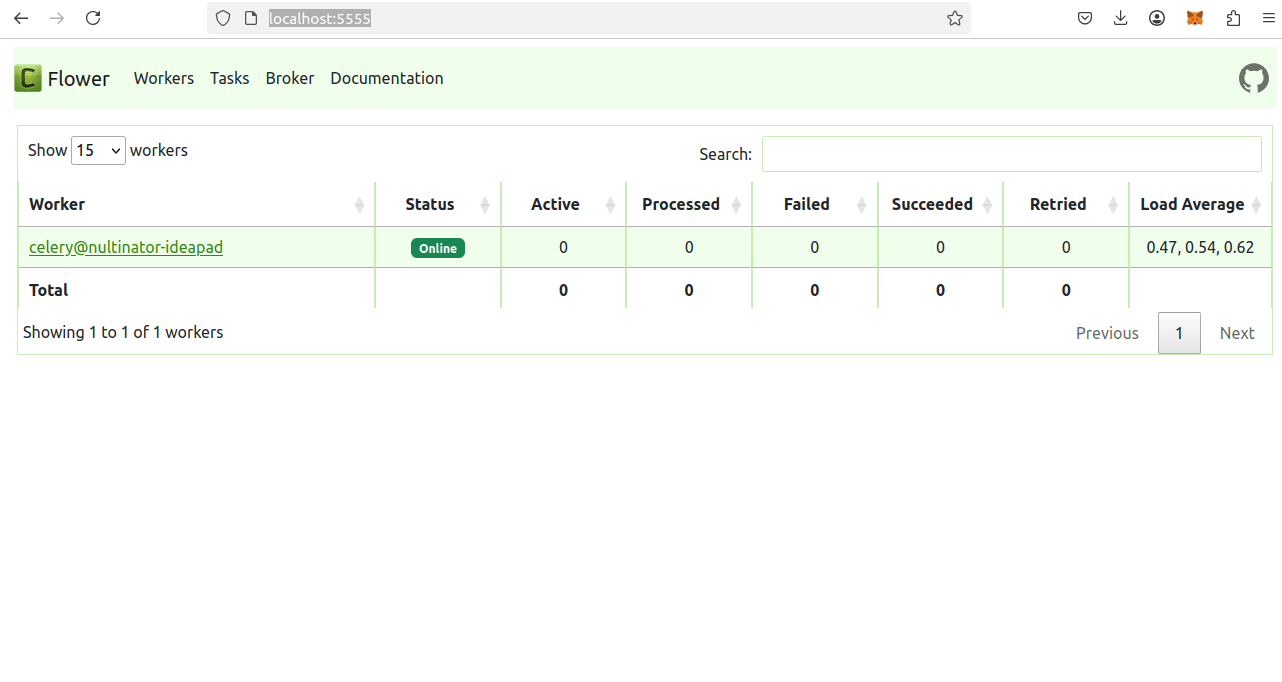
Real-Time Monitoring with Flower
For a visual dashboard that tracks everything your Celery system is doing, use Flower. It's a powerful, real-time monitoring tool for Celery.
Install Flower:
pip install flower
Start Flower:
celery -A celery_config flower
Once running, open your browser and visit http://localhost:5555.
You’ll get a live dashboard where you can:
- View real-time task execution status (pending, started, succeeded, failed)
- Monitor worker status, uptime, and performance
- Track retry attempts and errors
- Revoke or re-execute tasks manually
- Drill down into individual task arguments and results
Conclusion: Scale Your Scrapers Without Losing Your Mind
By combining Celery with RabbitMQ, you’ve built more than just a scraper—you’ve built a resilient, scalable scraping system.
With this setup, you can:
- ✅ Auto-Retry failed tasks without lifting a finger
- 🚀 Distribute scraping jobs across multiple workers or servers
- 📈 Monitor and debug everything in real-time with full transparency
Say goodbye to:
- 😫 Cron jobs that fail silently in the night
- 😴 2 AM emergency scraper restarts
- 🧍♂️ Manually babysitting scripts to keep them alive
This architecture is battle-tested and ready to grow with you. Whether you’re scraping 10 pages or 10 million, you now have the foundation to:
- Scale horizontally across machines
- Add scheduling, proxy rotation, and error handling with ease
- Keep your workflows maintainable and production-ready
Build smart. Sleep well. Let Celery do the heavy lifting.

Real-World Example: 50,000+ Daily Scrapes
Imagine collecting data from hundreds of sites, some updated hourly, others multiple times a day.
One team we worked with scaled to 50,000+ daily scrapes using Celery + RabbitMQ.
Here's how they did it:
-
Distributed Workers
- Multiple Celery workers (10+ instances) running on separate servers handled the load.
- Each worker had the same codebase but pointed to a shared RabbitMQ instance, ensuring even task distribution (no single worker overloaded).
-
Smart Task Partitioning
- Rather than a single massive scraping function, they broke down jobs by site and page category (e.g., product pages, pricing pages).
- This modular approach let them rerun or retry just the failing piece without restarting every task, keeping partial successes intact.
-
Monitoring & Alerting
- Flower provided real-time metrics on task throughput, failures, and queue sizes.
- Alerts fired when queue lengths exceeded thresholds (indicating possible slowdowns or outages).
- Developers used these insights to spin up extra workers or investigate site-specific bans.
-
Auto-Retries & Backoff
- Transient failures (like slow responses or minor site outages) triggered Celery retries automatically, often succeeding on the second or third attempt.
- Backoff strategies (e.g., exponential delays) protected workers from hammering a temporarily unavailable site.
-
Proxy Rotation
- With sites that limit scraping aggressively, they rotated through hundreds of IPs to avoid bans.
- Each task automatically fetched a fresh proxy from a pool, preventing widespread IP blocks that would affect all scrapers.
-
Minimal On-Call Stress
- Before Celery, the team ran ad hoc cron jobs that constantly broke in the middle of the night.
- After switching to queue-based scheduling, 2 AM alerts dropped significantly because tasks auto-rescheduled themselves, no human intervention needed unless a real systemic issue occurred (like RabbitMQ going down).
Key Lessons Learned
- Buffer your tasks: Spread out scrapes over time. Don't launch all 50k tasks at once; instead, batch them or use Celery Beat for smaller, more frequent intervals.
- Know your site targets: If a site imposes strict rate limits, throttling or proxy rotation is essential.
- Log everything: Detailed logs of request/response metadata helped them debug issues at scale (like repeating 403 errors from certain proxies).
Common Pitfalls & Edge Cases
-
Rate Limits & IP Blocks
- At high volumes, rotating proxies or applying backoff strategies (Celery retries) can prevent bans.
- Consider dynamic user agents and request pacing to avoid triggering aggressive rate limiting.
-
Long-Running Tasks
- A single scrape might involve parsing multiple pages or complex JavaScript rendering.
- Splitting large scrapes into sub-tasks, each handling a piece of the workflow, helps avoid timeouts and simplifies retries.
-
Broker Failovers
- RabbitMQ is robust, but for mission-critical uptime, many teams cluster RabbitMQ across multiple servers.
- This way, a single node failure doesn't stall all tasks.
-
Memory Leaks
- Watch for memory usage in your scraping code, especially if Celery workers run for days without restart.
- If you're parsing huge JSON files or storing large results, consider offloading data quickly to a database rather than keeping it in memory.
Alternatives to Celery + RabbitMQ
-
RQ (Redis Queue)
- Simpler than Celery, but lacks certain advanced features like built-in scheduling or comprehensive worker management.
- Fine for smaller workloads or if you're already using Redis extensively.
-
Airflow
- Great for complex DAGs (Directed Acyclic Graphs) and orchestrating multi-step pipelines (e.g., scrape → transform → load).
- Heavier to set up and possibly overkill if you just need simpler scheduling and retries.
-
Kubernetes CronJobs
- If you're fully on Kubernetes, CronJobs handle time-based tasks in a containerized environment.
- However, you lose Celery's built-in retries, result handling, and monitoring unless you build your own solution around it.
What's your experience scaling scrapers?
- Still love cron?
- Prefer Celery alternatives like RQ or Airflow?
Share your thoughts and best practices!
More Web Scraping Guides
For even bigger workloads, investigate Kubernetes, serverless workers, and proxy rotation solutions.
Explore specialized scraping tutorials:
By integrating these into your Celery + RabbitMQ pipeline, you'll keep data flowing at any scale, without losing your mind.