Web Scraping Part 6 - Using Proxies
Now that you’ve learned how to spoof user‑agents and browser headers to look like a real visitor, it’s time to tackle the next common roadblock: IP‑based blocking. In this last installment we’ll show you how to slip past those limits by routing your requests through proxies—servers that mask your real address and make every hit look like it’s coming from somewhere new.
We’ll cover why proxies matter, compare the three most practical ways to use them (rotating lists, gateways, and proxy APIs), and then drop each option straight into the scraper you built earlier in the series. By the end, you’ll be able to scrape reliably - even from sites that rate‑limit, geo‑lock, or outright block single IPs—without rewriting your whole codebase.
- Python Requests + BeautifulSoup
- Node.js Axios + Cheerio
- Node.js Puppeteer
- Node.js Playwright

Python Requests/BS4 Beginners Series Part 6: Proxies
So far in this Python Requests/BeautifulSoup 6-Part Beginner Series, we have learned how to build a basic web scraper Part 1, scrape data from a website in Part 2, clean it up, save it to a file or database in Part 3, and make our scraper more robust and scalable by handling failed requests and using concurrency in Part 4. We also learned how to use fake user-agents and browser headers to bypass restrictions on sites trying to prevent scraping in Part 5
In Part 6, we'll explore how to use proxies to bypass various website restrictions by hiding your real IP address and location without needing to worry about user agents and headers.
- Why Use Proxies
- The 3 Most Common Proxy Integration
- Integrate Proxy Aggregator into the Existing Scraper
- Complete Code
- Conclusion
Need help scraping the web?
Then check out ScrapeOps, the complete toolkit for web scraping.
Python Requests/BeautifulSoup 6-Part Beginner Series
-
Part 1: Basic Python Requests/BeautifulSoup Scraper - We'll go over the basics of scraping with Python, and build our first Python scraper. (Part 1)
-
Part 2: Cleaning Dirty Data & Dealing With Edge Cases - Web data can be messy, unstructured, and have lots of edge cases. In this tutorial we'll make our scraper robust to these edge cases, using data classes and data cleaning pipelines. (Part 2)
-
Part 3: Storing Data in AWS S3, MySQL & Postgres DBs - There are many different ways we can store the data that we scrape from databases, CSV files to JSON format, and S3 buckets. We'll explore several different ways we can store the data and talk about their pros, and cons and in which situations you would use them. (Part 3)
-
Part 4: Managing Retries & Concurrency - Make our scraper more robust and scalable by handling failed requests and using concurrency. (Part 4)
-
Part 5: Faking User-Agents & Browser Headers - Make our scraper production ready by using fake user agents & browser headers to make our scrapers look more like real users. (Part 5)
-
Part 6: Using Proxies To Avoid Getting Blocked - Explore how to use proxies to bypass anti-bot systems by hiding your real IP address and location. (Part 6)
The code for this project is available on GitHub.
Why Use Proxies?
Scraping data from websites can be tricky sometimes. Websites might restrict you based on your location or block your IP address. This is where proxies come in handy.
Proxies help you bypass these restrictions by hiding your real IP address and location. When you use a proxy, your request gets routed through a proxy server first, acting as an intermediary. This way, the website only sees the proxy's IP address, not yours.
Websites often serve different information based on specific locations. Without a proxy, you might not be able to access information that's relevant to your needs if you're not located in a particular location.
Furthermore, proxies offer an extra layer of security by encrypting your data as it travels between your device and the server. This protects your data from being thwarted by third parties.
Additionally, you can use multiple proxies at the same time to distribute your scraping requests across different IP addresses, avoiding website rate limits.
The 3 Most Common Proxy Integration
Let's dive into integrating Python Requests with the 3 most common proxy formats:
- Rotating Through a List of Proxy IPs
- Using Proxy Gateways
- Using Proxy API Endpoints
Previously, proxy providers offered lists of IP addresses, and you'd configure your scraper to cycle through them, using a new IP for each request. However, this method is less common now.
Many providers now offer access through proxy gateways or proxy API endpoints instead of raw lists. These gateways act as intermediaries, routing your requests through their pool of IPs.
Proxy Integration #1: Rotating Through Proxy IP List
Using rotating proxies is crucial because websites can restrict access to scrapers that send many requests from the same IP address. This technique makes it harder for websites to track and block your scraping activity by constantly changing the IP address used.
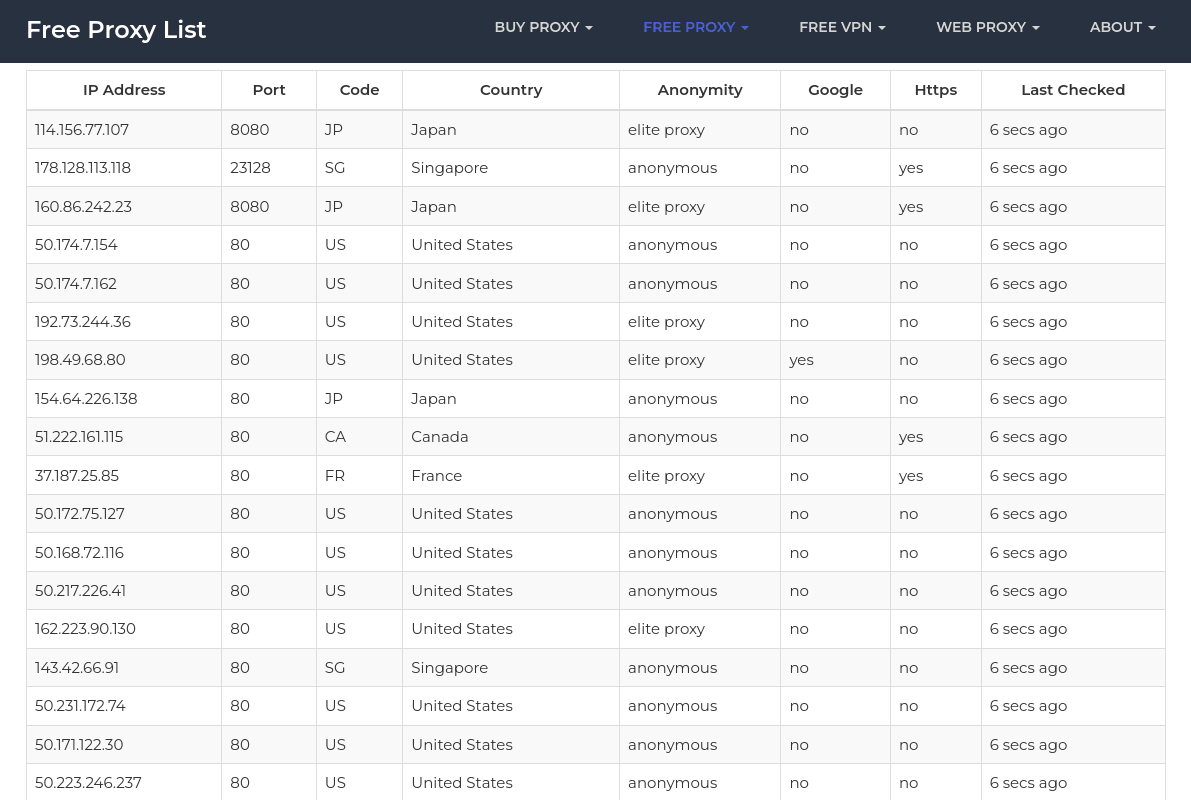
The code snippet fetches a list of free proxies from the Free Proxy List website. It extracts proxy information (IP address and port). Next, it filters out proxies that do not support HTTPS and returns a set of unique proxy entries.
import requests
from bs4 import BeautifulSoup
from itertools import cycle

def get_proxies():
    # Fetching proxies from a website
    url = "https://free-proxy-list.net/"
    response = requests.get(url)
    soup = BeautifulSoup(response.text, "html.parser")

    # Extracting proxy information from the HTML
    proxies = set()
    rows = soup.select("tbody tr")

    for row in rows:
        td7 = row.select_one("td:nth-child(7)")

        # Checking if the proxy supports HTTPS
        if td7 and td7.text.strip().lower() == "yes":
            td1 = row.select_one("td:nth-child(1)").text.strip()
            td2 = row.select_one("td:nth-child(2)").text.strip()

            # Combining IP and Port to form a proxy entry
            combined_result = f"{td1}:{td2}"
            proxies.add(combined_result)
    return proxies

# Obtain the set of proxies and create a cycle
proxies = cycle(get_proxies())
url = "https://icanhazip.com/"

for i in range(1, 6):
    # Selecting the next proxy from the cycle for each request
    proxy = next(proxies)

    try:
        # Making a request using the selected proxy
        response = requests.get(url, proxies={"http": proxy, "https": proxy})

        # Checking for HTTP errors in the response
        response.raise_for_status()

        print(
            f"Request #{i} successful. IP Address: {response.text.strip()}", end="\n")
    except Exception as e:
        # Skip free proxies with connection errors; retry the request with the next proxy in the cycle..
        print(f"Request #{i} failed! Exception Name: {type(e).__name__}")
The cycle function takes an iterable and creates an iterator that endlessly cycles through its elements. You can select the random proxy from this iterator using the next function.
Keep in mind that using free proxies can have limitations. Not all proxies may work perfectly, and that’s why we tried five times using a loop.
The output shows that only 2 attempts were successful out of 5 total attempts. The fetched IP address belongs to the proxy, not your own. This indicates that the HTTPS request was indeed routed through a proxy.

This is a simplistic example. For larger-scale scraping, you would require monitoring individual IP performance and removing banned/blocked ones from the proxy pool.
Proxy Integration #2: Using Proxy Gateway
Many proxy providers are moving away from selling static IP lists and instead offer access to their proxy pools through a gateway. This eliminates the need to manage and rotate individual IP addresses, as the provider handles that on your behalf. This has become the preferred method for using residential and mobile proxies, and increasingly for datacenter proxies as well.
Here is an example of how to integrate BrightData's residential proxy gateway into your Python Requests scraper:
import requests
proxies = {
    'http': 'http://brd.superproxy.io:22225',
    'https': 'http://brd.superproxy.io:22225',
}

url = 'https://icanhazip.com/'

response = requests.get(url, proxies=proxies, auth=(
    'Username', 'Password'))
print(response.status_code)
Integrating via a gateway is significantly easier compared to a proxy list as you don't have to worry about implementing all the proxy rotation logic.
Proxy Integration #3: Using Proxy API Endpoint
Recently, many proxy providers have begun offering smart proxy APIs. These APIs manage your proxy infrastructure by automatically rotating proxies and headers allowing you to focus on extracting the data you need.
Typically, you send the URL you want to scrape to an API endpoint, and the API returns the HTML response. While each provider's API integration differs slightly, most are very similar and easy to integrate with.
Here's an example of integrating with the ScrapeOps Proxy Manager:
import requests
from urllib.parse import urlencode

payload = {'api_key': 'APIKEY', 'url': 'https://httpbin.org/ip'}
r = requests.get('https://proxy.scrapeops.io/v1/', params=urlencode(payload))
print r.text
Here you simply send the URL you want to scrape to the ScrapeOps API endpoint in the URL query parameter, along with your API key in the api_key query parameter. ScrapeOps will then locate the optimal proxy for the target domain and deliver the HTML response directly to you.
You can get your free API key with 1,000 free requests by signing up here.
Note that, when using proxy API endpoints it is very important to encode the URL you want to scrape before sending it to the Proxy API endpoint. If the URL contains query parameters then the Proxy API might think that those query parameters are for the Proxy API and not the target website.
To encode your URL you just need to use the urlencode(payload) function as we've done above in the example.
Integrate Proxy Aggregator into the Existing Scraper
After integrating the ScrapeOps Proxy Aggregator, you won't need to worry about user agents and headers. ScrapeOps Proxy Aggregator acts as an intermediary between your scraper and the target website. It routes your requests through a pool of high-performing proxies from various providers.
These proxies already have different user-agent strings and other headers pre-configured that help you avoid detection and blocks, even without additional middleware.
In our scraper, we only need to modify the retry logic, and everything else remains the same. Specifically, we'll add a new method called make_scrapeops_request() to the RetryLogic class. The scrape_page() function will first request this new method.
Then, it will call the existing make_request() method with the final proxy URL generated by make_scrapeops_request(). Previously, make_request() was called directly from scrape_page().
import requests
from urllib.parse import urlencode

class RetryLogic:
    def __init__(
        self,
        retry_limit=5,
        anti_bot_check=False,
        use_fake_browser_headers=False,
        scrapeops_api_key="",


):
        self.retry_limit = retry_limit
        self.anti_bot_check = anti_bot_check
        self.use_fake_browser_headers = use_fake_browser_headers
        self.scrapeops_api_key = scrapeops_api_key

    def make_scrapeops_request(self, url, method="GET", **kwargs):
        payload = {"api_key": self.scrapeops_api_key, "url": url}
        clean_scrapeops_params = {}

        # Extract ScrapeOps parameters and clean the keys
        for key, value in kwargs.items():
            if "sops_" in key:
                clean_scrapeops_params[key] = value
                _ = kwargs.pop(key, None)
                clean_key = key.replace("sops_", "")
                clean_scrapeops_params[clean_key] = value

				# Update the payload with any additional ScrapeOps params
        payload.update(clean_scrapeops_params)
        proxy_url = "https://proxy.scrapeops.io/v1/?" + urlencode(payload)
        return self.make_request(proxy_url, method=method, **kwargs)

    def make_request(self, url, method="GET", **kwargs):
        kwargs.setdefault("allow_redirects", True)

        # Retry Logic
        for _ in range(self.retry_limit):
            try:
                response = requests.request(method, url, **kwargs)

                # Check if response status code is 200 or 404
                if response.status_code in [200, 404]:
                    if self.anti_bot_check and response.status_code == 200:
                        if not self.passed_anti_bot_check(response):
                            return False, response
                    return True, response
            except Exception as e:
                print("Error:", e)
        return False, None

    def passed_anti_bot_check(self, response):
        # Example Anti-Bot Check
        if "<title>Robot or human?</title>" in response.text:
            return False
        # Passed All Tests
        return True
The make_scrapeops_request() method starts by creating a dictionary called payload with two key-value pairs:
api_key: This holds the value stored in the class attributeself.scrapeops_api_key.url: This uses the providedurlargument.
Next, the method constructs the proxy URL by appending the encoded payload to the ScrapeOps proxy base URL (https://proxy.scrapeops.io/v1/?).
Finally, the method calls the make_request method with the constructed proxy_url.
The integration is incredibly simple. You no longer need to worry about the user agents and browser headers we used before. Just send the URL you want to scrape to the ScrapeOps API endpoint, and it will return the HTML response.
Complete Code
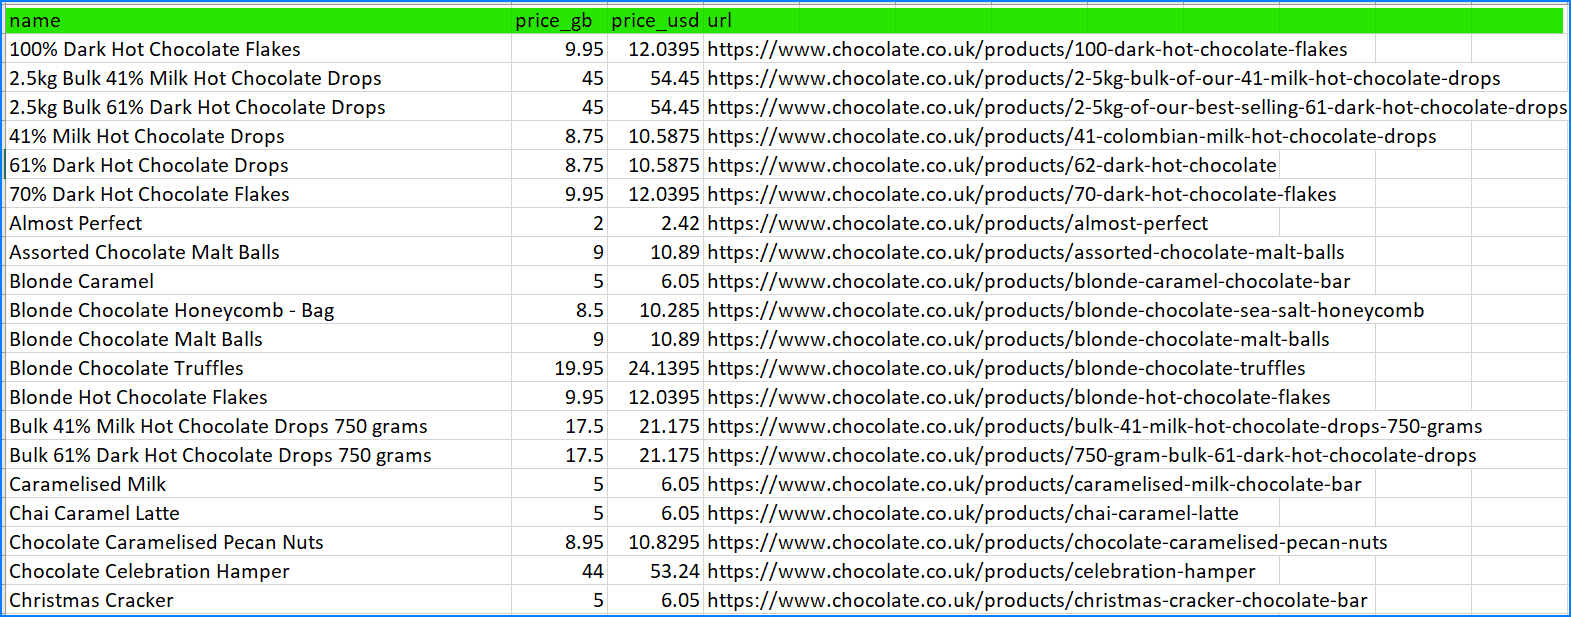
We did it! We have a fully functional scraper that creates a final CSV file containing all the desired data.
import os
import time
import csv
import requests
import concurrent.futures
from urllib.parse import urlencode
from bs4 import BeautifulSoup
from dataclasses import dataclass, field, fields, InitVar, asdict

@dataclass
class Product:
    name: str = ''
    price_string: InitVar[str] = ''
    price_gb: float = field(init=False)
    price_usd: float = field(init=False)
    url: str = ''

    def __post_init__(self, price_string):
        self.name = self.clean_name()
        self.price_gb = self.clean_price(price_string)
        self.price_usd = self.convert_price_to_usd()
        self.url = self.create_absolute_url()

    def clean_name(self):
        if not self.name:
            return 'missing'
        return self.name.strip()

    def clean_price(self, price_string):
        price_string = price_string.strip()
        price_string = price_string.replace('Sale price£', '')
        price_string = price_string.replace('Sale priceFrom £', '')
        return float(price_string) if price_string else 0.0

    def convert_price_to_usd(self):
        return self.price_gb * 1.21

    def create_absolute_url(self):
        if not self.url:
            return 'missing'
        return 'https://www.chocolate.co.uk' + self.url

class ProductDataPipeline:
    def __init__(self, csv_filename='', storage_queue_limit=5):
        self.names_seen = []
        self.storage_queue = []
        self.storage_queue_limit = storage_queue_limit
        self.csv_filename = csv_filename
        self.csv_file_open = False

    def save_to_csv(self):
        self.csv_file_open = True
        products_to_save = self.storage_queue.copy()
        self.storage_queue.clear()
        if not products_to_save:
            return

        keys = [field.name for field in fields(products_to_save[0])]
        file_exists = os.path.isfile(
            self.csv_filename) and os.path.getsize(self.csv_filename) > 0

        with open(self.csv_filename, mode='a', newline='', encoding='utf-8') as output_file:
            writer = csv.DictWriter(output_file, fieldnames=keys)

            if not file_exists:
                writer.writeheader()

            for product in products_to_save:
                writer.writerow(asdict(product))

        self.csv_file_open = False

    def clean_raw_product(self, scraped_data):
        return Product(
            name=scraped_data.get('name', ''),
            price_string=scraped_data.get('price', ''),
            url=scraped_data.get('url', '')
        )

    def is_duplicate(self, product_data):
        if product_data.name in self.names_seen:
            print(f"Duplicate item found: {product_data.name}. Item dropped.")
            return True
        self.names_seen.append(product_data.name)
        return False

    def add_product(self, scraped_data):
        product = self.clean_raw_product(scraped_data)
        if not self.is_duplicate(product):
            self.storage_queue.append(product)
            if len(self.storage_queue) >= self.storage_queue_limit and not self.csv_file_open:
                self.save_to_csv()

    def close_pipeline(self):
        if self.csv_file_open:
            time.sleep(3)
        if len(self.storage_queue) > 0:
            self.save_to_csv()

class RetryLogic:
    def __init__(self, retry_limit=5, anti_bot_check=False, use_fake_browser_headers=False, scrapeops_api_key=''):
        self.retry_limit = retry_limit
        self.anti_bot_check = anti_bot_check
        self.use_fake_browser_headers = use_fake_browser_headers
        self.scrapeops_api_key = scrapeops_api_key

    def make_scrapeops_request(self, url, method='GET', **kwargs):
        payload = {'api_key': self.scrapeops_api_key, 'url': url}
        clean_scrapeops_params = {key.replace(
            'sops_', ''): value for key, value in kwargs.items() if 'sops_' in key}
        payload.update(clean_scrapeops_params)
        proxy_url = 'https://proxy.scrapeops.io/v1/?' + urlencode(payload)
        return self.make_request(proxy_url, method=method, **kwargs)

    def make_request(self, url, method='GET', **kwargs):
        kwargs.setdefault('allow_redirects', True)

        for _ in range(self.retry_limit):
            try:
                response = requests.request(method, url, **kwargs)
                if response.status_code in [200, 404]:
                    if self.anti_bot_check and response.status_code == 200 and not self.passed_anti_bot_check(response):
                        return False, response
                    return True, response

            except Exception as e:
                print('Error', e)
        return False, None

    def passed_anti_bot_check(self, response):
        return '<title>Robot or human?</title>' not in response.text

def scrape_page(url):
    list_of_urls.remove(url)
    valid, response = retry_request.make_scrapeops_request(url)
    if valid and response.status_code == 200:
        soup = BeautifulSoup(response.content, 'html.parser')
        products = soup.select('product-item')
        for product in products:
            name = product.select('a.product-item-meta__title')[0].get_text()
            price = product.select('span.price')[
                0].get_text().replace('\nSale price£', '')
            url = product.select('div.product-item-meta a')[0]['href']

            data_pipeline.add_product(
                {'name': name, 'price': price, 'url': url})

        next_page = soup.select('a[rel="next"]')
        if next_page:
            list_of_urls.append(
                'https://www.chocolate.co.uk' + next_page[0]['href'])

def start_concurrent_scrape(num_threads=5):
    while list_of_urls:
        with concurrent.futures.ThreadPoolExecutor(max_workers=num_threads) as executor:
            executor.map(scrape_page, list_of_urls)

list_of_urls = ['https://www.chocolate.co.uk/collections/all']

if __name__ == "__main__":
    data_pipeline = ProductDataPipeline(csv_filename='product_data.csv')
    retry_request = RetryLogic(retry_limit=3, anti_bot_check=False,
                               use_fake_browser_headers=False, scrapeops_api_key='a96254e0-e202-450b-873a-a356b85b02c4')
    start_concurrent_scrape(num_threads=10)
    data_pipeline.close_pipeline()
The CSV file:


Node.js Cheerio Beginners Series Part 6: Avoiding Detection with Proxies
So far in this Node.js Cheerio Beginners Series, we have learned how to build a basic web scraper in Part 1, scrape data from a website in Part 2, clean it up, save it to a file or database in Part 3, and make our scraper more robust and scalable by handling failed requests and using concurrency in Part 4. We also learned how to use fake user-agents and browser headers to bypass restrictions on sites trying to prevent scraping in Part 5.
In Part 6, we'll explore how to use proxies to bypass various website restrictions by hiding your real IP address and location without needing to worry about user agents and headers.
- Why Use Proxies?
- The 3 Most Common Proxy Integration
- Integrate Proxy Aggregator into the Existing Scraper
- Complete Code
- Conclusion
Node.js Axios/CheerioJS 6-Part Beginner Series
This 6-part Node.js Axios/CheerioJS Beginner Series will walk you through building a web scraping project from scratch, covering everything from creating the scraper to deployment and scheduling.
- Part 1: Basic Node.js Cheerio Scraper - We'll learn the fundamentals of web scraping with Node.js and build your first scraper using Cheerio. (Part 1)
- Part 2: Cleaning Unruly Data & Handling Edge Cases - Web data can be messy and unpredictable. In this part, we'll create a robust scraper using data structures and cleaning techniques to handle these challenges. (Part 2)
- Part 3: Storing Scraped Data - Explore various options for storing your scraped data, including databases like MySQL or Postgres, cloud storage like AWS S3, and file formats like CSV and JSON. We'll discuss their pros, cons, and suitable use cases. (Part 3)
- Part 4: Managing Retries & Concurrency - Enhance your scraper's reliability and scalability by handling failed requests and utilizing concurrency. (Part 4)
- Part 5: Mimicking User Behavior - Learn how to create a production-ready scraper by simulating real users through user-agent and browser header manipulation. (Part 5)
- Part 6: Avoiding Detection with Proxies - Discover how to use proxies to bypass anti-bot systems by disguising your real IP address and location. (This article)
The code for this project is available on Github.
Need help scraping the web?
Then check out ScrapeOps, the complete toolkit for web scraping.
Why Use Proxies?
Scraping data from websites can be tricky sometimes. Websites might restrict you based on your location or block your IP address. This is where proxies come in handy.
Proxies help you bypass these restrictions by hiding your real IP address and location. When you use a proxy, your request gets routed through a proxy server first, acting as an intermediary. This way, the website only sees the proxy's IP address, not yours.
Websites often serve different information based on specific locations. Without a proxy, you might not be able to access information that's relevant to your needs if you're not located in a particular location.
Furthermore, proxies offer an extra layer of security by encrypting your data as it travels between your device and the server. This protects your data from being thwarted by third parties.
Additionally, you can use multiple proxies at the same time to distribute your scraping requests across different IP addresses, avoiding website rate limits.
The 3 Most Common Proxy Integration
Let's dive into integrating Node.js Axios with the 3 most common proxy formats:
- Rotating Through a List of Proxy IPs
- Using Proxy Gateways
- Using Proxy API Endpoints
Previously, proxy providers offered lists of IP addresses, and you'd configure your scraper to cycle through them, using a new IP for each request. However, this method is less common now.
Many providers now offer access through proxy gateways or proxy API endpoints instead of raw lists. These gateways act as intermediaries, routing your requests through their pool of IPs.
Proxy Integration #1: Rotating Through Proxy IP List
Using rotating proxies is crucial because websites can restrict access to scrapers that send many requests from the same IP address. This technique makes it harder for websites to track and block your scraping activity by constantly changing the IP address used.
The code snippet fetches a list of free proxies from the Free Proxy List website. It extracts proxy information (IP address and port). Next, it filters out proxies that do not support HTTPS and returns a set of unique proxy entries.
const axios = require("axios");
const cheerio = require("cheerio");

async function getProxies() {
  const url = "https://free-proxy-list.net/";
  const response = await axios.get(url);
  const html = response.data;
  const $ = cheerio.load(html);

  const rows = $("tbody tr");
  const proxies = [];
  for (const row of rows) {
    const columns = $(row).find("td");
    const ip = $(columns[0]).text();
    const port = $(columns[1]).text();
    if ($(columns[6]).text() === "yes") {
      proxies.push({ ip, port });
    }
  }

  return proxies;
}

(async () => {
  const proxies = await getProxies();
  const proxyCount = proxies.length;
  let proxyIndex = 0;

  for (let i = 0; i < 100; i++) {
    const proxy = proxies[proxyIndex];

    try {
      const response = await axios.get("https://httpbin.org/ip", {
        proxy: {
          protocol: "http",
          host: proxy.ip,
          port: proxy.port,
        },
      });

      console.log(proxyIndex, response.data);
    } catch (e) {
      console.log(proxyIndex, `Failed to use ${proxy.ip}:${proxy.port}`);
    }

    proxyIndex = (proxyIndex + 1) % proxyCount;
  }
})();
The proxyIndex variable and the % (modulo) operation is used to cycle through the list of proxies we fetched. Keep in mind that using free proxies can have limitations. Not all proxies may work perfectly (or at all), and that’s why we have the try/catch.
The following output shows that 5 out of 11 requests were successful. Note, the returned address is different each time because it is not our own, we are using the proxies.

This is a simplistic example. For larger-scale scraping, you would require monitoring individual IP performance and removing banned/blocked ones from the proxy pool.
Proxy Integration #2: Using Proxy Gateway
Many proxy providers are moving away from selling static IP lists and instead offer access to their proxy pools through a gateway. This eliminates the need to manage and rotate individual IP addresses, as the provider handles that on your behalf. This has become the preferred method for using residential and mobile proxies, and increasingly for datacenter proxies as well.
Here is an example of how to integrate BrightData's residential proxy gateway into your Node.js Axios scraper:
const axios = require("axios");

(async () => {
  for (let i = 0; i < 100; i++) {
    try {
      const response = await axios.get("https://httpbin.org/ip", {
        proxy: {
          protocol: "http",
          host: "http://brd.superproxy.io",
          port: 22225,
          auth: {
            username: "username",
            password: "password",
          },
        },
      });

      console.log(response.data);
    } catch (e) {
      console.log("Failed to use proxy");
    }
  }
})();
Integrating via a gateway is significantly easier compared to a proxy list as you don't have to worry about implementing all the proxy rotation logic.
Proxy Integration #3: Using Proxy API Endpoint
Recently, many proxy providers have begun offering smart proxy APIs. These APIs manage your proxy infrastructure by automatically rotating proxies and headers allowing you to focus on extracting the data you need.
Typically, you send the URL you want to scrape to an API endpoint, and the API returns the HTML response. While each provider's API integration differs slightly, most are very similar and easy to integrate with.
Here's an example of integrating with the ScrapeOps Proxy Manager:
const axios = require("axios");

(async () => {
  const response = await axios.get("https://proxy.scrapeops.io/v1/", {
    params: {
      api_key: "<YOUR_SCRAPE_OPS_KEY>",
      url: encodeURIComponent("https://httpbin.org/ip"),
    },
  });

  console.log(response.content);
})();
Here you simply send the URL you want to scrape to the ScrapeOps API endpoint in the URL query parameter, along with your API key in the api_key query parameter. ScrapeOps will then locate the optimal proxy for the target domain and deliver the HTML response directly to you.
You can get your free API key with 1,000 free requests by signing up here.
Note that, when using proxy API endpoints it is very important to encode the URL you want to scrape before sending it to the Proxy API endpoint. If the URL contains query parameters then the Proxy API might think that those query parameters are for the Proxy API and not the target website.
To encode your URL you just need to use the encodeURIComponent function as we've done above in the example.
Integrate Proxy Aggregator into the Existing Scraper
After integrating the ScrapeOps Proxy Aggregator, you won't need to worry about user agents and headers. ScrapeOps Proxy Aggregator acts as an intermediary between your scraper and the target website. It routes your requests through a pool of high-performing proxies from various providers.
These proxies already have different user-agent strings and other headers pre-configured that help you avoid detection and blocks, even without additional middleware.
So for our scraper, we can get rid of our existing header logic. Then we can add a new method named makeScrapeOpsRequest. This new method will craft the ScrapeOps API url that we can then pass to our existing makeRequest method.
async function makeScrapeOpsRequest(url) {
  const payload = {
    api_key: "<YOUR_SCRAPE_OPS_KEY>",
    url: encodeURIComponent(url),
  };

  const proxyUrl = `https://proxy.scrapeops.io/v1?${new URLSearchParams(
    payload
  ).toString()}`;

  return makeRequest(proxyUrl, 3, true);
}
The above method starts by making an object with the URL Query Param values we need. The API Key and URL. Note that we encode the URL. Then we use the URLSearchParams class to convert the object to a string to append to the ScrapeOps API URL.
Then we pass the appended URL to the existing makeRequest method. The integration is incredibly simple. You no longer need to worry about the user agents and browser headers we used before. Just send the URL you want to scrape to the ScrapeOps API endpoint, and it will return the HTML response.
Complete Code
We did it! We have a fully functional scraper that creates a final CSV file containing all the desired data.
const axios = require("axios");
const cheerio = require("cheerio");
const fs = require("fs");
const {
  Worker,
  isMainThread,
  parentPort,
  workerData,
} = require("worker_threads");

class Product {
  constructor(name, priceStr, url) {
    this.name = this.cleanName(name);
    this.priceGb = this.cleanPrice(priceStr);
    this.priceUsd = this.convertPriceToUsd(this.priceGb);
    this.url = this.createAbsoluteUrl(url);
  }

  cleanName(name) {
    if (name == " " || name == "" || name == null) {
      return "missing";
    }
    return name.trim();
  }

  cleanPrice(priceStr) {
    priceStr = priceStr.trim();
    priceStr = priceStr.replace("Sale price£", "");
    priceStr = priceStr.replace("Sale priceFrom £", "");
    if (priceStr == "") {
      return 0.0;
    }
    return parseFloat(priceStr);
  }

  convertPriceToUsd(priceGb) {
    return priceGb * 1.29;
  }

  createAbsoluteUrl(url) {
    if (url == "" || url == null) {
      return "missing";
    }
    return "https://www.chocolate.co.uk" + url;
  }
}

class ProductDataPipeline {
  constructor(csvFilename = "", storageQueueLimit = 5) {
    this.seenProducts = new Set();
    this.storageQueue = [];
    this.csvFilename = csvFilename;
    this.csvFileOpen = false;
    this.storageQueueLimit = storageQueueLimit;
  }

  saveToCsv() {
    this.csvFileOpen = true;
    const fileExists = fs.existsSync(this.csvFilename);
    const file = fs.createWriteStream(this.csvFilename, { flags: "a" });
    if (!fileExists) {
      file.write("name,priceGb,priceUsd,url\n");
    }
    for (const product of this.storageQueue) {
      file.write(
        `${product.name},${product.priceGb},${product.priceUsd},${product.url}\n`
      );
    }
    file.end();
    this.storageQueue = [];
    this.csvFileOpen = false;
  }

  cleanRawProduct(rawProduct) {
    return new Product(rawProduct.name, rawProduct.price, rawProduct.url);
  }

  isDuplicateProduct(product) {
    if (!this.seenProducts.has(product.url)) {
      this.seenProducts.add(product.url);
      return false;
    }
    return true;
  }

  addProduct(rawProduct) {
    const product = this.cleanRawProduct(rawProduct);
    if (!this.isDuplicateProduct(product)) {
      this.storageQueue.push(product);
      if (
        this.storageQueue.length >= this.storageQueueLimit &&
        !this.csvFileOpen
      ) {
        this.saveToCsv();
      }
    }
  }

  async close() {
    while (this.csvFileOpen) {
      // Wait for the file to be written
      await new Promise((resolve) => setTimeout(resolve, 100));
    }
    if (this.storageQueue.length > 0) {
      this.saveToCsv();
    }
  }
}

const listOfUrls = ["https://www.chocolate.co.uk/collections/all"];

async function makeScrapeOpsRequest(url) {
  const payload = {
    api_key: "<YOUR_SCRAPE_OPS_KEY>",
    url: encodeURIComponent(url),
  };

  const proxyUrl = `https://proxy.scrapeops.io/v1?${new URLSearchParams(
    payload
  ).toString()}`;

  return makeRequest(proxyUrl, 3, true);
}

async function makeRequest(
  url,
  retries = 3,
  antiBotCheck = false,
  headers = {}
) {
  for (let i = 0; i < retries; i++) {
    try {
      const response = await axios.get(url, {
        headers: headers,
      });
      if ([200, 404].includes(response.status)) {
        if (antiBotCheck && response.status == 200) {
          if (response.data.includes("<title>Robot or human?</title>")) {
            return null;
          }
        }
        return response;
      }
    } catch (e) {
      console.log(`Failed to fetch ${url}, retrying...`);
    }
  }
  return null;
}

async function scrape(url) {
  const response = await makeScrapeOpsRequest(url, 3, false);
  if (!response) {
    throw new Error(`Failed to fetch ${url}`);
  }

  const html = response.data;
  const $ = cheerio.load(html);
  const productItems = $("product-item");

  const products = [];
  for (const productItem of productItems) {
    const title = $(productItem).find(".product-item-meta__title").text();
    const price = $(productItem).find(".price").first().text();
    const url = $(productItem).find(".product-item-meta__title").attr("href");
    products.push({ name: title, price: price, url: url });
  }

  const nextPage = $("a[rel='next']").attr("href");
  return {
    nextUrl: nextPage ? "https://www.chocolate.co.uk" + nextPage : null,
    products: products,
  };
}

if (isMainThread) {
  const pipeline = new ProductDataPipeline("chocolate.csv", 5);
  const workers = [];

  for (const url of listOfUrls) {
    workers.push(
      new Promise((resolve, reject) => {
        const worker = new Worker(__filename, {
          workerData: { startUrl: url },
        });
        console.log("Worker created", worker.threadId, url);

        worker.on("message", (product) => {
          pipeline.addProduct(product);
        });

        worker.on("error", reject);
        worker.on("exit", (code) => {
          if (code !== 0) {
            reject(new Error(`Worker stopped with exit code ${code}`));
          } else {
            console.log("Worker exited");
            resolve();
          }
        });
      })
    );
  }

  Promise.all(workers)
    .then(() => pipeline.close())
    .then(() => console.log("Pipeline closed"));
} else {
  // Perform work
  const { startUrl } = workerData;

  const handleWork = async (workUrl) => {
    const { nextUrl, products } = await scrape(workUrl);
    for (const product of products) {
      parentPort.postMessage(product);
    }

    if (nextUrl) {
      console.log("Worker working on", nextUrl);
      await handleWork(nextUrl);
    }
  };

  handleWork(startUrl).then(() => console.log("Worker finished"));
}
NodeJS Puppeteer Beginners Series Part 6 - Using Proxies To Avoid Getting Blocked
So far in this NodeJS Puppeteer 6-Part Beginner Series, we have learned how to build a basic web scraper Part 1, scrape data from a website in Part 2, clean it up, save it to a file or database in Part 3, and make our scraper more robust and scalable by handling failed requests and using concurrency in Part 4. We also learned how to use fake user-agents and browser headers to bypass restrictions on sites trying to prevent scraping in Part 5.
In Part 6, we'll explore how to use proxies to bypass various website restrictions by hiding your real IP address and location without needing to worry about user agents and headers.
- Why Use Proxies
- The 3 Most Common Proxy Integration
- Integrate Proxy Aggregator into the Existing Scraper
- Complete Code
- Conclusion
Node.js Puppeteer 6-Part Beginner Series
-
Part 1: Basic Node.js Puppeteer Scraper - We'll learn the fundamentals of web scraping with Node.js and build your first scraper using NpdeJS Puppeteer. (Part 1)
-
Part 2: Cleaning Unruly Data & Handling Edge Cases - Web data can be messy and unpredictable. In this part, we'll create a robust scraper using data structures and cleaning techniques to handle these challenges. (Part 2)
-
Part 3: Storing Scraped Data in AWS S3, MySQL & Postgres DBs - Explore various options for storing your scraped data, including databases like MySQL or Postgres, cloud storage like AWS S3, and file formats like CSV and JSON. We'll discuss their pros, cons, and suitable use cases. (Part 3)
-
Part 4: Managing Retries & Concurrency - Enhance your scraper's reliability and scalability by handling failed requests and utilizing concurrency. (Part 4)
-
Part 5: Faking User-Agents & Browser Headers - Learn how to create a production-ready scraper by simulating real users through user-agent and browser header manipulation. (Part 5)
-
Part 6: Using Proxies To Avoid Getting Blocked - Discover how to use proxies to bypass anti-bot systems by disguising your real IP address and location. (This article)
Need help scraping the web?
Then check out ScrapeOps, the complete toolkit for web scraping.
Why Use Proxies?
When scraping data from websites, obstacles like location-based restrictions or IP bans can pose significant challenges. This is where proxies become invaluable.
Proxies enable you to bypass these restrictions by concealing your actual IP address and location. When you employ a proxy, your request first goes through a proxy server, which acts as an intermediary. Consequently, the website only sees the proxy's IP address, not yours.
Websites often display different content based on the user's location. Without a proxy, you might not be able to access location-specific information that you need.
Moreover, proxies provide an additional layer of security by encrypting your data as it travels between your device and the server. This helps protect your data from being intercepted by third parties.
Additionally, using multiple proxies simultaneously allows you to distribute your scraping requests across different IP addresses, helping you avoid website rate limits.
The 3 Most Common Proxy Integration
Let's explore integrating Puppeteer with the three most common proxy formats:
- Rotating Through a List of Proxy IPs
- Using Proxy Gateways
- Using Proxy API Endpoints
Previously, proxy providers offered lists of IP addresses, and you'd configure your scraper to cycle through them, using a new IP for each request. However, this method is less common now.
Many providers now offer access through proxy gateways or proxy API endpoints instead of raw lists. These gateways act as intermediaries, routing your requests through their pool of IPs.
Proxy Integration #1: Rotating Through a Proxy IP List
Rotating proxies is essential because websites can block scrapers sending numerous requests from the same IP address. By frequently changing the IP address used, this technique makes it harder for websites to detect and block your scraping activity.
Here’s how you can rotate through a list of proxies using Puppeteer:
const puppeteer = require('puppeteer');
const proxyList = ['http://proxy1:port', 'http://proxy2:port', 'http://proxy3:port']; // Add your proxies here

(async () => {
    for (let i = 0; i < proxyList.length; i++) {
        const browser = await puppeteer.launch({
            args: [`--proxy-server=${proxyList[i]}`]
        });
        const page = await browser.newPage();
        try {
            await page.goto('https://icanhazip.com/');
            const ip = await page.evaluate(() => document.body.textContent.trim());
            console.log(`Proxy IP: ${proxyList[i]}, Actual IP: ${ip}`);
        } catch (error) {
            console.log(`Failed to use proxy ${proxyList[i]}`);
        }
        await browser.close();
    }
})();
This script launches a new browser instance for each proxy in the list, navigates to a website that displays the IP address, and logs the result. If a proxy fails, the script moves on to the next one in the list.
Proxy Integration #2: Using Proxy Gateway
Many proxy providers are now offering access through proxy gateways, eliminating the need to manage and rotate individual IP addresses. The provider handles this for you, making it a preferred method for residential and mobile proxies.
Here's an example of how to integrate a proxy gateway with Puppeteer:
const puppeteer = require('puppeteer');

(async () => {
    const browser = await puppeteer.launch({
        args: ['--proxy-server=http://gateway.proxyprovider.com:port'] // Replace with your proxy gateway
    });
    const page = await browser.newPage();
    await page.authenticate({
        username: 'your-username',
        password: 'your-password'
    });
    await page.goto('https://icanhazip.com/');
    const ip = await page.evaluate(() => document.body.textContent.trim());
    console.log(`IP Address: ${ip}`);
    await browser.close();
})();
Using a proxy gateway simplifies the integration as you don’t need to handle the rotation logic manually. The provider’s gateway takes care of routing requests through different IP addresses.
Proxy Integration #3: Using Proxy API Endpoint
Many proxy providers now offer smart proxy APIs that manage your proxy infrastructure by automatically rotating proxies and headers. This allows you to focus on extracting the data you need.
Here’s an example using Puppeteer with a proxy API endpoint:
const puppeteer = require('puppeteer');

(async () => {
    const browser = await puppeteer.launch();
    const page = await browser.newPage();
    const targetUrl = 'https://httpbin.org/ip';
    const proxyApiUrl = `https://proxyapi.provider.com?api_key=YOUR_API_KEY&url=${encodeURIComponent(targetUrl)}`;

    await page.goto(proxyApiUrl);
    const ipData = await page.evaluate(() => document.body.textContent.trim());
    console.log(`IP Data: ${ipData}`);
    await browser.close();
})();
In this example, the target URL is sent to the proxy API endpoint, which handles the proxy rotation and returns the response.
Integrate Proxy Aggregator into the Existing Scraper
Integrating a proxy aggregator like ScrapeOps Proxy Aggregator simplifies proxy management further. You don’t need to worry about user agents or headers, as these are managed by the proxy aggregator.
Here’s how you can integrate it into an existing Puppeteer scraper:
const puppeteer = require('puppeteer');
const { encode } = require('querystring');

(async () => {
    const scrapeOpsApiKey = 'YOUR_API_KEY';
    const targetUrl = 'https://example.com';
    const proxyApiUrl = `https://proxy.scrapeops.io/v1/?${encode({ api_key: scrapeOpsApiKey, url: targetUrl })}`;

    const browser = await puppeteer.launch();
    const page = await browser.newPage();
    await page.goto(proxyApiUrl);
    const content = await page.content();

    // Process the content as needed
    console.log(content);

    await browser.close();
})();
The proxy aggregator routes your requests through a pool of proxies, providing different user-agent strings and headers to help avoid detection and blocks.
Complete Code
Below is a complete example of a Puppeteer scraper that integrates proxy management and scrapes data from a website, storing the results in a CSV file.
const puppeteer = require('puppeteer');
const fs = require('fs');
const path = require('path');
const cheerio = require('cheerio');

// Define the Product class
class Product {
    constructor(name, priceString, url) {
        this.name = this.cleanName(name);
        this.priceGBP = this.cleanPrice(priceString);
        this.priceUSD = this.convertPriceToUSD();
        this.url = this.createAbsoluteURL(url);
    }

    cleanName(name) {
        return name.trim() || 'missing';
    }

    cleanPrice(priceString) {
        if (!priceString) return 0.0;
        priceString = priceString.replace(/[^0-9.]+/g, '');
        return parseFloat(priceString) || 0.0;
    }

    convertPriceToUSD() {
        const exchangeRate = 1.21;
        return this.priceGBP * exchangeRate;
    }

    createAbsoluteURL(relativeURL) {
        const baseURL = 'https://www.chocolate.co.uk';
        return relativeURL ? `${baseURL}${relativeURL}` : 'missing';
    }
}

// Define the ProductDataPipeline class
class ProductDataPipeline {
    constructor(csvFilename = 'product_data.csv', storageQueueLimit = 5) {
        this.namesSeen = new Set();
        this.storageQueue = [];
        this.storageQueueLimit = storageQueueLimit;
        this.csvFilename = csvFilename;
        this.csvFileOpen = false;
    }

    saveToCSV() {
        this.csvFileOpen = true;
        const productsToSave = [...this.storageQueue];
        this.storageQueue = [];

        if (productsToSave.length === 0) return;

        const headers = Object.keys(productsToSave[0]);
        const fileExists = fs.existsSync(this.csvFilename);

        const csvWriter = fs.createWriteStream(this.csvFilename, { flags: 'a' });
        if (!fileExists) {
            csvWriter.write(headers.join(',') + '\n');
        }

        productsToSave.forEach(product => {
            const row = headers.map(header => product[header]).join(',');
            csvWriter.write(row + '\n');
        });

        csvWriter.end();
        this.csvFileOpen = false;
    }

    cleanRawProduct(scrapedData) {
        return new Product(scrapedData.name || '', scrapedData.price || '', scrapedData.url || '');
    }

    isDuplicate(product) {
        if (this.namesSeen.has(product.name)) {
            console.log(`Duplicate item found: ${product.name}. Item dropped.`);
            return true;
        }
        this.namesSeen.add(product.name);
        return false;
    }

    addProduct(scrapedData) {
        const product = this.cleanRawProduct(scrapedData);
        if (!this.isDuplicate(product)) {
            this.storageQueue.push(product);
            if (this.storageQueue.length >= this.storageQueueLimit && !this.csvFileOpen) {
                this.saveToCSV();
            }
        }
    }

    closePipeline() {
        if (this.csvFileOpen) {
            setTimeout(() => this.saveToCSV(), 3000);
        } else if (this.storageQueue.length > 0) {
            this.saveToCSV();
        }
    }
}

// Define the RetryLogic class with Residential Proxy Support
class RetryLogic {
    constructor(retryLimit = 5, proxyUsername, proxyPassword, proxyHost, proxyPort) {
        this.retryLimit = retryLimit;
        this.proxyUsername = proxyUsername;
        this.proxyPassword = proxyPassword;
        this.proxyHost = proxyHost;
        this.proxyPort = proxyPort;
    }

    async makeRequest(page, url) {
        for (let i = 0; i < this.retryLimit; i++) {
            try {
                // Set up proxy authentication
                await page.authenticate({
                    username: this.proxyUsername,
                    password: this.proxyPassword
                });

                await page.goto(url, { waitUntil: 'networkidle2' });

                const status = await page.evaluate(() => document.statusCode || 200);
                if ([200, 404].includes(status)) {
                    return { success: true, page };
                }
            } catch (error) {
                console.log('Error:', error);
            }
        }
        return { success: false, page };
    }
}

// Define the scraping function
const scrapePage = async (url, retryLogic, dataPipeline, listOfUrls) => {
    const browser = await puppeteer.launch({
        headless: true,
        args: [
            `--proxy-server=${retryLogic.proxyHost}:${retryLogic.proxyPort}`
        ]
    });

    const page = await browser.newPage();
    listOfUrls.splice(listOfUrls.indexOf(url), 1);
    const { success, page: responsePage } = await retryLogic.makeRequest(page, url);

    if (success) {
        const content = await responsePage.content();
        const $ = cheerio.load(content);
        const products = $('.product-item');

        products.each((index, product) => {
            const name = $(product).find('a.product-item-meta__title').text();
            const price = $(product).find('span.price').text().replace(/[^0-9.]+/g, '');
            const url = $(product).find('div.product-item-meta a').attr('href');

            dataPipeline.addProduct({ name, price, url });
        });

        const nextPage = $('a[rel="next"]').attr('href');
        if (nextPage) {
            listOfUrls.push(`https://www.chocolate.co.uk${nextPage}`);
        }
    }

    await browser.close();
};

// Define the function to start concurrent scraping
const startConcurrentScrape = async (numThreads = 5, retryLogic, dataPipeline, listOfUrls) => {
    while (listOfUrls.length) {
        await Promise.all(listOfUrls.slice(0, numThreads).map(url => scrapePage(url, retryLogic, dataPipeline, listOfUrls)));
    }
};

// Initialize and run the scraper
const listOfUrls = ['https://www.chocolate.co.uk/collections/all'];

const dataPipeline = new ProductDataPipeline('product_data.csv');

// Replace these with your residential proxy credentials
const retryRequest = new RetryLogic(
    3,
    'scrapeops', // Replace with your proxy username
    'YOUR_API_KEY', // Replace with your proxy password
    'http://residential-proxy.scrapeops.io',     // Replace with your proxy host (e.g., pr.proxyprovider.com)
    8181      // Replace with your proxy port (e.g., 8080)
);

startConcurrentScrape(10, retryRequest, dataPipeline, listOfUrls).then(() => {
    dataPipeline.closePipeline();
});
The CSV file:
Node.js Playwright Beginners Series Part 6: Using Proxies
So far in this Node.js Playwright Beginner Series, we have learned how to build a basic web scraper Part 1, scrape data from a website in Part 2, clean it up, save it to a file or database in Part 3, and make our scraper more robust and scalable by handling failed requests and using concurrency in Part 4. We also learned how to use fake user-agents and browser headers to bypass restrictions on sites trying to prevent scraping in Part 5
In Part 6, we'll explore how to use proxies to bypass various website restrictions by hiding your real IP address and location without needing to worry about user agents and headers.
- Why Use Proxies?
- The 3 Most Common Proxy Integration
- Integrate Proxy Aggregator into the Existing Scraper
- Complete Code
- Conclusion
Node.js Playwright 6-Part Beginner Series
-
Part 1: Basic Node.js Playwright Scraper - We'll learn the fundamentals of web scraping with Node.js and build your first scraper using Cheerio. (Part 1)
-
Part 2: Cleaning Unruly Data & Handling Edge Cases - Web data can be messy and unpredictable. In this part, we'll create a robust scraper using data structures and cleaning techniques to handle these challenges. (Part 2)
-
Part 3: Storing Scraped Data in AWS S3, MySQL & Postgres DBs - Explore various options for storing your scraped data, including databases like MySQL or Postgres, cloud storage like AWS S3, and file formats like CSV and JSON. We'll discuss their pros, cons, and suitable use cases. (Part 3)
-
Part 4: Managing Retries & Concurrency - Enhance your scraper's reliability and scalability by handling failed requests and utilizing concurrency. (Part 4)
-
Part 5: Faking User-Agents & Browser Headers - Learn how to create a production-ready scraper by simulating real users through user-agent and browser header manipulation. (Part 5)
-
Part 6: Using Proxies To Avoid Getting Blocked - Discover how to use proxies to bypass anti-bot systems by disguising your real IP address and location. (This Article)
Need help scraping the web?
Then check out ScrapeOps, the complete toolkit for web scraping.
Why Use Proxies?
Proxies are intermediary servers that route your web requests through a different IP address, effectively masking your real identity and location on the web. They act as middlemen between your device and the target website.
Scraping data from websites can be challenging due to restrictions like location-based blocks or IP bans.
Proxies help overcome these obstacles by:
- Bypassing Restrictions:
- Proxies mask your real IP address and location.
- Your request is routed through a proxy server, so the website only sees the proxy’s IP, not yours.
- Accessing Geo-Restricted Content:
- Websites often show different content based on location.
- Proxies allow you to appear as if you're browsing from different regions, enabling access to location-specific data.
- Enhancing Security:
- Proxies add a layer of security by encrypting data between your device and the server.
- This helps protect your data from third-party interception.
- Avoiding Rate Limits:
- Using multiple proxies allows you to distribute requests across different IPs.
- This helps prevent hitting rate limits or being flagged by the website.
Proxies are essential for scalable, secure, and unrestricted web scraping.
The 3 Most Common Proxy Integration
When integrating proxies into your web scraper, there are several approaches to choose from:
- Rotating Through a List of Proxy IPs
- Using Proxy Gateways
- Using Proxy API Endpoints
While manually rotating through a list of raw proxy IPs can work, it’s often inefficient and requires constant maintenance (e.g., replacing blocked or dead IPs).
Instead, using proxy gateways or proxy API endpoints is a preferred approach. These services act as intermediaries, managing the rotation and availability of IPs, making the integration smoother and more reliable.
Let’s dive into each method!
Proxy Integration #1: Rotating Through Proxy IP List
Rotating through a proxy IP list involves manually managing a list of static proxies and cycling through them during scraping. This method is suitable for scenarios where you have a relatively small number of requests and don’t need to scale rapidly.
For this demonstration, we'll use Free Proxy List to extract proxies that support HTTPS. We will then verify each proxy's functionality by accessing a test website.
Here’s how you can implement this:
const playwright = require("playwright");

async function getProxies() {
  const url = "https://free-proxy-list.net/";
  const browser = await playwright.chromium.launch();
  const page = await browser.newPage();
  await page.goto(url);

  const proxies = await page.evaluate(() => {
    const rows = Array.from(document.querySelectorAll("tbody tr"));
    return rows
      .filter(row => row.children[6].innerText === "yes")
      .map(row => ({
        ip: row.children[0].innerText,
        port: row.children[1].innerText
      }));
  });

  await browser.close();
  return proxies;
}

async function testProxy(proxy, index) {
  const browser = await playwright.chromium.launch({
    proxy: {
      server: `http://${proxy.ip}:${proxy.port}`
    }
  });

  const page = await browser.newPage();

  try {
    await page.goto("https://httpbin.org/ip");
    const content = await page.content();
    console.log(index, content);
  } catch (e) {
    console.log(index, `Failed to use ${proxy.ip}:${proxy.port}`);
  }

  await browser.close();
}

(async () => {
  const proxies = await getProxies();
  const proxyCount = proxies.length;

  for (let i = 0; i < proxyCount; i++) {
    const proxy = proxies[i];
    await testProxy(proxy, i);
  }
})();
In the above code:
- The
getProxies()function scrapes the proxies from the Free Proxy List, specifically targeting rows where the "HTTPS" column indicates availability. - Then the
testProxy()function tests each proxy by accessing httpbin.org/ip to verify its functionality.
Proxies from Free Proxy List are often unreliable and may not work as expected. For example, only a few of the proxies we tested were successful. Here are some results from our tests:
// 0 <html><head><meta name="color-scheme" content="light dark"><meta charset="utf-8"></head><body><pre>{
//   "origin": "189.240.60.168"
// }
// </pre><div class="json-formatter-container"></div></body></html>
// 1 Failed to use 68.178.168.41:80
// 2 Failed to use 160.86.242.23:8080
// 3 <html><head><meta name="color-scheme" content="light dark"><meta charset="utf-8"></head><body><pre>{
//   "origin": "164.52.206.180"
// }
// </pre><div class="json-formatter-container"></div></body></html>
This approach can work for a limited number of requests but may require proxy monitoring for large-scale scraping to handle and replace blocked proxies.
In subsequent sections, we'll explore more advanced and scalable approaches.
Proxy Integration #2: Using Proxy Gateway
As the landscape of proxy services evolves, many providers are shifting from offering static IP lists to providing access via proxy gateways.
This approach simplifies proxy management by allowing the provider to handle IP rotation and management. It’s particularly advantageous for accessing residential, mobile, and increasingly datacenter proxies.
Here are the advantages of using a proxy gateway:
- You no longer need to manually manage and rotate individual IP addresses. The proxy gateway takes care of this for you.
- Proxy gateways often come with built-in features like IP rotation, blacklist management, and performance monitoring.
- Ideal for high-volume scraping, as you don’t need to worry about the maintenance and rotation of a large list of proxies.
BrightData (formerly Luminati) is a well-known provider offering such proxy gateway services. Here’s a basic example of how to integrate BrightData’s residential proxy gateway into a Node.js scraper using Playwright:
const { chromium } = require("playwright");

(async () => {
  for (let i = 0; i < 100; i++) {
    const browser = await chromium.launch({
      proxy: {
        server: "http://username:password@brd.superproxy.io:22225"
      }
    });
    const page = await browser.newPage();

    try {
      await page.goto("https://httpbin.org/ip");
      const content = await page.textContent("body");
      console.log(content);
    } catch (e) {
      console.log("Failed to use proxy");
    }

    await browser.close();
  }
})();
In the script above:
-
The proxy object in
chromium.launch()includes the proxy server’s URL, which contains authentication credentials (username and password) and the endpoint provided by BrightData. Be sure to replace "username", "password", and "brd.superproxy.io:22225" with your actual credentials and endpoint. -
The code runs a loop 100 times, each time launching a new browser instance with the proxy settings. This allows you to test multiple requests through the proxy.
-
Each browser instance navigates to httpbin.org/ip, which returns the IP address of the request. The content of the page is logged to verify if the proxy is working correctly.
Using a proxy gateway significantly reduces the complexity of proxy management, making it easier to focus on scraping tasks without worrying about the intricacies of proxy rotation and maintenance. In the next sections, we’ll explore even more advanced proxy integration methods.
Proxy Integration #3: Using Proxy API Endpoint
Managing proxies manually can be a time-consuming and error-prone process, especially when scaling your scraping efforts. To simplify this, many modern proxy providers offer smart proxy APIs that take care of proxy management and rotation for you.
One of the standout solutions in this space is ScrapeOps Proxy Manager, which automates the entire proxy process.
Why Use ScrapeOps Proxy Manager?
- Seamless Integration: You only need to send the target URL and your API key, and ScrapeOps handles the rest.
- Automated Proxy Rotation: The service automatically rotates IP addresses and optimizes the connection, saving you from manually managing proxy lists.
- Advanced Features: Built-in functionalities like header rotation and request retries ensure you can focus purely on scraping without worrying about proxy infrastructure.
- Scalable: Ideal for large-scale web scraping projects as it handles high-volume requests effortlessly.
You can get your free API key with 1,000 free requests by signing up here.
Here’s a quick demonstration of how to integrate ScrapeOps Proxy Manager into a Playwright scraper.
const playwright = require("playwright");

(async () => {
  const apiKey = "<YOUR_SCRAPE_OPS_KEY>";
  const targetUrl = encodeURIComponent("https://httpbin.org/ip");
  const scrapeOpsUrl = `https://proxy.scrapeops.io/v1/?api_key=${apiKey}&url=${targetUrl}`;

  const browser = await playwright.chromium.launch();
  const page = await browser.newPage();

  try {
    await page.goto(scrapeOpsUrl);
    const content = await page.textContent("body");
    console.log(content);
  } catch (e) {
    console.log("Failed to fetch the URL through ScrapeOps proxy");
  }

  await browser.close();
})();
- Replace
<YOUR_SCRAPE_OPS_KEY>with your actual API key to authenticate with the ScrapeOps service. - Ensure the target URL is encoded with encodeURIComponent() to prevent issues with query parameters.
With ScrapeOps, you can eliminate the hassle of managing proxies manually, making your scraping process more reliable and efficient. If you're serious about scaling your scraping operations, this is one of the best solutions out there.
Integrate Proxy Aggregator into the Existing Scraper
In the previous part of this series, we manually configured user agents and headers to help evade detection.
However, with ScrapeOps Proxy Aggregator, this manual setup is no longer necessary. ScrapeOps handles the rotation of both proxies and headers automatically, providing a seamless experience that greatly reduces the chance of your scraper being blocked.
To integrate the ScrapeOps Proxy Aggregator into our scraper, we’ll create a new method named makeScrapeOpsRequest(). This method will construct the ScrapeOps API URL using your API key and the target URL, and then pass that to our existing makeRequest() function.
Here’s how the code looks:
async function makeScrapeOpsRequest(page, url) {
  const payload = {
    api_key: "<YOUR_SCRAPE_OPS_KEY>",
    url: encodeURIComponent(url),
  };

  const proxyUrl = `https://proxy.scrapeops.io/v1?${new URLSearchParams(
    payload
  ).toString()}`;

  return makeRequest(page, proxyUrl, 3, true);
}
In this snippet, we use URLSearchParams() to convert our payload object (which contains the API key and encoded URL) into a query string. This helps in appending the key-value pairs to the base ScrapeOps API URL in a clean and structured format.
By passing this newly formed ScrapeOps API URL to our makeRequest() method, ScrapeOps will handle everything for you—including proxy rotation and request headers.
Complete Code
We now have a fully functional scraper that gathers all the required data and exports it into a final CSV file. Here's the complete code for our scraper:
const { chromium } = require('playwright');
const fs = require('fs');
const { Worker, isMainThread, parentPort, workerData } = require('worker_threads');

class Product {
  constructor(name, priceStr, url) {
    this.name = this.cleanName(name);
    this.priceGb = this.cleanPrice(priceStr);
    this.priceUsd = this.convertPriceToUsd(this.priceGb);
    this.url = this.createAbsoluteUrl(url);
  }

  cleanName(name) {
    if (name === " " || name === "" || name == null) {
      return "missing";
    }
    return name.trim();
  }

  cleanPrice(priceStr) {
    if (!priceStr) {
      return 0.0;
    }
    priceStr = priceStr.trim();
    priceStr = priceStr.replace("Sale price£", "");
    priceStr = priceStr.replace("Sale priceFrom £", "");
    if (priceStr === "") {
      return 0.0;
    }


    return parseFloat(priceStr);
  }

  convertPriceToUsd(priceGb) {
    return priceGb * 1.29;
  }

  createAbsoluteUrl(url) {
    if (url === "" || url == null) {
      return "missing";
    }
    return "https://www.chocolate.co.uk" + url;
  }
}

class ProductDataPipeline {
  constructor(jsonFileName = "", storageQueueLimit = 5) {
    this.seenProducts = new Set();
    this.storageQueue = [];
    this.jsonFileName = jsonFileName;
    this.jsonFileOpen = false;
    this.storageQueueLimit = storageQueueLimit;
  }

  saveToJson() {
    if (this.storageQueue.length <= 0) {
      return;
    }

    const fileExists = fs.existsSync(this.jsonFileName);
    let existingData = [];
    if (fileExists) {
      const fileContent = fs.readFileSync(this.jsonFileName, "utf8");
      existingData = JSON.parse(fileContent);
    }

    const mergedData = [...existingData, ...this.storageQueue];
    fs.writeFileSync(this.jsonFileName, JSON.stringify(mergedData, null, 2));
    this.storageQueue = [];
  }

  cleanRawProduct(rawProduct) {
    return new Product(rawProduct.name, rawProduct.price, rawProduct.url);
  }

  isDuplicateProduct(product) {
    if (!this.seenProducts.has(product.url)) {
      this.seenProducts.add(product.url);
      return false;
    }
    return true;
  }

  addProduct(rawProduct) {
    const product = this.cleanRawProduct(rawProduct);
    if (!this.isDuplicateProduct(product)) {
      this.storageQueue.push(product);
      if (this.storageQueue.length >= this.storageQueueLimit) {
        this.saveToJson();
      }
    }
  }

  async close() {
    if (this.storageQueue.length > 0) {
      this.saveToJson();
    }
  }
}

const listOfUrls = ["https://www.chocolate.co.uk/collections/all"];

async function makeRequest(page, url, retries = 3, antiBotCheck = false) {
  for (let i = 0; i < retries; i++) {
    try {
      const response = await page.goto(url);
      const status = response.status();
      if ([200, 404].includes(status)) {
        if (antiBotCheck && status == 200) {
          const content = await page.content();
          if (content.includes("<title>Robot or human?</title>")) {
            return null;
          }
        }
        return response;
      }
    } catch (e) {
      console.log(`Failed to fetch ${url}, retrying...`);
    }
  }
  return null;
}

async function makeScrapeOpsRequest(page, url) {
    const proxyUsername = "scrapeops";
    const proxyPassword = "YOUR-SCRAPEOPS-RESIDENTIAL-PROXY-API-KEY";
    const proxyUrl = `http://${proxyUsername}:${proxyPassword}@residential-proxy.scrapeops.io:8181`;

    const proxyAgent = new (await import('https-proxy-agent')).HttpsProxyAgent(proxyUrl);

    return makeRequest(page, url, 3, true, proxyAgent);
}


async function scrape(url) {
  const browser = await chromium.launch({ headless: true });
  const page = await browser.newPage();

  const response = await makeScrapeOpsRequest(page, url);
  if (!response) {
    await browser.close();
    return { nextUrl: null, products: [] };
  }

  const productItems = await page.$$eval("product-item", items =>
    items.map(item => {
      const titleElement = item.querySelector(".product-item-meta__title");
      const priceElement = item.querySelector(".price");
      return {
        name: titleElement ? titleElement.textContent.trim() : null,
        price: priceElement ? priceElement.textContent.trim() : null,
        url: titleElement ? titleElement.getAttribute("href") : null
      };
    })
  );

  const nextUrl = await nextPage(page);
  await browser.close();

  return {
    nextUrl: nextUrl,
    products: productItems.filter(item => item.name && item.price && item.url)
  };
}

async function nextPage(page) {
  let nextUrl = null;
  try {
    nextUrl = await page.$eval("a.pagination__nav-item:nth-child(4)", item => item.href);
  } catch (error) {
    console.log('Last Page Reached');
  }
  return nextUrl;
}

if (isMainThread) {
  const pipeline = new ProductDataPipeline("chocolate.json", 5);
  const workers = [];

  for (const url of listOfUrls) {
    workers.push(
      new Promise((resolve, reject) => {
        const worker = new Worker(__filename, {
          workerData: { startUrl: url }
        });
        console.log("Worker created", worker.threadId, url);

        worker.on("message", (product) => {
          pipeline.addProduct(product);
        });

        worker.on("error", reject);
        worker.on("exit", (code) => {
          if (code !== 0) {
            reject(new Error(`Worker stopped with exit code ${code}`));
          } else {
            console.log("Worker exited");
            resolve();
          }
        });
      })
    );
  }

  Promise.all(workers)
    .then(() => pipeline.close())
    .then(() => console.log("Pipeline closed"));
} else {
  const { startUrl } = workerData;
  const handleWork = async (workUrl) => {
    const { nextUrl, products } = await scrape(workUrl);
    for (const product of products) {
      parentPort.postMessage(product);
    }

    if (nextUrl) {
      console.log("Worker working on", nextUrl);
      await handleWork(nextUrl);
    }
  };

  handleWork(startUrl).then(() => console.log("Worker finished"));
}
Here’s the "chocolate.csv" file that will be generated when you run the code above:

Conclusion
This guide showed how proxies let you sidestep IP blocks and geo‑gates by masking your real address. We looked at the three most practical integration options; rotating lists, proxy gateways, and "set‑and‑forget" proxy APIs - and wired the ScrapeOps Proxy Aggregator straight into our scraper so you can scrape reliably with minimal code changes.
Below is a quick recap of the 6‑Part Beginner Series—follow any chapter to revisit the details:
- Part 1: Basic Scraper – Build your first scraper and learn the fundamentals. (Part 1)
- Part 2: Cleaning Dirty Data & Dealing With Edge Cases – Tame messy HTML with data classes and cleaning pipelines. (Part 2)
- Part 3: Storing Our Data – Compare CSV, JSON, S3 buckets, and SQL/NoSQL databases for scraped output. (Part 3)
- Part 4: Retries & Concurrency – Add fault‑tolerance and speed by handling retries and running requests in parallel. (Part 4)
- Part 5: User‑Agents & Browser Headers – Blend in as a real visitor by rotating headers and UA strings. (Part 5)
- Part 6: Using Proxies To Avoid Getting Blocked – Harness proxies to bypass rate limits and location fences. (This tutorial)
Happy scraping!