How To Submit a Form With Python: Exploring Various Methods
Form submission is a fundamental aspect of web development and automation. It allows you to interact with web applications and automate repetitive tasks. Python offers a multitude of methods for programmatically submitting forms. Each of these methods caters to different use cases and requirements.
In this article, we will dive into various approaches for submitting forms using Python and provide detailed steps and examples for each method.
- TL:DR - How To Submit A Form With Python
- Understanding Form Submission
- Exploring Methods for Python Form Submission
- Using Requests Library
- Selenium WebDriver
- Mechanize Library
- Beautiful Soup with Requests
- Pyppeteer and Playwright
- Using Scrapy Framework
- Advanced Techniques and Libraries
- Conclusion
- More Python Web Development Resources
Need help scraping the web?
Then check out ScrapeOps, the complete toolkit for web scraping.
TL:DR - How To Submit A Form With Python
Here is a simple script to submit a form with Python:
import requests

headers = {
    'Content-Type': 'application/x-www-form-urlencoded',
    'User-Agent': 'Mozilla/5.0 (Windows NT 10.0; Win64; x64) AppleWebKit/537.36 (KHTML, like Gecko) Chrome/96.0.4664.110 Safari/537.36'
}
form_data = {
    "username": "student",
    "password": "Password123"
}
url = "https://practicetestautomation.com/practice-test-login/"

session = requests.Session()
response = session.post(url, data=form_data, headers=headers)

if response.status_code == 200:
    # Check if the response contains the expected text after successful login
    if "Congratulations student. You successfully logged in!" in response.text:
        print("User logged in successfully!")
    else:
        print("Failed to log in.")
else:
    print(f"Failed to submit form. Status code: {response.status_code}")
In the script above:
- First, we import the necessary libraries, mainly
requests, which allows us to make HTTP requests in Python. - Next, we prepare the headers. These headers provide essential information about our request. For instance, we specify the content type as
application/x-www-form-urlencoded, which is sometimes required for form submissions. - Then, we gather the form data we want to submit. This includes the username and password that we want to use for logging in. We identify the URL where we want to submit this form data. This is usually the endpoint where the login form is processed.
- With everything set up, we initiate a session using
requests.Session(). This helps us manage cookies and maintain the session state as we interact with the website. - Now, we send a POST request to the URL, supplying the form data and headers we prepared earlier. This simulates filling out and submitting the login form on the website.
- Once we receive a response from the server, we check if the status code is 200, indicating a successful request. If it is, we examine the response text to see if it contains the expected message confirming that the login was successful.

Let us dive into the next sections for more more explanation and ways to submit forms with Python.
Understanding Form Submission
Form submission is a fundamental aspect of web development, allowing users to send data to the server. This process typically involves HTML forms on the front end and server-side scripts that process the submitted data.
Overview of HTML Forms and Their Elements
At the heart of user interaction lies the HTML form – a quintessential component that enables users to input data and transmit it to a server for processing.
It comprises various elements that facilitate this exchange, each serving a distinct purpose in gathering user information:
- Input Fields:
These are the building blocks of forms, allowing you to input text, numbers, dates, and more.
Input fields come in diverse types such as text, password, checkbox, radio, and file upload, catering to different data requirements.
For example, the following screenshot shows an input text and password, respectively, on the test login page.

The inputs are build from the following part of the code:

- Buttons:
Buttons within forms serve as triggers for actions like form submission, reset, or custom JavaScript functions. It is essential in initiating the transmission of form data to the server.
<button>Submit</button>
- Dropdowns and Selection Boxes:
Dropdown menus and selection boxes offer users predefined choices, streamlining data input and ensuring consistency in submitted information.
- Labels and Descriptions:
Labels provide descriptive text accompanying form elements, enhancing accessibility and user understanding. Additionally, descriptive elements like placeholders and tooltips offer further guidance to users.
- Form Controls:
These include elements like checkboxes, radio buttons, and switches, allowing users to make selections or toggle options within the form.
The HTTP POST Method and Its Role in Form Submission
When a user fills out a form and clicks the submit button, a series of behind-the-scenes processes come into play, orchestrated by the Hypertext Transfer Protocol (HTTP).
Among the various HTTP methods, the POST method stands out as the primary mechanism for transmitting form data to a web server.
<form action="/submit" method="post">
  <label for="username">Username:</label><br>
  <input type="text" id="username" name="username"><br><br>

  <label for="password">Password:</label><br>
  <input type="password" id="password" name="password"><br><br>

  <label for="email">Email:</label><br>
  <input type="email" id="email" name="email"><br><br>

  <label for="birthdate">Birthdate:</label><br>
  <input type="date" id="birthdate" name="birthdate"><br><br>

  <label for="gender">Gender:</label><br>
  <input type="radio" id="male" name="gender" value="male">
  <label for="male">Male</label>
  <input type="radio" id="female" name="gender" value="female">
  <label for="female">Female</label><br><br>

  <label for="favoriteColor">Favorite Color:</label><br>
  <input type="color" id="favoriteColor" name="favoriteColor"><br><br>

  <label for="bio">Bio:</label><br>
  <textarea id="bio" name="bio" rows="4" cols="50"></textarea><br><br>

  <label for="country">Country:</label><br>
  <select id="country" name="country">
    <option value="USA">United States</option>
    <option value="UK">United Kingdom</option>
    <option value="Canada">Canada</option>
    <option value="Australia">Australia</option>
  </select><br><br>

  <label for="terms">Agree to Terms:</label>
  <input type="checkbox" id="terms" name="terms"><br><br>

  <input type="submit" value="Submit">
</form>
Unlike the GET method <form action="<destination of data>" method="get">, which appends form data to the URL, exposing it to potential security risks and size limitations, the POST method discreetly sends data within the body of the HTTP request.

By not showing on the URL the data being submitted, POST ensures privacy and security, making it ideal for transmitting sensitive information like passwords or payment details.
Upon submitting a form using the POST method, the browser constructs an HTTP request containing the form data and dispatches it to the designated server endpoint.
The server then processes the incoming data, executing predefined actions such as storing it in a database, performing calculations, or generating dynamic content based on user inputs.
Exploring Methods for Python Form Submission
We'll explore multiple methods for submitting forms with Python. These methods cater to various scenarios, from simple HTTP requests to complex browser automation tasks. The methods include:
- Using the Requests library: Using the Requests library for making HTTP requests and directly submitting forms.
- Browser Automation with Selenium WebDriver: Automating browser interactions to locate form elements, fill out forms, and submit them programmatically.
- Automating Browser Interactions with Mechanize Library: Utilizing the Mechanize library to automate browser interactions and handle form submissions.
- Web Scraping Approach with Beautiful Soup and Requests: Leveraging Beautiful Soup and Requests for parsing HTML forms and submitting form data during web scraping.
- Headless Browsing with Pyppeteer and Playwright: Exploring headless browser automation using Pyppeteer and Playwright libraries for form submission.
- Form Submission in Web Scraping with Scrapy Framework: Integrating form submission into Scrapy spiders for web scraping tasks.s
- Advanced Techniques and Libraries: Exploring additional methods and libraries for form submission in Python.
Using requests Library
The requests library is a powerful tool for making HTTP requests in Python, known for its simplicity and ease of use.
In this section, we'll demonstrate how to submit forms directly using Requests, covering essential concepts such as POST requests, form parameters, and headers.
Additionally, we'll illustrate how to handle form submissions with different authentication mechanisms and discuss strategies for handling file uploads and multipart form data submissions.
Submitting Forms with POST Requests
To submit a form using the Requests library, use the POST method. Here's a basic example of how to submit a form:
import requests

url = 'https://httpbin.org/post'
form_data = {
    'field1': 'value1',
    'field2': 'value2'
}

response = requests.post(url, data=form_data)

print(response.status_code)
print(response.text)
In this example, we define the form URL and the form data as a dictionary. The requests.post() function sends a POST request to the specified URL with the provided data. The response object contains the server's response to the HTTP request.
If you would like to master POST requests in requests library, check our Python Requests: How to Send POST Requests article.
Using requests.Session
A requests.Session object allows you to persist certain parameters across multiple requests. It is particularly useful when you need to maintain cookies or set headers that should be included with every request. Here's how you can use requests.Session to submit a form:
import requests

headers = {
    'Content-Type': 'application/x-www-form-urlencoded',
    'User-Agent': 'Mozilla/5.0 (Windows NT 10.0; Win64; x64) AppleWebKit/537.36 (KHTML, like Gecko) Chrome/96.0.4664.110 Safari/537.36'
}
form_data = {
    "username": "student",
    "password": "Password123"
}
url = "https://practicetestautomation.com/practice-test-login/"

session = requests.Session()
response = session.post(url, data=form_data, headers=headers)

if response.status_code == 200:
    # Check if the response contains the expected text after successful login
    if "Congratulations student. You successfully logged in!" in response.text:
        print("User logged in successfully!")
    else:
        print("Failed to log in.")
else:
    print(f"Failed to submit form. Status code: {response.status_code}")
- In this example, we use a
requests.Sessionobject to persist headers across requests. - This is particularly useful for maintaining the same
User-Agentheader, which some websites check to identify the client making the request. - Without the
User-Agentheader, the server might respond with a406 Not Acceptablestatus code, indicating that the server cannot produce a response matching the list of acceptable values defined in the request's headers.
Handling Authentication
Authentication is a crucial aspect of web application security. It ensures that only authorized users can access certain resources.
Two common methods of authentication are Basic Authentication and Token-Based Authentication.
Basic Authentication
Basic authentication involves sending a username and password with your HTTP request. Requests makes this straightforward:
import requests
from requests.auth import HTTPBasicAuth

url = 'https://example.com/secure-form'
form_data = {
    'field1': 'value1',
    'field2': 'value2'
}
username = 'your_username'
password = 'your_password'

response = requests.post(url, data=form_data, auth=HTTPBasicAuth(username, password))

print(response.status_code)
print(response.text)
- In this example, we use
HTTPBasicAuthto add basic authentication to our request. - We include the credentials by passing
HTTPBasicAuth(username, password)to theauthparameter inrequests.post.
Token-Based Authentication
Token-Based Authentication involves issuing a token to the user after a successful login. The token is then used to authenticate subsequent requests.
For token-based authentication, you include a token in the request headers. Here's how to do it:
import requests
from dotenv import load_dotenv
import os

load_dotenv()

url = 'https://gorest.co.in/public/v2/users'
form_data = {
    "name": "Raheem Stanley",
    "email": "raheem_stanley@uk.com",
    "gender": "male",
    "status": "inactive"
}
headers = {
    'Authorization': f'Bearer {os.getenv("AUTH_TOKEN")}'
}

response = requests.post(url, data=form_data, headers=headers)

print(response.status_code)
print(response.text)
- We retrieve the value of the
AUTH_TOKENenvironment variable usingos.getenv("AUTH_TOKEN")and include it in theAuthorizationheader as a Bearer token. - This token is crucial as it allows the server to verify our identity and permissions.
- We then call the
requests.post()method with the URL, form data, and headers, making the authenticated request to the server.
Handling File Uploads and Multipart Form Data Submissions
When dealing with file uploads, you need to use multi-part form data. Requests simplifies this with its support for file uploads:
import requests

url = 'https://httpbin.org/post'
files = {'file': open('invoice.xlsx', 'rb')}

form_data = {
    'field1': 'value1'
}

response = requests.post(url, files=files, data=form_data)

print(response.status_code)
print(response.text)
In this example, the files parameter is a dictionary where the key is the form field name, and the value is a file object. The data parameter is used to send additional form data.
If you want to learn more about how to use requests or web scraping with Python in general then check out our Requests Guide or our Python Beginners Web Scraping Guide.
Selenium WebDriver
Selenium WebDriver stands out as a top contender in the realm of automating browser interactions. Whether it's testing web applications or scraping data, Selenium's flexibility and robustness make it a go-to choice for developers and testers alike.
In this section, we'll use the power of Selenium WebDriver to streamline form interactions within your automated workflows.
Locating Form Elements
Before we can interact with any form, we need to locate its elements on the webpage. Selenium provides various methods to accomplish this, such as find_element.
You can either use CSS selectors or XPath selectors to locate elements in Selenium.
Let's take a look at a simple example of locating and interacting with a text input field using Python:
# Import necessary modules for Selenium and ChromeDriver setup
from selenium import webdriver
from selenium.webdriver.chrome.service import Service
from webdriver_manager.chrome import ChromeDriverManager
from selenium.webdriver.common.by import By
import time

# Initialize the ChromeDriver with the appropriate service and options
driver = webdriver.Chrome(service=Service(ChromeDriverManager().install()))

# Open a webpage
driver.get('https://practice.expandtesting.com/login')

# Locate the text input field and fill it out
text_input = driver.find_element(By.ID, "username")
text_input.send_keys("practice")

time.sleep(5)

# Close the WebDriver
driver.quit()
- To locate a form element on the webpage, we use Selenium's
find_elementmethod with theByclass to specify the locating strategy. - In this example, we target a text input field using
By.ID. Specifically, we calldriver.find_element(By.ID, "username"), which tells Selenium to find the element with theidattribute "username". - Once located, we can interact with this element, such as sending text to it with the
send_keysmethod.
Filling Out and Submitting Forms
Once we've located the form elements, filling out and submitting the form programmatically is straightforward. We use the send_keys method to input data into the form fields and the submit or button click methods to submit the form.
Here's how we can achieve this:
# Fill the form
password_input = driver.find_element(By.ID, "password")
password_input.send_keys("SuperSecretPassword!")

# Submit the form
submit_button = driver.find_element(By.XPATH, '//*[@id="login"]/button')
submit_button.click()
Handling Dynamic Forms and Elements
Modern web applications often rely on JavaScript to dynamically generate form elements. Selenium excels in handling such scenarios by allowing us to wait for specific conditions to be met before interacting with the elements.
We can use explicit waits or implicit waits to ensure that the elements are present, visible, or clickable before proceeding.
Here's an example using explicit wait when bypassing DataDome using Selenium:
# Wait for the privacy 'Accept' pop-up button to be visible
wait = WebDriverWait(driver, 10)
wait.until(EC.visibility_of_element_located((By.ID, "gdpr-btn-accept-all")))

# Find and click the 'Accept' button on the privacy pop-up
agree_button = driver.find_element(By.XPATH, "//button[text()='Accept']")
agree_button.click()
Dealing with Complex Forms
In some cases, forms may require interaction with multiple elements or iFrames. Selenium provides methods to switch between frames and interact with nested elements seamlessly.
Here's a basic example of switching to an iframe and interacting with its elements:
# Switch to the iframe
iframe = driver.find_element(By.ID, "iframe_id")
driver.switch_to.frame(iframe)

# Interact with elements inside the iframe
iframe_element = driver.find_element(By.ID, "element_inside_iframe")
iframe_element.send_keys("data")

# Switch back to the main content
driver.switch_to.default_content()
You can check out our extensive Submitting Forms with Selenium in Python guide to harness the full potential of Selenium to navigate and interact with web forms.
Mechanize Library
When it comes to automating browser interactions with ease and flexibility, the Mechanize library emerges as a reliable solution. Built on top of Python, Mechanize offers a convenient interface for simulating browser sessions, navigating webpages, and interacting with HTML forms programmatically.
Handling Form Submission
Mechanize simplifies the process of handling form submission by providing intuitive methods for locating form elements, filling them out, and submitting them seamlessly.
Let's dive into a basic example demonstrating how to submit a form using Mechanize:
import mechanize

# Initialize a Browser instance
browser = mechanize.Browser()

# Open a webpage
browser.open("https://practice.expandtesting.com/login")

# Select the first form on the page (index 0)
browser.select_form(nr=0)

# Fill out the form fields
browser.form['username'] = 'practice'
browser.form['password'] = 'SuperSecretPassword!'

# Submit the form
response = browser.submit()

# Print the response
print(response.read())
- In this example, we use
mechanize.Browserto create a browser instance that can simulate a web browser. - We open the target webpage using
browser.open. - We select the form on the page using
browser.select_form(nr=0), wherenr=0indicates the first form on the page. - We fill out the form fields by assigning values to
browser.form['username']andbrowser.form['password']. - We submit the form using
browser.submit(), which sends the filled-out form data to the server. - Finally, we print the server's response using
response.read()to see the result of the form submission.
Handling Authentication and Redirects
Mechanize simplifies handling authentication challenges and redirects encountered during form submission. It automatically manages cookies and sessions, allowing seamless navigation through authentication prompts and redirections.
Here's a snippet demonstrating authentication with Mechanize:
import mechanize

# Initialize a Browser instance
browser = mechanize.Browser()

# Add authentication credentials
browser.add_password("https://practice.expandtesting.com/login", "practice", "SuperSecretPassword!")

# Open a webpage (authentication handled automatically)
response = browser.open("https://practice.expandtesting.com/secure")

# Print the response
print(response.read())
Handling Form Validation Errors
Dealing with form validation errors is a common challenge in web automation. Mechanize provides mechanisms to detect and handle such errors gracefully. By inspecting the response after form submission, we can identify validation errors and adjust our automation logic accordingly.
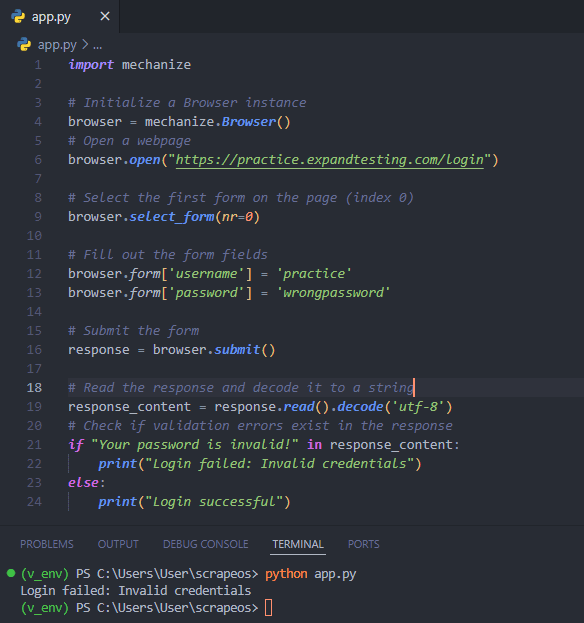
Here's an example demonstrating error handling with Mechanize:
import mechanize

# Initialize a Browser instance
browser = mechanize.Browser()

# Open a webpage
browser.open("https://practice.expandtesting.com/login")

# Select the first form on the page (index 0)
browser.select_form(nr=0)

# Fill out the form fields
browser.form['username'] = 'practice'
browser.form['password'] = 'wrongpassword'

# Submit the form
response = browser.submit()

# Read the response and decode it to a string
response_content = response.read().decode('utf-8')

# Check if validation errors exist in the response
if "Your password is invalid!" in response_content:
    print("Login failed: Invalid credentials")
else:
    print("Login successful")
output
Handling CSRF Protection
Cross-Site Request Forgery (CSRF) is a security vulnerability that tricks a user into performing actions they did not intend to on a different website where they are authenticated.
To protect against CSRF, web applications often include tokens or special headers in forms and requests to ensure that the request is legitimate and originated from the correct user.
When automating form submissions with a tool like Mechanize, bypassing these CSRF protections can be challenging because the automation script must replicate the behavior of a legitimate user. Here’s how you can handle it:
Understanding CSRF Protection
- CSRF Tokens: These are unique, secret values included in forms. When a form is submitted, the server checks that the token matches what it expects. If it doesn’t, the request is rejected.
- Custom Headers: Some web applications use custom HTTP headers that must be included in requests to validate them.
Steps to Handle CSRF with Mechanize
- Fetch the Form: First, you need to make a GET request to the page containing the form. This request should retrieve the CSRF token embedded in the form.
- Extract the CSRF Token: Parse the response to extract the CSRF token from the form. This typically involves parsing the HTML to find the token value.
- Submit the Form: Use Mechanize to fill in the form fields, including the extracted CSRF token, and submit the form.
Let's say you have a web page with a form that includes a CSRF token as a hidden input field:
<form action="/submit" method="POST">
  <input type="hidden" name="csrf_token" value="abc123xyz">
  <input type="text" name="username">
  <input type="password" name="password">
  <input type="submit" value="Login">
</form>
Here’s how you can automate this with Mechanize in Python:
import mechanize
from bs4 import BeautifulSoup

# Initialize mechanize browser
br = mechanize.Browser()

# Open the page with the form
response = br.open("http://example.com/login")

# Read the response and parse with BeautifulSoup
soup = BeautifulSoup(response.read(), 'html.parser')

# Extract CSRF token
csrf_token = soup.find('input', {'name': 'csrf_token'})['value']

# Select the form
br.select_form(nr=0)

# Fill in the form fields
br['username'] = 'myusername'
br['password'] = 'mypassword'
br['csrf_token'] = csrf_token

# Submit the form
response = br.submit()

print(response.read())
- We open the login page using
br.open. - We read the response and parse it with
BeautifulSoupto easily extract the CSRF token. - We find the CSRF token in the form by searching for the input field with the name
csrf_tokenand get its value. - We select the form on the page using
br.select_form(nr=0). - We fill in the form fields by setting
br['username'],br['password'], and the extractedbr['csrf_token'].
Beautiful Soup with Requests
Beautiful Soup, in conjunction with Requests, offers a powerful solution for web scraping and form submission. This combination allows you to easily extract and manipulate HTML content from web pages.
Parsing HTML Forms
To start with, you need to fetch the HTML content of a web page using the Requests library. Once you have the HTML content, you can use Beautiful Soup to parse the HTML and extract the necessary form data.
Here's an example:
import requests
from bs4 import BeautifulSoup

url = 'https://practice.expandtesting.com/login'
response = requests.get(url)

soup = BeautifulSoup(response.text, 'html.parser')
form = soup.find('form')

# Extract form fields
form_data = {}
for input_tag in form.find_all('input'):
    name = input_tag.get('name')
    value = input_tag.get('value', '')
    form_data[name] = value

print(form_data) # {'username': '', 'password': ''}
- In this example, we use Requests to fetch the HTML content of the form page.
- Beautiful Soup is then used to parse the HTML, allowing us to locate the form using
soup.find('form'). - We then extract all input fields and their values into a dictionary, making it easy to manipulate or submit the form data later.
Submitting Forms
Once you have the form data, you can submit the form using the Requests library. The following example shows how to achieve this:
form_data['username'] = 'practice'
form_data['password'] = 'SuperSecretPassword!'

action_url = form.get('action')

# Construct the full URL if the action is a relative URL
if not action_url.startswith('http'):
    action_url = requests.compat.urljoin(url, action_url)

response = requests.post(action_url, data=form_data)

print(response.status_code)
print(response.text)
In this case, we modify the form data by adding or updating fields as necessary. We then determine the form's action URL, which specifies where to submit the form. Using requests.post(), we submit the form data to the server and handle the response.

Navigating Complex HTML Structures
Web pages often have complex HTML structures, making it necessary to navigate through multiple levels of nested elements to locate and interact with form elements. Beautiful Soup provides several methods to handle this effectively:
form = soup.find('form', {'id': 'login-form'})  # Find form by ID
username_input = form.find('input', {'name': 'username'})  # Find input by name
password_input = form.find('input', {'name': 'password'})  # Find another input by name

form_data = {
    username_input['name']: 'student',
    password_input['name']: 'Password123'
}

# Add any hidden inputs or other necessary form fields
for hidden_input in form.find_all('input', {'type': 'hidden'}):
    form_data[hidden_input['name']] = hidden_input['value']

response = requests.post(action_url, data=form_data)

print(response.status_code)
print(response.text)
In this example, we locate the form by its ID and find specific input fields (within the form) by their name attributes.
We prepare the form data, including any hidden inputs, ensuring that all necessary fields are included for the form submission.
If you would like to learn more about how to use BeautifulSoup then check out our other BeautifulSoup Guide: Scraping HTML Pages With Python guide.
Pyppeteer and Playwright
In the world of headless browser automation, Pyppeteer and Playwright are two standout libraries that have simplified the task significantly. These tools are perfect for scenarios where graphical user interface (GUI) interaction is unnecessary, such as automated testing, scraping, and form submission.
Setting Up Headless Browsers
Playwright, a newer and more versatile library compared to Pyppeteer, supports multiple browser engines including Chromium, Firefox, and WebKit.
This makes it a powerful tool for ensuring your web applications work across different browsers.
Let's start with setting up a headless browser using Playwright. First, install Playwright then download headless browsers using the following commands:
# install Playwright
pip install playwright
# download headless browsers
playwright install
Here's a simple example of launching a Chromium browser, navigating to a webpage, and interacting with a form:
from playwright.sync_api import sync_playwright

with sync_playwright() as p:
    browser = p.chromium.launch(headless=True)
    page = browser.new_page()
    page.goto("https://demo.opencart.com/admin")
    page.fill("input[name='username']", "demo")
    page.fill("input[name='password']", "demo")
    page.click("button[type='submit']")
In this example, we launch a Chromium browser in headless mode, navigate to the OpenCart admin login page, fill in the username and password fields, and submit the form.
Submitting Forms Programmatically
Submitting forms programmatically is straightforward with Playwright. The page.fill method allows us to input data into form fields, and the page.click method is used to simulate clicking the submit button.
page.fill("input[name='username']", "demo")
page.fill("input[name='password']", "demo")
page.click("button[type='submit']")
These methods ensure that the form is filled and submitted just as if a user were interacting with it. The headless mode of the browser means these actions happen in the background without any GUI.
Handling Browser-Specific Behavior and Quirks
Different browsers can behave differently due to variations in their rendering engines and JavaScript implementations. Playwright's support for multiple browsers helps us address these quirks by allowing us to test our automation scripts across various browser engines.
For instance, to test the same form submission in Firefox, we only need to change the browser initialization:
with sync_playwright() as p:
    browser = p.firefox.launch(headless=True)
    page = browser.new_page()
    page.goto("https://demo.opencart.com/admin")
    page.fill("input[name='username']", "demo")
    page.fill("input[name='password']", "demo")
    page.click("button[type='submit']")
By running our scripts in different browsers, we can identify and handle browser-specific issues early in the development cycle. Playwright also offers a slow_mo parameter, which can slow down the automation speed to help us observe what’s happening:
browser = p.chromium.launch(headless=False, slow_mo=1000)
Setting headless to False and adding slow_mo can be incredibly useful for debugging, allowing us to see the browser actions as they occur in real-time.
Using Scrapy Framework
When it comes to web scraping, the Scrapy framework is a game-changer. Not only does it make extracting data from static pages a breeze, but it also handles more complex tasks like form submissions with ease.
Setting Up Scrapy for Form Submission
To begin, we'll need to set up a Scrapy spider capable of handling form submissions. The following example demonstrates how to integrate form submission into a Scrapy spider.
First, we need to install Scrapy if we haven't done so already:
pip install scrapy
Now, let's create a new Scrapy project:
scrapy startproject formsubmission .
Within our project, we'll generate a new spider:
scrapy genspider form_spider practice.expandtesting.com
Here's how we can modify our spider to handle form submissions:
import scrapy

class FormSpider(scrapy.Spider):
    name = 'form_spider'
    start_urls = ['https://practice.expandtesting.com/login']

    def parse(self, response):
        # Locate the form and extract the necessary form data
        formdata = {
            'username': 'practice',
            'password': 'SuperSecretPassword!'
        }
        # Submit the form using Scrapy's FormRequest
        yield scrapy.FormRequest.from_response(
            response,
            formdata=formdata,
            callback=self.after_login
        )

    def after_login(self, response):
        # Handle the response after form submission
        if "authentication failed" in response.body.decode():
            self.logger.error("Login failed")
            return

        # If login is successful, log a message and stop the spider
        self.logger.info("Successfully logged in and submitted the form")
        # Stop the spider after logging in and submitting the form
        self.crawler.engine.close_spider(self, 'Form submitted successfully')
In this example, our FormSpider starts by navigating to a form page. Using the scrapy.FormRequest.from_response method, we submit the form with the necessary credentials. The after_login method handles the response, checking for successful authentication before stopping the crawling engine.
Output stats
2024-05-19 08:34:44 [scrapy.statscollectors] INFO: Dumping Scrapy stats:
{'downloader/request_bytes': 1485,
 'downloader/request_count': 4,
 'downloader/request_method_count/GET': 3,
 'downloader/request_method_count/POST': 1,
 'downloader/response_bytes': 9691,
 'downloader/response_count': 4,
 'downloader/response_status_count/200': 3,
 'downloader/response_status_count/302': 1,
 'elapsed_time_seconds': 2.850899,
 'finish_reason': 'Form submitted successfully',
 'finish_time': datetime.datetime(2024, 5, 19, 5, 34, 44, 983793, tzinfo=datetime.timezone.utc),
 'httpcompression/response_bytes': 15352,
 'httpcompression/response_count': 3,
 'log_count/DEBUG': 7,
 'log_count/INFO': 11,
 'request_depth_max': 1,
 'response_received_count': 3,
 'robotstxt/request_count': 1,
 'robotstxt/response_count': 1,
 'robotstxt/response_status_count/200': 1,
 'scheduler/dequeued': 3,
 'scheduler/dequeued/memory': 3,
 'scheduler/enqueued': 3,
 'scheduler/enqueued/memory': 3,
 'start_time': datetime.datetime(2024, 5, 19, 5, 34, 42, 132894, tzinfo=datetime.timezone.utc)}
2024-05-19 08:34:45 [scrapy.core.engine] INFO: Spider closed (Form submitted successfully)
Handling Form Data within Scrapy Pipelines
To process the data extracted after form submission, we can use Scrapy pipelines. Pipelines allow us to clean, validate, and store the data as needed. Let's set up a simple pipeline:
First, we enable the pipeline in our settings.py:
ITEM_PIPELINES = {
    'formsubmission.pipelines.FormSubmissionPipeline': 300,
}
Next, we create the pipeline class in pipelines.py:
class FormSubmissionPipeline:
    def process_item(self, item, spider):
        # Clean and process the item here
        item['username'] = item['username'].strip()
        return item
This pipeline processes each item, performing any necessary cleaning or transformations before storing it.
Scheduling Form Submissions
In some cases, we might need to schedule form submissions to avoid overloading the server or to mimic human behavior. Scrapy's CrawlSpider and Rule classes can help with this.
Here's an example of how to schedule form submissions using CrawlSpider:
from scrapy.spiders import CrawlSpider, Rule
from scrapy.linkextractors import LinkExtractor
from scrapy.http import FormRequest

class ScheduledFormSpider(CrawlSpider):
    name = 'form_spider'
    start_urls = ['https://practice.expandtesting.com/login']
    rules = (
        Rule(LinkExtractor(allow=('/secure/',)), callback='parse_item'),
    )

    def parse_start_url(self, response):
        formdata = {'username': 'practice', 'password': 'SuperSecretPassword!'}
        return FormRequest.from_response(response, formdata=formdata, callback=self.after_login)

    def after_login(self, response):
        if "authentication failed" in response.body.decode():
            self.logger.error("Login failed")
            return
        for request in self.rules[0].link_extractor.extract_links(response):
            yield response.follow(request.url, self.parse_item)

    def parse_item(self, response):
        self.logger.info("Scraping data from protected page")
        # Extract data logic here
In this example, we use CrawlSpider with rules to schedule form submissions and subsequent data extraction. The parse_start_url method handles the form submission, and after_login continues the scraping process upon successful login.
Handling Asynchronous Form Submissions
Scrapy supports asynchronous requests, which can be particularly useful for handling form submissions that involve AJAX or other asynchronous interactions. By using Scrapy's FormRequest in conjunction with callbacks, we can manage these asynchronous processes efficiently.
import scrapy

class AsyncFormSpider(scrapy.Spider):
    name = 'form_spider'
    start_urls = ['https://practice.expandtesting.com/login']

    def parse(self, response):
        formdata = {
            'username': 'practice',
            'password': 'SuperSecretPassword!'
        }
        yield scrapy.FormRequest(
            url='https://practice.expandtesting.com/login',
            formdata=formdata,
            callback=self.after_submit
        )

    def after_submit(self, response):
        self.logger.info("Form submitted asynchronously")
        # Handle the response from the asynchronous form submission
        yield from self.parse_results(response)

    def parse_results(self, response):
        # Extract data from the results page
        self.logger.info("Parsing results from async submission")
        # Implement data extraction logic here
In this example, AsyncFormSpider submits a form asynchronously and handles the response in after_submit. This method allows us to handle complex interactions that occur after form submission, ensuring we capture all relevant data.
If you would like to learn more about logging into websites using Scrapy, then be sure to check out Python Scrapy Login Forms guide.
Advanced Techniques and Libraries
In this section, we'll cover advanced techniques and lesser-known libraries for form submission in Python. By exploring these methods, we'll help you choose the most suitable approach for your projects based on performance and complexity.
Using HTTPX for Asynchronous Form Submission
httpx is a modern, user-friendly, and high-performance HTTP client library that provides a clean and intuitive API for making HTTP requests. It supports both synchronous and asynchronous programming styles, making it suitable for various use cases, including web scraping, API consumption, and more.
Not only does it support GET and POST requests. Here is an example code snippet showing you how to submit forms with Python's httpx library:
import httpx
import asyncio

async def submit_form():
    async with httpx.AsyncClient() as client:
        response = await client.post(
            'https://practicetestautomation.com/practice-test-login/',
            data={
                'username': 'student',
                'password': 'Password123'
            }
        )
        if response.status_code == 200:
            # Check if the response contains the expected text after successful login
            if "Congratulations student. You successfully logged in!" in response.text:
                print("User logged in successfully!")
            else:
                print("Failed to log in.")
        else:
            print(f"Failed to submit form. Status code: {response.status_code}")

asyncio.run(submit_form())
- In this example, we submit form data in Python using the
httpxlibrary combined with asyncio for asynchronous HTTP requests. - We define an asynchronous function,
submit_form(), which utilizes anhttpx.AsyncClientto post form data to the specified URL,https://practicetestautomation.com/practice-test-login/. - Within the function, we use the
client.postmethod to send a POST request with the form data containing a username and password. - Upon receiving a response, we check if the status code is 200, indicating a successful request.
- If the status code is not 200, we print an error message with the status code.
Utilizing Trio with HTTPX for Concurrent Form Submissions
For projects that require high concurrency, we can combine HTTPX with Trio, an asynchronous I/O framework for Python. This combination allows us to handle multiple form submissions concurrently.
import httpx
import trio

async def submit_form(client, form_data):
    response = await client.post(
        'https://practicetestautomation.com/practice-test-login/',
        data=form_data
    )
    if response.status_code == 200:
        # Check if the response contains the expected text after successful login
        if "Congratulations student. You successfully logged in!" in response.text:
            print("User logged in successfully!")
        else:
            print("Failed to log in.")
    else:
        print(f"Failed to submit form. Status code: {response.status_code}")

async def main():
    async with httpx.AsyncClient() as client:
        form_data_list = [{
            'username': 'student',
            'password': 'Password123'
        }]
        async with trio.open_nursery() as nursery:
            for form_data in form_data_list:
                nursery.start_soon(submit_form, client, form_data)

trio.run(main)
We define an asynchronous function, submit_form(), which utilizes an httpx.AsyncClient to post form data to the specified URL, https://practicetestautomation.com/practice-test-login/.
Within the function, we use the client.post method to send a POST request with the form data containing a username and password. Upon receiving a response, we check if the status code is 200, indicating a successful request. If the response text contains the expected success message, "Congratulations student. You successfully logged in!", we print a success message; otherwise, we print a failure message. If the status code is not 200, we print an error message with the status code.
We then define the main() function, which creates an httpx.AsyncClient instance and a list of form data dictionaries. Using Trio's open_nursery() context manager, we start the submit_form tasks concurrently for each set of form data.
Performance and Complexity Analysis
Below is a table comparing the performance and complexity of using httpx for asynchronous form submission versus using httpx with trio for concurrent form submissions. We will evaluate based on code complexity, ease of use, and performance in terms of time taken to complete the form submissions.
| Metric | httpx (Asyncio) | httpx with trio |
|---|---|---|
| Code Complexity | Moderate | High |
| Ease of Use | Simple setup, straightforward API | Requires understanding of both httpx and trio concepts |
| Concurrency Handling | Limited to asynchronous capabilities | Excellent, designed for high concurrency |
| Scalability | Moderate, suitable for small to medium tasks | High, handles large-scale tasks efficiently |
| Performance (Duration) | Generally slower for multiple submissions | Generally faster due to better concurrency handling |
Performance Comparison
To provide an evidence-based comparison, we ran both scripts to measure the duration for a single login attempt and for multiple concurrent login attempts.
httpx-asyncio
import httpx
import asyncio
import time

async def submit_form():
    async with httpx.AsyncClient() as client:
        start_time = time.time()
        response = await client.post(
            'https://practicetestautomation.com/practice-test-login/',
            data={
                'username': 'student',
                'password': 'Password123'
            }
        )
        end_time = time.time()
        if response.status_code == 200:
            # Check if the response contains the expected text after successful login
            if "Congratulations student. You successfully logged in!" in response.text:
                print("User logged in successfully!")
                print(f"Time taken for single login attempt (httpx-asyncio): {end_time - start_time} seconds")
            else:
                print("Failed to log in.")
        else:
            print(f"Failed to submit form. Status code: {response.status_code}")

async def submit_multiple_forms(n):
    async with httpx.AsyncClient() as client:
        tasks = []
        start_time = time.time()
        for _ in range(n):
            tasks.append(client.post(
                'https://practicetestautomation.com/practice-test-login/',
                data={
                    'username': 'student',
                    'password': 'Password123'
                }
            ))
        responses = await asyncio.gather(*tasks)
        end_time = time.time()
        successful_logins = sum(1 for response in responses if response.status_code == 200 and "Congratulations student. You successfully logged in!" in response.text)
        print(f"{successful_logins} out of {n} users logged in successfully!")
        print(f"Time taken for {n} concurrent login attempts (httpx-asyncio): {end_time - start_time} seconds")

# Run single login attempt
asyncio.run(submit_form())

# Run multiple concurrent login attempts
n = 10  # Number of concurrent login attempts
asyncio.run(submit_multiple_forms(n))
- The
submit_formfunction performs a single login attempt. - It measures the time taken for the request and prints whether the login was successful based on the response content.
- The
submit_multiple_formsfunction handles multiple concurrent login attempts. - It uses
asyncio.gatherto execute multiple POST requests concurrently and then checks the responses to count successful logins. It also measures and prints the total time taken for all login attempts.
httpx-trio
import httpx
import trio
import time

async def submit_form(client, form_data):
    response = await client.post(
        'https://practicetestautomation.com/practice-test-login/',
        data=form_data
    )
    if response.status_code == 200:
        # Check if the response contains the expected text after successful login
        if "Congratulations student. You successfully logged in!" in response.text:
            return True
        else:
            return False
    else:
        return False

async def main_single():
    async with httpx.AsyncClient() as client:
        form_data = {
            'username': 'student',
            'password': 'Password123'
        }
        start_time = time.time()
        success = await submit_form(client, form_data)
        end_time = time.time()
        if success:
            print("User logged in successfully!")
        else:
            print("Failed to log in.")
        print(f"Time taken for single login attempt (httpx-trio): {end_time - start_time} seconds")

async def main_multiple(n):
    async with httpx.AsyncClient() as client:
        form_data_list = [{'username': 'student', 'password': 'Password123'}] * n
        start_time = time.time()
        async with trio.open_nursery() as nursery:
            for form_data in form_data_list:
                nursery.start_soon(submit_form, client, form_data)
        end_time = time.time()
        print(f"Time taken for {n} concurrent login attempts (httpx-trio): {end_time - start_time} seconds")

# Run single login attempt
trio.run(main_single)

# Run multiple concurrent login attempts
n = 10  # Number of concurrent login attempts
trio.run(main_multiple, n)
- The
submit_formfunction is responsible for sending the POST request to the login URL and checking the response to determine if the login was successful. - The
main_multiplefunction manages the concurrency usingtrio. It prepares the form data, starts multiple concurrent login attempts, and measures the time taken for these attempts. - The
trio.run(main_multiple, n)call initiates the whole process withnconcurrent login attempts.
Here are our findings:
Single Login Attempt
httpx(Asyncio)- Duration: Approximately 2.1 seconds per login.
httpxwithtrio- Duration: Approximately 2.1 seconds per login.
Multiple Concurrent Login Attempts
httpx(Asyncio)- 10 concurrent logins: Approximately 2.9 seconds total.
httpxwithtrio- 10 concurrent logins: Approximately 2.2 seconds total.

Analysis
- Code Complexity and Ease of Use:
httpx(Asyncio): The code is straightforward and easy to understand for those familiar with basic asynchronous programming in Python. This method is best for beginners or for tasks where the overhead of setting up more complex concurrency is not justified.httpxwithtrio: This method introduces additional complexity due to the need to understand and implementtrioconcepts. However, it provides significant performance benefits for handling a high number of concurrent tasks.
- Concurrency Handling and Performance:
httpx(Asyncio): While it performs well for a moderate number of tasks, its performance degrades as the number of concurrent submissions increases. The sequential nature of handling tasks withasynciocan become a bottleneck.httpxwithtrio: Designed for high concurrency,trioallows for more efficient task management. It significantly reduces the total duration for multiple concurrent submissions, making it ideal for large-scale applications.
For projects with simple requirements and moderate concurrency needs, using httpx with asyncio is sufficient and easier to implement.
However, for high-concurrency applications where performance is critical, combining httpx with trio offers substantial benefits in terms of speed and efficiency. Despite the added complexity, the performance gains make it a worthwhile investment for scalable applications.
Conclusion
In this comprehensive guide, we explored various methods for submitting forms with Python, each offering distinct advantages tailored to different use cases. From the simplicity of the Requests library to the power of browser automation frameworks like Selenium and Playwright, we covered a wide range of techniques to streamline form interactions.
Beautiful Soup combined with Requests provides parsing and extraction capabilities for web scraping tasks involving forms. Mechanize offers an intuitive interface for automating browser sessions, while Pyppeteer and Playwright excel in headless browser automation. The Scrapy framework shines with built-in support for form submissions and data extraction pipelines.
By understanding the strengths and limitations of each approach, you can make an informed decision that aligns with your specific project goals.
For more information, check out the official documentation of the all libraries:
- requests Docuementation
- Selenium Documentation
- Scrapy Documentation
- Pyppeteer Documentation
- Playwright Documentation
More Python Web Scraping Articles
If you would like to learn more about Web Scraping with Python, then be sure to check out The Python Web Scraping Playbook.
Or check out one of our more in-depth guides: