How To Download Images With Python
Image downloading is a crucial aspect of web scraping, data collection, and automation tasks. Python provides multiple ways to download images, each suitable for different requirements and use cases.
This article explores various methods to download images using Python, offering detailed steps and examples for each approach.
- TL:DR - How To Download Images With Python
- Understanding Image Downloading
- Exploring Methods for Python Image Downloading
- Using Requests Library
- Requests with Pillow
- Requests with Beautiful Soup
- Using urllib
- Asynchronous Downloading with aiohttp
- Using http.client
- Web Scraping with Scrapy
- Browser Automation with Selenium
- Advanced Concepts
- Case Study: Scrape Unsplash
- Common Issues and Troubleshooting
- Best Practices for Downloading Images
- Conclusion
- More Python Web Scraping Guides
Let's dive right in!
Need help scraping the web?
Then check out ScrapeOps, the complete toolkit for web scraping.
TL:DR - How To Download Images With Python
The simplest method to download an image using Python is with the requests library.
Here's a quick example using the requests library:
import requests

url = 'https://cdn.pixabay.com/photo/2023/11/16/05/02/mountains-8391433_640.jpg'
response = requests.get(url)

if response.status_code == 200:
    with open('requests.jpg', 'wb') as file:
        file.write(response.content)
- To download an image using Python, we start by importing the
requestslibrary. This library allows us to send HTTP requests easily. - Next, we define the URL of the image we want to download.
- We use the
requests.getmethod to send a GET request to the specified URL. This method retrieves the content of the image. - We then check if the request was successful by verifying if the status code is 200, which means the request was OK.
- If the request is successful, we open a file in write-binary mode (
'wb'). We name this filerequests.jpg. - Finally, we write the content of the response to this file. This saves the image to our local disk.
The above example works for simple scenarios. What if you want want to manipulate the image in the process? Send asynchronous requests? Or crawl a website like a human reader to avoid getting blocked when downloading images?
Read on to find out more.
Understanding Image Downloading
When downloading images using Python, it's essential to understand some key concepts. These include MIME types, image URLs, and HTTP GET requests.
MIME Types
MIME types (Multipurpose Internet Mail Extensions) tell us what kind of file we're dealing with. Think of it like labeling a box: you want to know what's inside without opening it.
MIME types are like labels that describe the type of file we're working with on the internet. They were originally developed to help email programs understand different kinds of file attachments. Now, they are used in many places on the web.
For images, some common MIME types include:
image/jpeg: This is for JPEG images, a popular format for photos because it compresses the file size without much loss of quality.image/png: This is for PNG images, which support transparency and are often used for graphics and icons.image/gif: This is for GIF images, which can be used for simple animations and have a limited color palette.
When a web server sends an image to your browser or a program, it includes the MIME type in the HTTP headers. This tells the browser or program what kind of file it is and how to display or handle it.
For instance, if the MIME type is image/jpeg, the program knows it is a JPEG image and will handle it accordingly.
Understanding MIME types is crucial because it ensures that our programs handle files correctly. If we misinterpret the file type, we might try to process it incorrectly, leading to errors or corrupted files.
By checking the MIME type, we can make sure we're handling the right kind of file in the right way.
Image URLs and HTTP GET Requests
Image URLs are web addresses that point directly to the image files.
These are links that direct you to image files, such as https://example.com/image.jpg and can be embedded in web pages or provided by web services. When you access these URLs, the server returns the image data.
When we download an image, we send an HTTP GET request to the image URL. This request asks the server to send the image data back to us.
The primary purpose of a GET request is to retrieve data from a server at the specified resource.
Explanation of How Binary Data is Handled in Image Downloading
Images are binary files, meaning they contain data in a format that isn't human-readable. When we download an image, we need to read this binary data and save it correctly to ensure the image is not corrupted.
Handling binary data correctly is crucial when downloading and saving images to ensure that the files are not corrupted.
A GET request is sent to the image URL. The server responds with the image data, which is transmitted over the network in binary form. The response from the server includes HTTP headers and the binary content of the image.
The binary data must be written to a file in binary mode to preserve its integrity. This is why we open files in write-binary mode ('wb') when saving images. This mode allows us to write the raw binary data directly to the file, preserving the image's integrity.
Importance of Handling Errors and Exceptions During Downloads
Handling errors and exceptions during downloads is crucial to ensure the robustness and reliability of your web scraping process.
Proper error handling helps you manage various scenarios that can occur during the downloading process. Network issues, incorrect URLs, and server problems can cause our requests to fail.
By checking the status code of our response and using try-except blocks, we can manage these errors gracefully and ensure our program doesn't crash unexpectedly.
Handling errors ensures that we can troubleshoot issues without losing progress or corrupting files.
Exploring Methods for Python Image Downloading
When downloading images in Python, several methods can be employed depending on the specific requirements of the task, such as handling large files, managing asynchronous downloads, or simply using basic synchronous requests. The methods include:
- Using the Requests library: Making HTTP GET requests to download images directly.
- Requests with Pillow: Combining Requests with Pillow to manipulate and save images.
- Requests with Beautiful Soup: Using Beautiful Soup to parse HTML and extract image URLs for downloading.
- Using urllib: Utilizing the built-in
urlliblibrary for downloading images. - Asynchronous Downloading with aiohttp: Leveraging
aiohttpfor asynchronous image downloading. - Using http.client: Employing the low-level
http.clientmodule for downloading images. - Web Scraping with Scrapy: Integrating image downloading into Scrapy spiders.
- Browser Automation with Selenium: Using Selenium to download images from dynamic web pages.
Using requests Library
The requests library is a powerful tool for making HTTP requests in Python. It simplifies the process of sending HTTP requests and handling responses, making it an excellent choice for downloading images from the web.
This method is simple and straightforward for basic downloads and suitable for synchronous tasks.
Let's see how to download images using the requests library.
Downloading a Single Image
Let's walk through the basic process of downloading a single image using the requests library. Below is an example code snippet for downloading an image and saving it to disk:
import requests

url = 'https://cdn.pixabay.com/photo/2023/11/16/05/02/mountains-8391433_640.jpg'
response = requests.get(url)

if response.status_code == 200:
    with open('requests.jpg', 'wb') as file:
        file.write(response.content)
In this example:
- Importing the
requestsLibrary: We start by importing therequestslibrary.pip install requestsif you haven't. - Sending a GET Request: We send a GET request to the image URL using
requests.get(url). This fetches the image data from the server. - Checking the Response Status: We check if the response status code is 200 (OK) to ensure that the image was fetched successfully.
- Saving the Image: If the response is successful, we open a file named
requests.jpgin write-binary mode ('wb'). We then write the binary content of the response to this file usingfile.write(response.content).

Downloading Multiple Images
To extend the single image downloading script to handle multiple images, we can loop through a list of image URLs and save each one to a specified directory. Here's an example:
import requests

image_urls = [
    'https://cdn.pixabay.com/photo/2023/11/16/05/02/mountains-8391433_640.jpg',
    'https://cdn.pixabay.com/photo/2024/02/12/16/05/hunter-peak-8568915_640.jpg',
    'https://cdn.pixabay.com/photo/2016/04/22/16/42/winter-1346098_1280.jpg'
]

for index, url in enumerate(image_urls):
    response = requests.get(url)
    if response.status_code == 200:
        filename = f'image_{index+1}.jpg'
        with open(filename, 'wb') as file:
            file.write(response.content)
In this example:
- List of Image URLs: We create a list of image URLs (
image_urls) that we want to download. - Loop Through URLs: We use a
forloop to iterate through the list of image URLs. Theenumeratefunction helps us keep track of the index to create unique filenames. - Download Each Image: For each URL, we send a GET request to fetch the image data. If the response is successful, we save the image with a unique filename (
image_1.jpg,image_2.jpg, etc.) in write-binary mode.
By following these steps, we can efficiently download single or multiple images using the requests library, ensuring that each image is saved correctly and handling potential errors gracefully.
Requests with Pillow
Pillow is a popular image processing library in Python that allows us to open, manipulate, and save images easily. By combining Pillow with the requests library, we can download images from the web and perform various image manipulations.
By combining requests with Pillow, we can easily download and manipulate images in Python. This approach is useful for tasks like resizing, cropping, or applying filters to images after downloading them.
Here's an example that demonstrates downloading an image, opening it with Pillow, and saving it to disk.
import requests
from PIL import Image
from io import BytesIO

url = 'https://cdn.pixabay.com/photo/2023/11/16/05/02/mountains-8391433_640.jpg'
response = requests.get(url)

if response.status_code == 200:
    image = Image.open(BytesIO(response.content))
    image.save('requests_pillow.jpg')
Let's break down the code:
- Importing Libraries: We import the
requestslibrary for making HTTP requests and thePillowlibrary (asPIL) for image processing. We also importBytesIOfrom theiomodule to handle the image data in memory. You should installrequestsandPillowlibraries first.pip install requests Pillow - Defining the Image URL: We specify the URL of the image we want to download.
- Sending a GET Request: We use the
requests.getmethod to send an HTTP GET request to the specified URL. This method retrieves the content of the image. - Checking the Response Status: We check if the request was successful by verifying that the status code is 200. A status code of 200 means the request was successful.
- Opening the Image with Pillow: We use
BytesIOto convert the response content (which is in bytes) into a file-like object. We then useImage.openfrom Pillow to open this image. - Saving the Image: We save the image to the disk with the filename
requests_pillow.jpg.
Requests with Beautiful Soup
Beautiful Soup, in conjunction with requests, offers a powerful solution for web scraping. This combination allows us to easily parse HTML, extract image URLs, and download images from web pages.
By using requests with Beautiful Soup, we can effectively scrape web pages to find and download images. This approach is useful for gathering images from websites for various applications, such as data collection, analysis, or creating image datasets.
Here's an example that shows how to scrape a webpage and download all images.
import requests
from bs4 import BeautifulSoup

page_url = 'https://scrapeops.io/'
response = requests.get(page_url)
soup = BeautifulSoup(response.content, 'html.parser')

img_tags = soup.find_all('img')
img_url = [url for url in img_tags if 'https' in url['src'] and '.png' in url['src']]
img_url = img_url[0]['src']

img_data = requests.get(img_url).content
with open('requests_bs4.jpg', 'wb') as file:
    file.write(img_data)
Let's break down the code:
- Importing Libraries: We import the
requestslibrary for making HTTP requests and theBeautifulSoupclass from thebs4module for parsing HTML.pip install requests bs4first. - Defining the Webpage URL: We specify the URL of the webpage we want to scrape.
- Sending a GET Request: We use the
requests.getmethod to send an HTTP GET request to the specified URL. This method retrieves the HTML content of the webpage. - Parsing the HTML: We create a BeautifulSoup object by passing the HTML content to the
BeautifulSoupconstructor along with the parser type ('html.parser'). This object allows us to navigate and search the HTML structure. - Finding Image Tags: We use the
soup.find_allmethod to find all<img>tags on the webpage. This method returns a list of all image tags. - Extracting Image URLs: We filter the list of image tags to get the URLs of the images we are interested in. In this example, we look for image URLs that contain
'https'and end with'.png'. We extract the URL from thesrcattribute of the first matching image tag. - Downloading the Image: We send a GET request to the extracted image URL to download the image data. We then write this data to a file named
requests_bs4.jpgin write-binary mode ('wb').

Using urllib
urllib is a built-in Python library for handling URLs. It offers a straightforward way to download images and other files from the web without needing to install additional packages.
Using urllib, we can easily download images directly from the web. This method is particularly useful when we want a simple, built-in solution without relying on external libraries.
Here's an example code snippet for downloading an image using urllib:
import urllib.request

url = 'https://cdn.pixabay.com/photo/2023/11/16/05/02/mountains-8391433_640.jpg'
headers = {'User-Agent': 'Mozilla/5.0 (Windows NT 10.0; Win64; x64) AppleWebKit/537.36 (KHTML, like Gecko) Chrome/58.0.3029.110 Safari/537.3'}

req = urllib.request.Request(url, headers=headers)
with urllib.request.urlopen(req) as response:
    with open('urllib.jpg', 'wb') as file:
        file.write(response.read())
Let's break down the code:
- Importing the Library: We import the
urllib.requestmodule, which contains functions for opening and reading URLs. - Defining the Image URL: We specify the URL of the image we want to download.
- Setting HTTP Headers: We define a dictionary of HTTP headers to include in our request. In this case, we set the
User-Agentheader to mimic a web browser. This helps to avoid being blocked by some servers that reject requests from non-browser clients. Better yet, you can use ScrapeOps Proxy Aggregator to avoid getting blocked. - Creating a Request Object: We create a
Requestobject using theurllib.request.Requestfunction. We pass the image URL and the headers dictionary to this function. - Sending the Request and Downloading the Image: We use
urllib.request.urlopento send the request and open the URL. This function returns a response object, which we can read to get the image data. - Saving the Image: We open a file in write-binary mode (
'wb') to save the image. We read the image data from the response object and write it to the file.
Asynchronous Downloading with aiohttp
aiohttp is an asynchronous HTTP client library that allows us to perform HTTP requests concurrently.
By using aiohttp for asynchronous downloading, we can efficiently download multiple images concurrently, making the most of available resources and reducing the overall time taken for the task, improving efficiency and speed.
Here's an example code snippet for downloading images asynchronously using aiohttp:
import aiohttp
import asyncio

async def download_image(url, session, filename):
    async with session.get(url) as response:
        if response.status == 200:
            with open(filename, 'wb') as file:
                file.write(await response.read())

async def main(url):
    async with aiohttp.ClientSession() as session:
        await download_image(url, session, 'aiohttp.jpg')

url = 'https://cdn.pixabay.com/photo/2023/11/16/05/02/mountains-8391433_640.jpg'
asyncio.run(main(url))
Let's break down the code:
- Importing the Libraries: We import
aiohttpfor asynchronous HTTP requests andasynciofor managing asynchronous tasks.pip install aiohttpfirst. - Defining the
download_imageFunction: We define an asynchronous functiondownload_imagethat takes a URL, an aiohttp session, and a filename as input. This function sends an HTTPGETrequest to the URL using the session and writes the response content to the specified filename. - Defining the
mainFunction: We define an asynchronousmainfunction that takes a URL as input. Inside this function, we create an aiohttp session usingaiohttp.ClientSession()and call thedownload_imagefunction to download the image asynchronously. - Running the
mainFunction: We specify the URL of the image we want to download and useasyncio.run(main(url))to run themainfunction asynchronously.
Using http.client
The http.client module provides a low-level HTTP protocol interface, giving us fine-grained control over HTTP requests. While it may require more manual handling compared to higher-level libraries, it offers flexibility and control over the request process.
Using http.client, we have direct control over the HTTP request process, making it suitable for scenarios requiring low-level interactions with the HTTP protocol.
Here's an example code snippet for downloading an image using http.client:
import http.client
import urllib.parse

url = 'https://cdn.pixabay.com/photo/2023/11/16/05/02/mountains-8391433_640.jpg'
parsed_url = urllib.parse.urlparse(url)

conn = http.client.HTTPSConnection(parsed_url.netloc)
conn.request('GET', parsed_url.path)
response = conn.getresponse()

if response.status == 200:
    with open('httpClient.jpg', 'wb') as file:
        file.write(response.read())
Let's break down the code:
- Importing the Libraries: We import the
http.clientmodule for low-level HTTP requests and theurllib.parsemodule for URL parsing. - Parsing the URL: We use
urllib.parse.urlparseto parse the given URL and extract its components such as the network location (netloc) and the path (path). - Establishing a Connection: We create an HTTPS connection to the server specified by the network location using
http.client.HTTPSConnection. - Sending the Request: We send a GET request to the server for the specified path using
conn.request('GET', parsed_url.path). - Getting the Response: We retrieve the response from the server using
conn.getresponse(). This returns an HTTPResponse object containing the response status, headers, and body. - Checking the Response Status: We check if the response status is 200, indicating a successful request.
- Saving the Image: If the request is successful, we open a file in write-binary mode (
'wb') and write the response body (image data) to it.
Web Scraping with Scrapy
Scrapy is a powerful web scraping framework that provides a high-level interface for crawling websites and extracting data. It offers features for handling form submissions, pagination, and other complex scenarios commonly encountered during web scraping tasks.
By leveraging Scrapy's capabilities, we can efficiently scrape websites, handle complex scenarios, and download images along with other data. This makes Scrapy a valuable tool for various web scraping projects.
Below is an example code snippet for downloading images within a Scrapy spider:
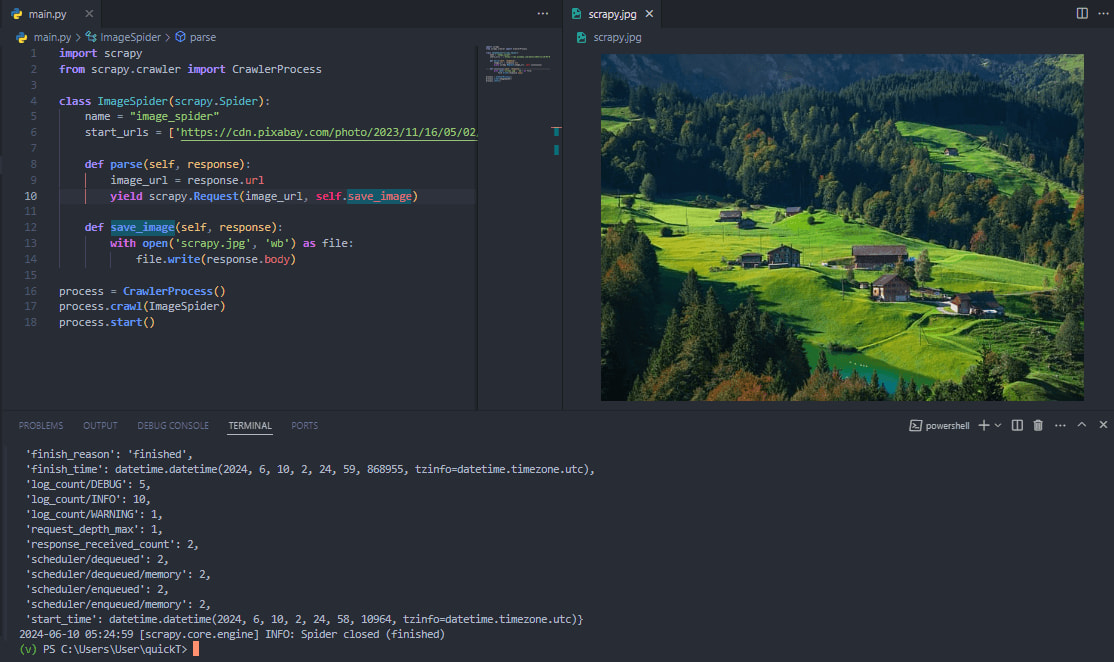
import scrapy
from scrapy.crawler import CrawlerProcess

class ImageSpider(scrapy.Spider):
    name = "image_spider"
    start_urls = ['https://cdn.pixabay.com/photo/2023/11/16/05/02/mountains-8391433_640.jpg']

    def parse(self, response):
        image_url = response.url
        yield scrapy.Request(image_url, self.save_image)

    def save_image(self, response):
        with open('scrapy.jpg', 'wb') as file:
            file.write(response.body)

process = CrawlerProcess()
process.crawl(ImageSpider)
process.start()
Let's break down the code:
- Importing Scrapy Modules: We import the necessary modules from Scrapy, including
scrapyandCrawlerProcess, to define and run the spider.pip install scrapyfirst. - Defining the Spider: We define a spider class named
ImageSpiderthat inherits fromscrapy.Spider. We set the spider's name and define thestart_urls, which are the URLs the spider will start crawling from. - Parsing the Response: In the
parsemethod, we extract the image URL from the response and send a request to download the image. We pass thesave_imagemethod as the callback function to handle the response. - Saving the Image: The
save_imagemethod receives the response containing the image data. We open a file in write-binary mode ('wb') and write the image data to it. - Running the Spider: We create a
CrawlerProcessinstance and use it to run the spider by callingprocess.crawl(ImageSpider)and thenprocess.start().
If you would like to master Scrapy, check out our extensive Python Scrapy Playbook.
Browser Automation with Selenium
Selenium is widely used for automating browser interactions, especially when dealing with dynamic content or JavaScript-generated elements on web pages. This makes it an excellent choice for tasks like downloading images that are dynamically loaded or generated by JavaScript.
By using Selenium for browser automation, we can interact with web pages dynamically and perform tasks like downloading images with ease.
Below is an example code snippet for downloading images using Selenium:
from selenium import webdriver
from selenium.webdriver.chrome.service import Service
from webdriver_manager.chrome import ChromeDriverManager
from selenium.webdriver.common.by import By
import requests

driver = webdriver.Chrome(service=Service(ChromeDriverManager().install()))
driver.get('https://scrapeops.io/')

img = driver.find_element(By.CLASS_NAME, 'hero-image')
img_url = img.get_attribute('src')
img_data = requests.get(img_url).content

with open('selenium.jpg', 'wb') as file:
    file.write(img_data)

driver.quit()
Let's break down the code:
- Importing Selenium Modules: We import the necessary modules from Selenium, including
webdriver,Service,ChromeDriverManager, andBy, to set up and interact with the WebDriver.pip install selenium webdriver-managerfirst. - Setting up Chrome WebDriver: We set up the Chrome WebDriver using ChromeDriverManager to automatically download and manage the Chrome driver binary.
- Navigating to the Webpage: We use the WebDriver to navigate to the desired webpage (
'https://scrapeops.io/'in this example). - Finding the Image Element: We locate the image element on the webpage using its class name (
'hero-image'in this example). - Getting the Image URL: We retrieve the URL of the image from the
srcattribute of the image element. - Downloading the Image: We use the
requestslibrary to download the image data from the URL obtained in the previous step. - Saving the Image to a File: We save the image data to a file named
'selenium.jpg'in write-binary mode ('wb'). - Quitting the WebDriver: Finally, we quit the WebDriver to close the browser window and release system resources.
Advanced Concepts
Downloading images with Python can involve more advanced concepts beyond the basics of sending HTTP GET requests and handling binary data.
These advanced concepts can improve the efficiency, robustness, and scalability of your image downloading tasks. Let's review some of these concepts:
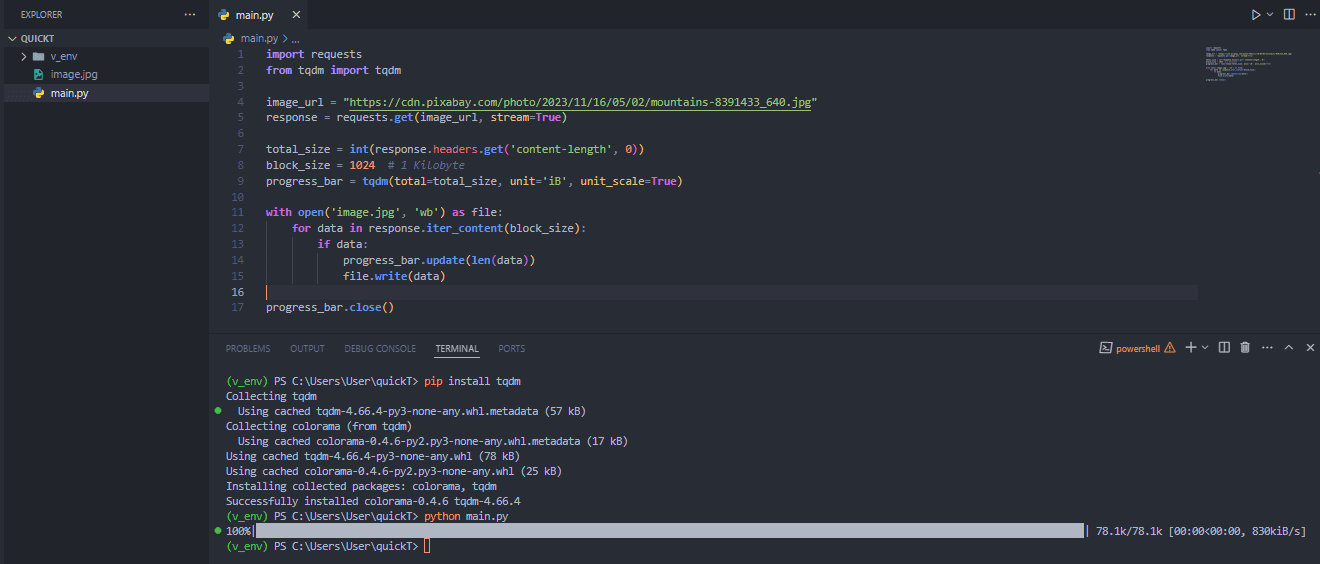
Downloading Images with Progress Reporting
When downloading large images or multiple images, providing feedback to users about the download progress can enhance the overall experience. This can be achieved by implementing progress bars using libraries like tqdm.
Here's an example of how to use tqdm with the requests library to display a progress bar during image download:
import requests
from tqdm import tqdm

image_url = "https://cdn.pixabay.com/photo/2023/11/16/05/02/mountains-8391433_640.jpg"
response = requests.get(image_url, stream=True)

total_size = int(response.headers.get('content-length', 0))
block_size = 1024
progress_bar = tqdm(total=total_size, unit='iB', unit_scale=True)

with open('image.jpg', 'wb') as file:
    for data in response.iter_content(block_size):
        if data:
            progress_bar.update(len(data))
            file.write(data)

progress_bar.close()
Let's break down the code:
- Importing Required Modules: We import the necessary modules for making HTTP requests and showing a progress bar.
requestsis used for sending HTTP requests, andtqdmis used for displaying the progress bar. - Setting the Image URL: We define the URL of the image we want to download.
- Making the HTTP Request: We send a GET request to the image URL, with the
stream=Trueparameter to stream the response content. - Getting the Total Size: We retrieve the total size of the content from the response headers. If it's not provided, we default to 0.
- Setting the Block Size: We define the block size for reading the response content in chunks of 1024 bytes (1 Kilobyte).
- Initializing the Progress Bar: We create a
tqdmprogress bar with the total size of the content. Theunit='iB'indicates the unit is in bytes, andunit_scale=Trueadjusts the units to a readable format. - Downloading and Saving the Image: We open a file in write-binary mode (
'wb') to save the image. We then iterate over the response content in chunks of the specified block size, update the progress bar with the size of each chunk, and write the chunk to the file. - Closing the Progress Bar: After the download is complete, we close the progress bar.
Downloading Images with Metadata
Certain applications may require downloading images along with their metadata, such as EXIF data. This metadata can provide valuable information about the image, including camera settings, location, and other contextual details.
To download images with metadata using Python, you can leverage the Pillow library, which supports reading and writing image metadata.
Here's an example:
import requests
from PIL import Image
from io import BytesIO

image_url = "https://example.com/image.jpg"
response = requests.get(image_url)

image = Image.open(BytesIO(response.content))
exif_data = image.getexif()

image.save("image.jpg", exif=exif_data)
Let's break down the code:
- Importing Required Modules: We import the necessary modules for making HTTP requests and handling image data.
requestsis used for sending HTTP requests,ImagefromPIL(Pillow) is used for image processing, andBytesIOis used for handling byte data in memory. - Setting the Image URL: We define the URL of the image we want to download.
- Making the HTTP Request: We send a GET request to the image URL to download the image.
- Opening the Image: We create an image object from the downloaded content.
BytesIOallows us to convert the response content (byte data) into a file-like object, whichImage.opencan read. - Getting EXIF Data: We retrieve the EXIF (Exchangeable Image File Format) metadata from the image, which contains information like camera settings and date taken.
- Saving the Image with EXIF Data: We save the image to a file named "image.jpg", ensuring that the EXIF metadata is preserved.
Now that you understand the ways to download images, including advanced concepts, let's dive into a case study to enable you choose the most suitable way to download images with Python.
Case Study: Scrape Unsplash
In this case study, we will demonstrate how to scrape images from Unsplash, a popular image library, using various Python methods for downloading images.
This section will showcase practical examples of downloading scripts and compare their performance to highlight the most efficient techniques for real-world applications.
Method 1: Using requests Library
First, we use the requests library to scrape and download images from Unsplash. This method is straightforward and suitable for simple HTTP requests.
Example Code
import requests

def download_image_requests(url, filename):
    response = requests.get(url)
    if response.status_code == 200:
        with open(filename, 'wb') as file:
            file.write(response.content)

# Example usage
url = 'https://images.unsplash.com/photo-1541698444083-023c97d3f4b6'
download_image_requests(url, 'requests_unsplash.jpg')
Explanation:
- We import
requestsfor making HTTP requests. - The function
download_image_requestsdownloads an image usingrequestsand saves it to a file. - We send a GET request to the specified URL using
requests.get. - If the response status code is 200, we open a file in binary write mode (
'wb') and write the response content to it. - Example usage demonstrates downloading an image from a URL and saving it locally using the
requestslibrary.
Method 2: Using requests with Pillow
By combining the requests library with Pillow, we can download and manipulate images easily. This method is beneficial when image processing is required.
Example Code
import requests
from PIL import Image
from io import BytesIO

def download_image_pillow(url, filename):
    response = requests.get(url)
    if response.status_code == 200:
        image = Image.open(BytesIO(response.content))
        image.save(filename)

# Example usage
url = 'https://images.unsplash.com/photo-1541698444083-023c97d3f4b6'
download_image_pillow(url, 'pillow_unsplash.jpg')
Explanation:
- We import
requestsfor making HTTP requests andImagefromPIL(Python Imaging Library) for image processing. - The function
download_image_pillowdownloads an image usingrequestsand saves it usingPIL. - We send a GET request to the specified URL using
requests.get. - If the response status code is 200, we open the image using
Image.openandBytesIO(response.content). - The image is then saved to the specified filename using
image.save. - Example usage demonstrates downloading an image from a URL and saving it locally using Pillow.
Method 3: Using BeautifulSoup with requests
For scraping multiple images, BeautifulSoup can be used with requests to parse HTML and extract image URLs from Unsplash.
Example Code
import requests
from bs4 import BeautifulSoup

def scrape_unsplash_images(page_url):
    response = requests.get(page_url)
    soup = BeautifulSoup(response.content, 'html.parser')
    img_tags = soup.find_all('img', {'src': True})
    img_urls = [img['src'] for img in img_tags if 'images.unsplash.com' in img['src']]
    return img_urls

def download_images_bs4(page_url):
    img_urls = scrape_unsplash_images(page_url)
    for i, url in enumerate(img_urls[:5]):
        response = requests.get(url)
        if response.status_code == 200:
            with open(f'bs4_image_{i+1}.jpg', 'wb') as file:
                file.write(response.content)

# Example usage
page_url = 'https://unsplash.com'
download_images_bs4(page_url)
Explanation:
- We utilize
requestsfor making HTTP requests andBeautifulSoupfor parsing HTML. - The
scrape_unsplash_imagesfunction scrapes Unsplash image URLs from a webpage. - It filters images based on their source containing 'images.unsplash.com'.
- The
download_images_bs4function downloads Unsplash first 5 images using the scraped URLs. - It saves images to files if the response status is 200.
Method 4: Using aiohttp for Asynchronous Downloads
For efficient downloading of multiple images, aiohttp allows concurrent HTTP requests, improving performance.
Example Code
import aiohttp
import asyncio

async def download_image_aiohttp(url, filename):
    async with aiohttp.ClientSession() as session:
        async with session.get(url) as response:
            if response.status == 200:
                with open(filename, 'wb') as file:
                    file.write(await response.read())

async def main(urls):
    tasks = []
    for i, url in enumerate(urls):
        tasks.append(download_image_aiohttp(url, f'aiohttp_image_{i+1}.jpg'))
    await asyncio.gather(*tasks)

# Example usage
urls = [
    'https://images.unsplash.com/photo-1541698444083-023c97d3f4b6',
    'https://images.unsplash.com/photo-1717457779554-6579b29b6f83'
]
asyncio.run(main(urls))
Explanation:
- We use
aiohttpfor asynchronous HTTP requests andasynciofor managing asynchronous tasks. - The function
download_image_aiohttpasynchronously downloads images using aiohttp. - We create a session with
aiohttp.ClientSession()for making HTTP requests. - Each image download task is executed asynchronously with
session.get. - Images are saved to files if the response status is 200.
- The
mainfunction asynchronously handles multiple image downloads concurrently. - Tasks for each image download are created and executed concurrently with
asyncio.gather. - Example usage demonstrates downloading images from specified URLs asynchronously using
asyncio.run.
Method 5: Using urllib
This method uses the built-in urllib library to download images.
Example Code
import urllib.request

def download_image_urllib(url, filename):
    headers = {'User-Agent': 'Mozilla/5.0'}
    req = urllib.request.Request(url, headers=headers)
    with urllib.request.urlopen(req) as response:
        with open(filename, 'wb') as file:
            file.write(response.read())

# Example usage
url = 'https://images.unsplash.com/photo-1541698444083-023c97d3f4b6'
download_image_urllib(url, 'urllib_unsplash.jpg')
Explanation:
- The
urlliblibrary is used to create a request object and open a URL to fetch image data. - The image data is read from the response and saved to a file.
- This method highlights using a built-in Python library to perform image downloads, which can be useful when avoiding external dependencies.
Method 6: Using http.client
This method uses the http.client module for low-level HTTP requests to download images.
Example Code
import http.client
import urllib.parse

def download_image_httpclient(url, filename):
    parsed_url = urllib.parse.urlparse(url)
    conn = http.client.HTTPSConnection(parsed_url.netloc)
    conn.request('GET', parsed_url.path)
    response = conn.getresponse()
    if response.status == 200:
        with open(filename, 'wb') as file:
            file.write(response.read())

# Example usage
url = 'https://images.unsplash.com/photo-1541698444083-023c97d3f4b6'
download_image_httpclient(url, 'httpclient_unsplash.jpg')
Explanation:
- The
http.clientmodule is used for low-level HTTP interactions, including establishing connections and sending requests. - The image data is read directly from the HTTP response and saved to a file.
- This method provides fine-grained control over the HTTP request process, suitable for scenarios requiring low-level handling.
Method 7: Using Scrapy
This method uses the Scrapy framework for web scraping to download images.
Example Code
import scrapy
from scrapy.crawler import CrawlerProcess

class ImageSpider(scrapy.Spider):
    name = "image_spider"
    start_urls = ['https://unsplash.com']

    def parse(self, response):
        img_urls = response.css('img::attr(src)').getall()
        img_urls = [url for url in img_urls if 'images.unsplash.com' in url]
        for i, url in enumerate(img_urls):
            yield scrapy.Request(url, callback=self.save_image, meta={'filename': f'scrapy_image_{i+1}.jpg'})

    def save_image(self, response):
        filename = response.meta['filename']
        with open(filename, 'wb') as file:
            file.write(response.body)

# Running the spider
process = CrawlerProcess()
process.crawl(ImageSpider)
process.start()
Explanation:
- Scrapy is used to create a web spider that crawls the Unsplash website and extracts image URLs.
- The spider sends requests to the extracted URLs to download the images and saves them to disk.
- This method demonstrates using a robust web scraping framework to automate the process of crawling web pages and downloading images.
Method 8: Using Selenium for Dynamic Content
When dealing with dynamically loaded content, Selenium can automate browser interactions to retrieve images.
Example Code
from selenium import webdriver
from selenium.webdriver.chrome.service import Service
from webdriver_manager.chrome import ChromeDriverManager
from selenium.webdriver.common.by import By
import requests

def download_image_selenium(url, img_class, filename):
    driver = webdriver.Chrome(service=Service(ChromeDriverManager().install()))
    driver.get(url)
    img = driver.find_element(By.CLASS_NAME, img_class)
    img_url = img.get_attribute('src')
    response = requests.get(img_url)
    if response.status_code == 200:
        with open(filename, 'wb') as file:
            file.write(response.content)
    driver.quit()

# Example usage
url = 'https://unsplash.com'
img_class = 'vkrMA'
download_image_selenium(url, img_class, 'selenium_unsplash.jpg')
Explanation
- Selenium helps us automate browser interactions for retrieving images from web pages with dynamic content or JavaScript-generated elements.
- We set up a WebDriver using ChromeDriverManager to manage the Chrome driver binary.
- The WebDriver navigates to the specified URL and locates the image element on the page using its class name.
- We extract the image URL from the element, and then we send a GET request to download the image content.
- If the response status code is 200 (OK), we save the image content to a file.
- Finally, we close the WebDriver to release system resources.
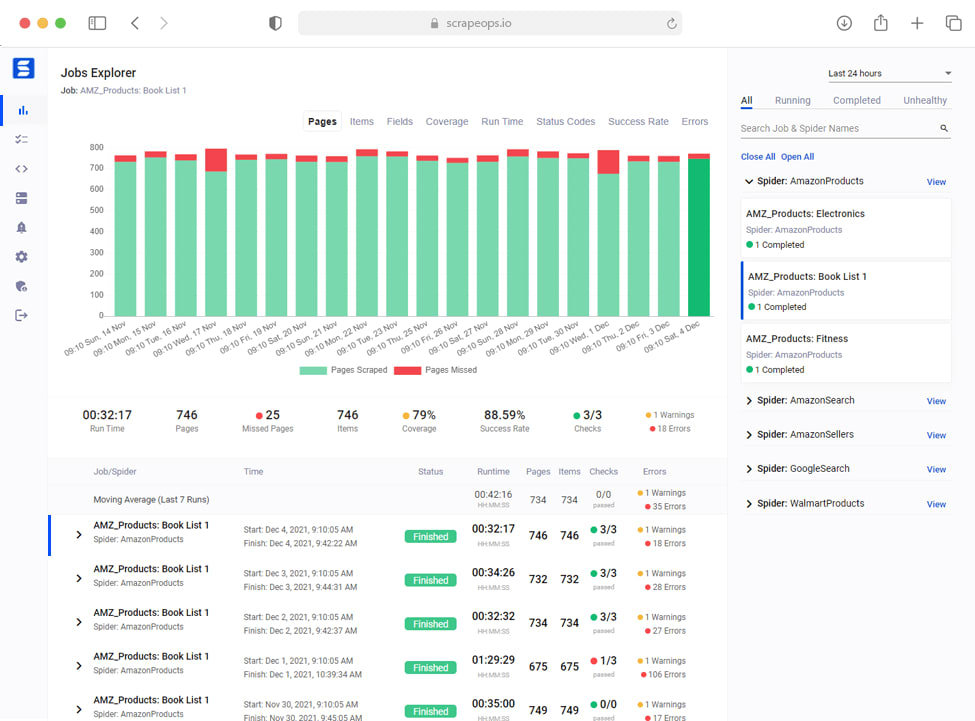
Performance Comparison
To compare the performance of each method, we can measure factors such as speed, ease of implementation, and ability to handle dynamic content.
To practically compare the speed of different methods for downloading images from Unsplash, we can write a script that times each method while downloading the same image.
Below is an example script that does this using Python's time module to measure the download duration.
import time
import requests
from PIL import Image
from io import BytesIO
import urllib.request
import aiohttp
import asyncio
import http.client
from selenium import webdriver
from selenium.webdriver.common.by import By

# URL of the image to download
image_url = "https://images.unsplash.com/photo-1541698444083-023c97d3f4b6"

# Function to time a function call
def time_function(func, *args, **kwargs):
    start = time.time()
    result = func(*args, **kwargs)
    end = time.time()
    return end - start, result


def download_with_requests(url):
    response = requests.get(url)
    with open("image_requests.jpg", "wb") as file:
        file.write(response.content)

def download_with_pillow(url):
    response = requests.get(url)
    image = Image.open(BytesIO(response.content))
    image.save("image_pillow.jpg")

def download_with_urllib(url):
    headers = {'User-Agent': 'Mozilla/5.0'}
    req = urllib.request.Request(url, headers=headers)
    with urllib.request.urlopen(req) as response:
        with open("image_urllib.jpg", 'wb') as file:
            file.write(response.read())


async def download_with_aiohttp(url):
    async with aiohttp.ClientSession() as session:
        async with session.get(url) as response:
            with open("image_aiohttp.jpg", "wb") as file:
                file.write(await response.read())
def run_aiohttp(url):
    asyncio.run(download_with_aiohttp(url))


def download_with_http_client(url):
    parsed_url = urllib.parse.urlparse(url)
    conn = http.client.HTTPSConnection(parsed_url.netloc)
    conn.request('GET', parsed_url.path)
    response = conn.getresponse()
    with open("image_httpClient.jpg", 'wb') as file:
        file.write(response.read())


def download_with_selenium(url):
    driver = webdriver.Chrome()
    driver.get(url)
    img = driver.find_element(By.TAG_NAME, "img")
    src = img.get_attribute("src")
    response = requests.get(src)
    with open("image_selenium.jpg", "wb") as file:
        file.write(response.content)
    driver.quit()


# Timing each method
methods = {
    "Requests": download_with_requests,
    "Pillow": download_with_pillow,
    "urllib": download_with_urllib,
    "aiohttp": run_aiohttp,
    "http.client": download_with_http_client,
    "Selenium": download_with_selenium
}

# Measure the speed of each method
for name, method in methods.items():
    duration, _ = time_function(method, image_url)
    print(f"{name}: {duration:.2f} seconds")
Note:
- The code does not handle
ScrapyandBeautiful Soupbecause they require a different setup or parsing of the webpage. - Install necessary libraries before running the script:
pip install requests pillow bs4 aiohttp scrapy selenium.
Results:
Run this script to get the duration of each method, giving a practical comparison of their speeds. You may see output like:
Requests: 5.91 seconds
Pillow: 6.01 seconds
urllib: 4.91 seconds
aiohttp: 5.18 seconds
http.client: 6.22 seconds
Selenium: 19.30 seconds
Note: These results will vary based on your internet connection, computer's performance, and the Unsplash server's response time.

Below is a comparison table summarizing the various performance aspects:
| Method | Description | Use Case | Pros | Cons |
|---|---|---|---|---|
| requests | HTTP GET requests to download images | Simple downloads | Easy to use | Limited to static content |
| requests with Pillow | Download and manipulate images | Image processing | Combines download and manipulation | Extra dependency (Pillow) |
| requests with Beautiful Soup | Parse HTML and extract image URLs | Web scraping | Powerful for extracting multiple images | Requires HTML parsing |
| Using urllib | Built-in library for handling URLs | Simple downloads | No external dependencies | Basic functionality |
| Asynchronous Downloading with aiohttp | Asynchronous image downloading | High concurrency | Fast for multiple downloads | More complex implementation |
| Using http.client | Low-level HTTP protocol interface | Fine-grained control | Precise control | Verbose and lower-level |
| Scrapy | Integrate image downloading into spiders | Comprehensive web scraping | Powerful framework | Steeper learning curve |
| Selenium | Automate browser to download images | Dynamic content | Handles JavaScript content | Resource-intensive |
This case study highlights the strengths and weaknesses of each method, helping you choose the best approach for your specific needs when scraping images from Unsplash or similar websites.
However, despite knowing the right tool to use, some issues could hinder your image downloading process. What are the issues? How do you troubleshoot them?
Find out below.
Common Issues and Troubleshooting
During image downloading using Python, several common issues may arise that could disrupt the process. It's essential to be aware of these issues and how to troubleshoot them to ensure smooth downloading.
Below are some common problems and troubleshooting tips:
Network Issues
Network issues such as unstable internet connections or server downtime can interrupt image downloads. To troubleshoot network issues:
- Check your internet connection to ensure it's stable.
- Verify that the server hosting the images is accessible and not experiencing downtime.
- Retry the download after a short period in case of temporary network disruptions.
Timeouts
Timeouts can occur when the server takes too long to respond to the download request. To troubleshoot timeouts:
- Increase the timeout duration in your HTTP request settings to allow more time for the server to respond.
- Retry the download with a higher timeout value if the issue persists.
Corrupted Files
Corrupted image files may occur due to incomplete downloads or errors during the download process. To troubleshoot corrupted files:
- Check the file size of the downloaded image to ensure it matches the expected size.
- Verify the integrity of the downloaded image using checksums or file validation techniques.
- Retry the download if the file appears to be corrupted, ensuring a complete and error-free download.
HTTP Errors
HTTP errors, such as 404 Not Found or 403 Forbidden, may occur if the requested image is not available or access to it is restricted. To troubleshoot HTTP errors:
- Verify the URL of the image to ensure it is correct and accessible.
- Check for any authentication requirements or access restrictions that may prevent downloading the image.
- Handle different HTTP error codes gracefully in your code to provide appropriate error messages to users.
Insufficient Permissions
Insufficient permissions may prevent the script from writing the downloaded image to the specified directory. To troubleshoot permission issues:
- Ensure that the directory where you intend to save the downloaded images has the necessary
writepermissions. - Run the script with appropriate permissions or as an administrator to avoid permission-related errors.
By addressing these common issues and following the troubleshooting tips provided, you can overcome obstacles encountered during image downloading with Python, ensuring a smooth and successful process.
Lastly, let's look at some of the best practices when downloading images with Python.
Best Practices for Downloading Images
When downloading images using Python, it's essential to adhere to best practices to ensure efficiency, ethical behavior, and compliance with legal requirements.
Below are some tips for downloading images responsibly:
Respect Robots.txt Files
- Before downloading images from a website, check its
robots.txtfile to understand any restrictions or guidelines set by the website owner. - Respect the directives specified in the
robots.txtfile, such as crawl-delay rules and allowed/disallowed paths, to avoid overloading the server or violating the website's terms of service.
Handle Rate Limits
- Be mindful of rate limits imposed by websites to prevent excessive traffic or abuse.
- Implement rate-limiting mechanisms in your code to control the frequency of download requests and avoid triggering rate-limiting measures imposed by the server.
Ensure Compliance with Legal Considerations
- Before downloading and using images, ensure that you have the legal right to do so, especially concerning copyright laws.
- Obtain permission or necessary licenses for images that are subject to copyright protection, particularly if you intend to use them for commercial purposes or redistribution.
- Respect the terms of use specified by image hosting platforms or content providers when downloading images from their websites.
Attribute Properly
- When using downloaded images, provide proper attribution to the original creators or sources, especially if required by the image license or terms of use.
- Include attribution information, such as the author's name, source URL, and license type, alongside the image where applicable.
Monitor Script Behavior
- Regularly monitor the behavior of your download script to ensure it operates as intended and does not violate website policies or legal requirements.
- Handle errors and exceptions gracefully to prevent disruptions and avoid unnecessary strain on server resources.
By following these best practices, you can download images responsibly and ethically while minimizing the risk of encountering issues such as server restrictions, rate limits, or legal concerns.
Conclusion
In conclusion, we've covered various methods to download images using Python, ranging from simple HTTP requests to complex browser automation. Each method has its advantages and is suitable for different scenarios.
By understanding these methods, you can choose the most appropriate approach for your specific image downloading needs.
Check out the official documentation of each library to get more information.
- requests Documentation
- Beautiful Soup Documentation
- urllib Documentation
- http.client Documentation
- Pillow Documentation
- aiohttp Documentation
- Selenium Documentation
- Scrapy Documentation
More Python Web Scraping Guides
If you would like to learn more about Web Scraping with Python, then be sure to check out The Python Web Scraping Playbook.
Or check out one of our more in-depth guides: