
Puppeteer Guide: Submitting A Form
When considering the automation of forms on web pages, Puppeteer proves to be a valuable tool with a range of methods for efficiently managing different form input types. Opting for Puppeteer in form automation offers the advantage of speed, facilitated by its direct integration with the headless Chromium browser, thereby eliminating the requirement for a separate web driver.
This article will thoroughly explore the intricacies of automating various form input types and capturing responses after form submission using Puppeteer.
- TLDR - How To Submit a Form Using Puppeteer
- Understanding HTML Forms
- Submitting Forms with Puppeteer:
- Handling Form Elements With Puppeteer
- Handling File Uploads & Attachments
- Handling Confirmation Dialog Box:
- Handling Captchas:
- Best Practices
- Troubleshooting
- Conclusion
- More Puppeteer Web Scraping Guides
Need help scraping the web?
Then check out ScrapeOps, the complete toolkit for web scraping.
TLDR - How To Submit a Form Using Puppeteer
To kick things off, let's delve into a practical example script that automates form submission on this Login Page. In this script, we will use Puppeteer methods such as page.type() to input data into the username and password fields, and page.click() to click on the submit button.
const puppeteer = require('puppeteer');

(async () => {
  const browser = await puppeteer.launch({ headless: false });

  const page = await browser.newPage();
  await page.goto("https://practicetestautomation.com/practice-test-login/");
  await page.type('#username', 'student');
  await page.type('#password', 'Password123');

  await Promise.all([
    page.waitForNavigation(),
    page.click('#submit'),
  ]);

  await browser.close();
})();
Let's break down the code to understand each step:
-
The script begins by creating a new instance of a headful browser using
puppeteer.launch(). Theheadless: falseoption is set on line 3, allowing the visual observation of the browser as it opens and closes. -
The script uses
page.goto(url)to navigate to the specified login form's webpage. -
The CSS selectors for the form inputs and submit button are identified through inspection with browser devtools:
- Username: #username
- Password: #password
- Submit: #submit
These selectors provide a precise means of targeting the relevant elements within the webpage's structure.
-
The
page.type()function is employed to fill in the username and password fields. -
The
page.click()function is used to emulate a button click on the submit button. -
Additionally,
page.waitForNavigation()ensures that the script waits for the page to load after the form submission. -
Finally, the browser instance is closed using
browser.close().
Upon executing this NodeJS script, you will observe the browser opening, and the field values will be automatically populated on your screen. If you find the concepts of page.type() and page.click() unclear, rest assured; we will delve into a detailed discussion of these methods later on.
Understanding HTML Forms
If you're already familiar with HTML forms and their input types, feel free to skip this section.
The <form> element is a container for various <input> elements designed to collect a wide range of data from users.
Each form is equipped with an "action" attribute and a "submit" button. Upon clicking the submit button, the collected data undergoes processing and validation through JavaScript before being sent to the URL specified in the action attribute.
A basic form element looks like this:
<form action="/action_page.php" method="post">
  <label for="username">Username:</label>
  <input type="text" id="username" name="username" required>

  <label for="password">Password:</label>
  <input type="password" id="password" name="password" required>

  <input type="submit" value="Login">
</form>
Building blocks within a form are the <input> elements, commonly represented as follows:
<input type="text" name="username" />
The <input> element can assume various types based on the value set to its "type" attribute. Here are some common types of form input types that you may encounter when writing automation scripts for form submission:
| Category | Input Type | Description |
|---|---|---|
| Basic Input Types | text | Single-line text input. |
password | Secure password input. | |
search | Search query input. | |
tel | Telephone number input. | |
url | URL entry with protocol validation. | |
email | Email address input. | |
| Numeric Input Types | number | Numeric input with restrictions. |
range | Slider for selecting numeric values within a specified range. | |
| Date and Time Types | date | Calendar-based date input. |
time | Input for specifying a specific time. | |
datetime-local | Combined date and time input in a localized format. | |
month | Selection of a specific month. | |
week | Selection of a specific week. | |
| Selection Input Types | checkbox | Binary option that can be checked or unchecked. |
radio | Selection of a single option from a group. | |
| File Input Type | file | Allows users to upload files. |
| Button Types | button | Clickable button without a predefined action. |
submit | Triggers the form submission process. | |
reset | Resets form fields to default values. | |
| Miscellaneous Types | color | Selection of a color from a palette. |
hidden | Stores data on the client-side without display. | |
image | Functions as a submit button with an image representation. |
Submitting Forms with Puppeteer:
Puppeteer provides various methods that can be combined to write an efficient script for automating form submission. As we explored earlier, two key methods are page.type() and page.click().
However, before writing actual code, a crucial first step is inspecting the form on the target web page using devtools to analyze its HTML structure.
This inspection entails locating each input element within the form, using CSS selectors or XPath expressions. Additionally, it also involves observing whether these elements employ validation attributes such as required and pattern to define constraints on the type of data accepted.
Step 1: Inspecting a Form Using DevTools
Let's explore how to inspect a form using DevTools. For the rest of the tutorial, we will use SauceDemo for educational purposes.
Begin by navigating to the SauceDemo Login Page, the target website for this example, in your browser.
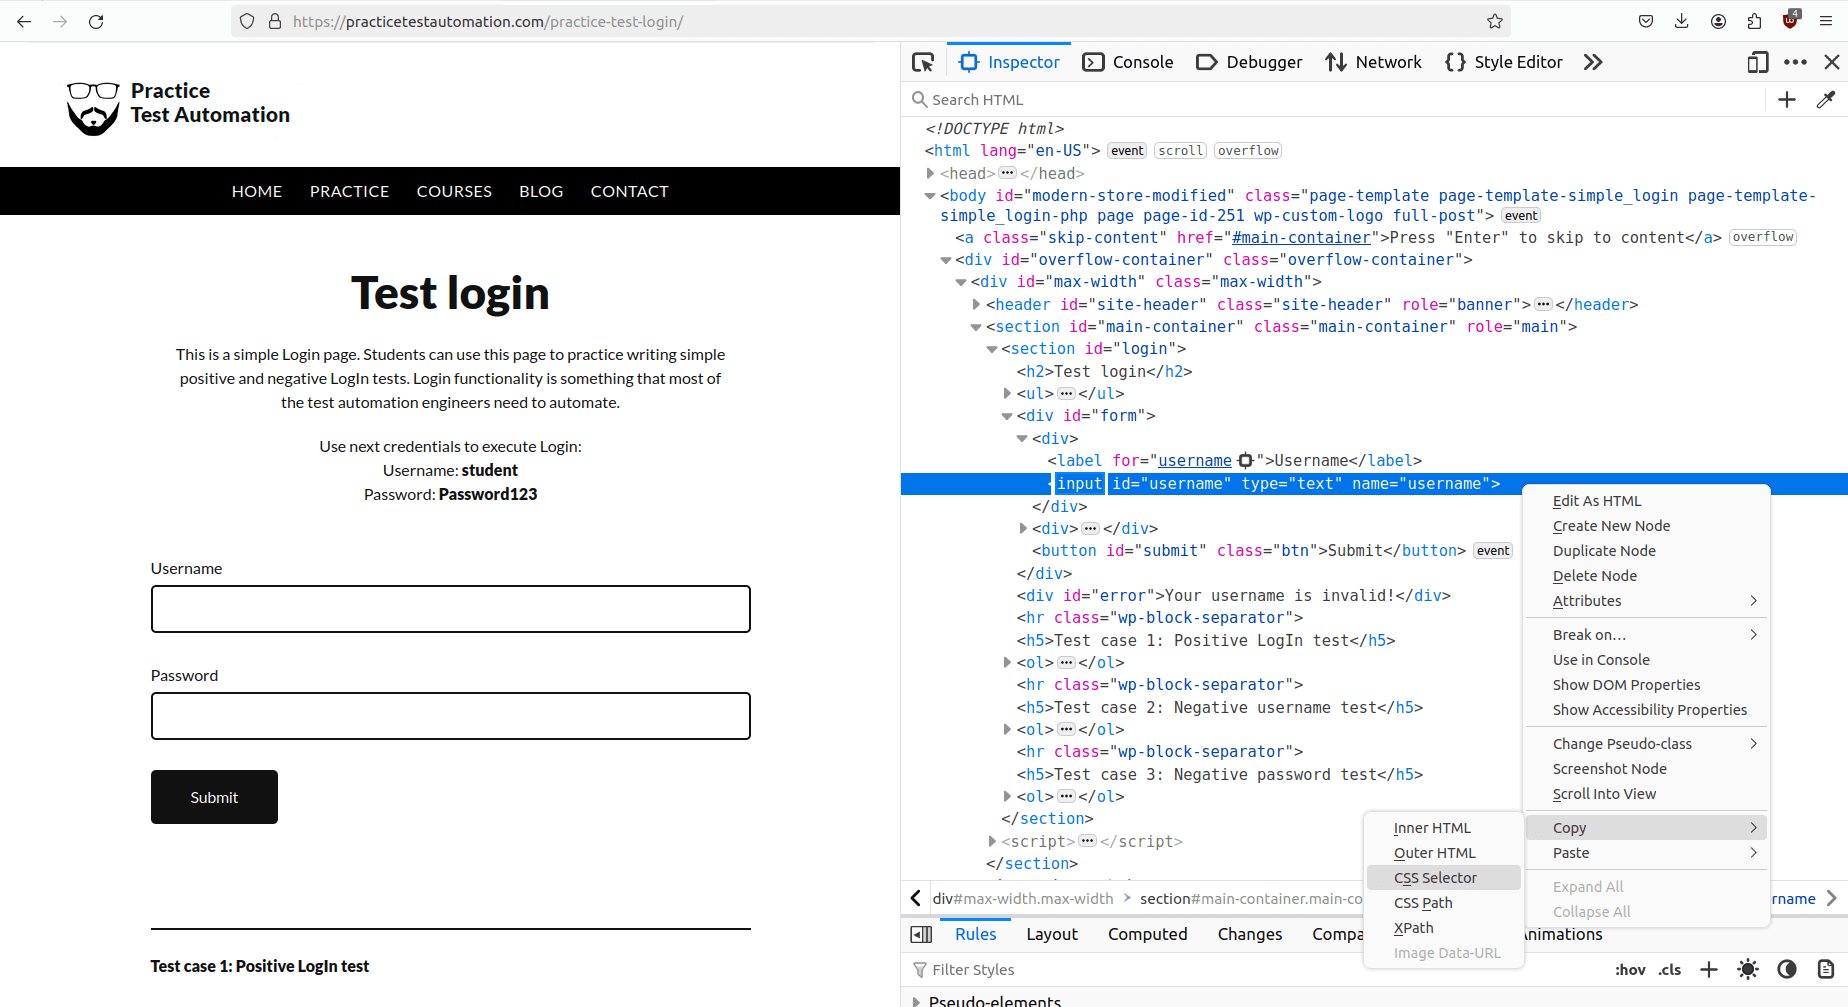
Once the form becomes visible, right-click on the page and select "Inspect". On the right-hand side, the DevTools frame will open, resembling something like this:
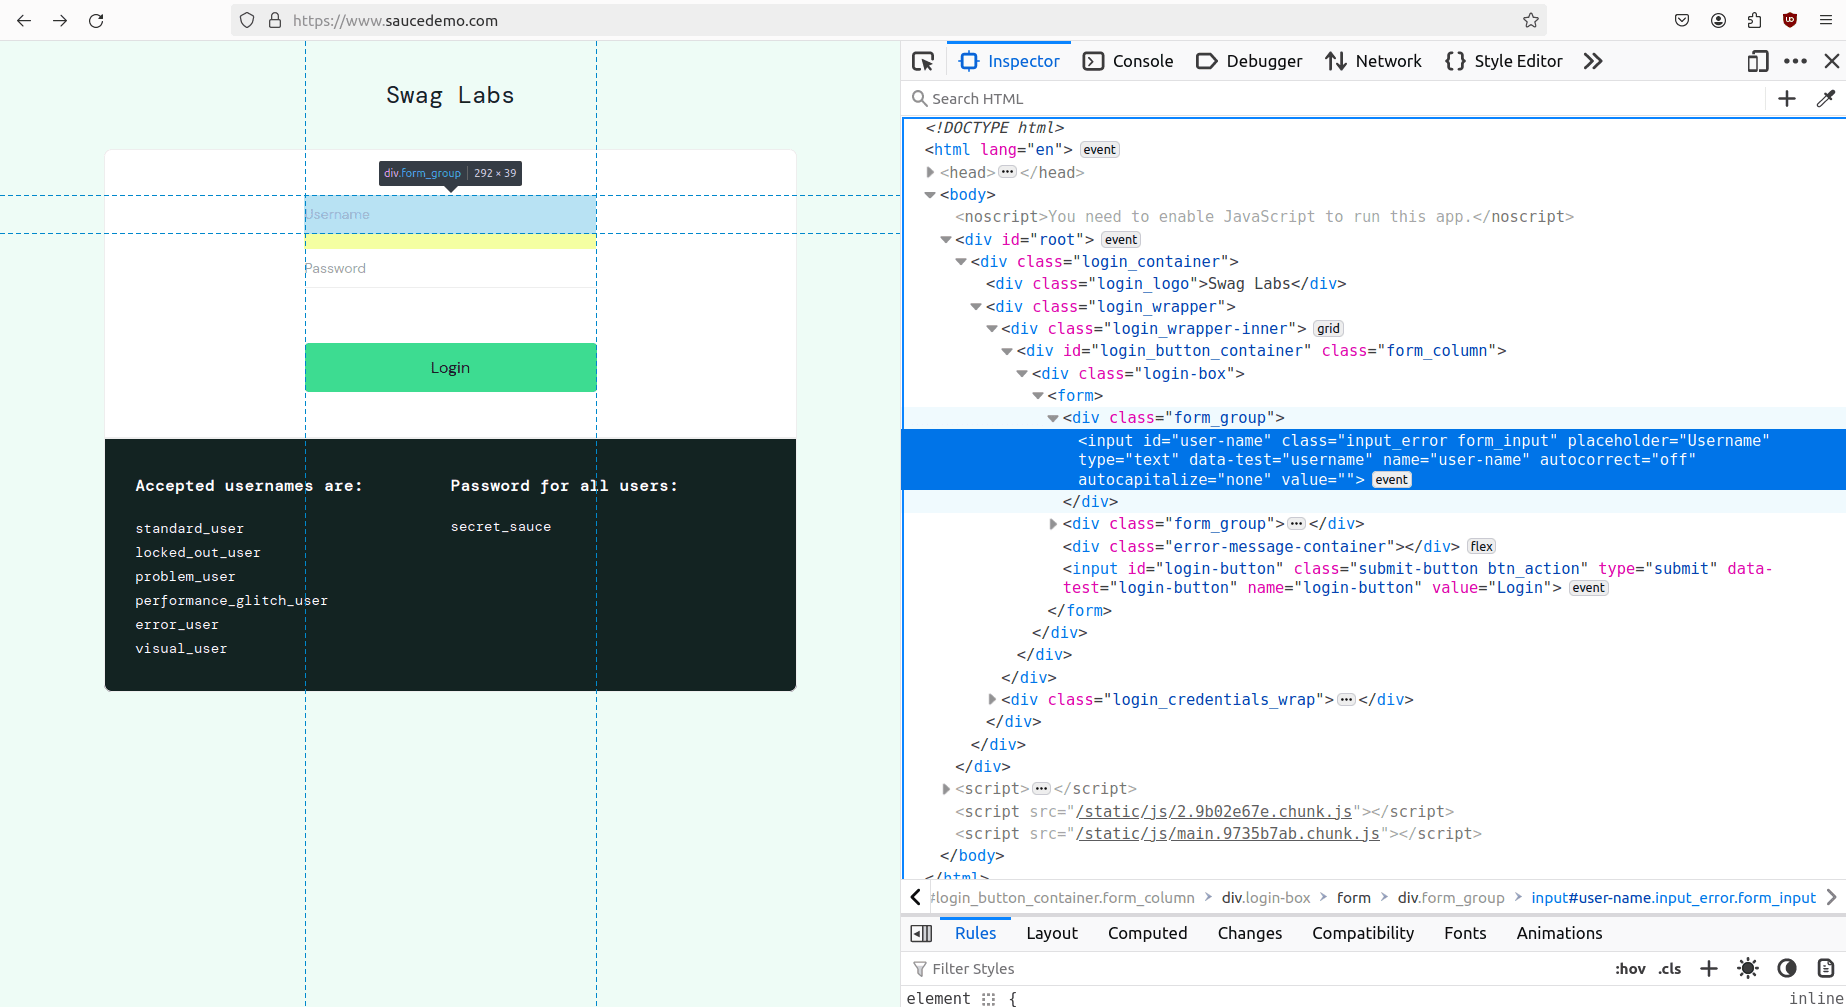
Here, I've highlighted the HTML code for the first input field in our form. Right-click on the highlighted area, choose "copy", and you'll see various options.
Our focus lies on the "CSS Selector" and "XPath" options. Clicking on either of them will copy the respective CSS selector or XPath.
- CSS Selectors: On a website, elements are arranged within an HTML block, each equipped with a CSS selector typically formed from attributes like id, class, tag name, or others. These attributes play a pivotal role in uniquely identifying and targeting each element. For a more comprehensive understanding of how CSS selectors work, you can explore the details here. The CSS selectors we derived in our case are:
const form = {
  username: "#user-name",
  password: "#password",
  submit: "#login-button"
}
- XPath: XPath is utilized to navigate the DOM tree structure of HTML and selectively choose elements based on various conditions, as detailed here. While XPath offers a more flexible approach than CSS selectors, it may also involve more verbosity. Below are the XPaths corresponding to input elements in our specific case:
const form = {
  username: "//*[@id="user-name"]",
  password: "//*[@id="password"]",
  submit: "//*[@id="login-button"]"
}
Now that we've identified the location of our input elements, we're ready to start writing our script.
Step 2: Automating Form Inputs and Clicks
When working on forms with basic input fields that require textual data and a submit button, it's crucial to familiarize yourself with two fundamental methods:
Method 1 - page.type(selector, value, options):
This method is versatile, serving as both a page method and an element-specific method (e.g., el.type(value, options)). It is employed to input text into designated fields and requires two or three arguments:
-
selector: The CSS selector or XPath expression of the target input field, which we have already seen in the previous example.
-
value: The actual value that you want to input into the target input field.
-
options: (optional): A precautionary measure against bot detection, the third argument adds a delay (time to wait between key presses) in milliseconds to simulate an actual user's typing speed.
Here's an example:
await page.type('#username', 'Jon Doe', { delay: 100 });
Method 2 - page.click(selector, options):
Specifically designed for buttons or input elements with types "submit" or "button", this method is utilized to simulate a click event. It can be applied to buttons, links, checkboxes, or any other clickable element. Here's an overview of its arguments:
-
selector: CSS selector or XPath expression to locate the target input, similar to the one in
type()method. -
options: (optional): An object with two possible properties,
buttonandclickCount. The "button" option determines which mouse button to use for clicking and has three possible values:left,right, ormiddle(default is 'left'). The "clickCount" determines how many times to click, such as double click or triple click that are common on computers.
Here's an example:
await page.click('#button', { button: 'left', clickCount: 2 });
In addition to these methods, there are others available, but for this section, we will stick to the same SauceDemo Form for which we inspected selector values in the previous section. In the upcoming sections, we will delve into more methods for handling sliders, ranges, drop-down menus, etc. However, for now, let's concentrate on the example at hand.
Take a look at this script:
const puppeteer = require('puppeteer');

const form = {
  username: "#user-name",
  username_value: "standard_user",

  password: "#password",
  password_value: "secret_sauce",

  submit: "#login-button"
};

(async () => {
  // Launch Puppeteer in the headful mode for visual debugging
  const browser = await puppeteer.launch({ headless: false });

  // Open a new page and navigate to the saucedemo website
  const page = await browser.newPage();
  await page.goto("https://www.saucedemo.com/");

  // Populate the username and password fields with provided values
  await page.type(form.username, form.username_value);
  await page.type(form.password, form.password_value);

  // Click the submit button and wait for navigation to complete
  await Promise.all([
    page.waitForNavigation(),
    page.click(form.submit),
  ]);

  // Close the browser once the form is submitted
  await browser.close();
})();
Upon executing this script, the Saucedemo website will open, input fields will be populated, and the form will be submitted. Here's a breakdown of the script:
-
We defined a "form" object containing selectors and corresponding values. The
username_valueandpassword_valuewere taken from the SauceDemo Login Page. -
The
{headless: false}option is utilized for visual debugging during code testing with Puppeteer. This allows observation of the form automation on the screen. However, in production, it's recommended to use{headless: "new"}for faster execution in headless mode. -
Values from the "form" object, such as
form.usernamefor the selector andform.username_valuefor its value, are provided as arguments to the type() method. A similar approach is taken for the second type() method. The optional "options" argument in type() is omitted for simplicity, though it may be useful in real scenarios. -
The
click()method is used to simulate clicking the submit button, followed by waiting for the form submission using thewaitForNavigation()method. This ensures that the script waits until the form is submitted and the response is received. Both waitForNavigation() and click() methods are asynchronous, and they are encapsulated withinPromise.all([])to prevent race conditions.
Forms can also be submitted by pressing the "Enter" key on the keyboard rather than clicking the submit button. In your script, you can employ page.keyboard.press("Enter") to submit forms as an alternative to using the page.click() method. This approach may save you some time.
Step 3: Form Validation
Form validation refers to the process of checking the data entered into a form to ensure that it meets specific criteria or requirements. The purpose of form validation is to improve the quality and accuracy of the data submitted by users and to prevent errors or invalid input.
Here are some commonly used validation attributes for input elements:
- required: This attribute makes an input field mandatory, and the form cannot be submitted unless this field has a value.
<input type="text" required>
- pattern: The pattern attribute allows you to specify a regular expression that the input value must match for the form to be submitted.
<input type="text" pattern="[A-Za-z]{3}">
- min and max: For numeric input types, the min and max attributes set the minimum and maximum values allowed, respectively.
<input type="number" min="0" max="100">
- minlength and maxlength: These attributes specify the minimum and maximum length of text input.
<input type="text" minlength="5" maxlength="10">
- pattern with title: You can use the pattern attribute along with the title attribute to provide a custom error message when the input does not match the specified pattern.
<input type="text" pattern="[0-9]{3}" title="Please enter a three-digit number">
- step: For numeric input types, the step attribute defines the legal number intervals.
<input type="number" step="5">
- autocomplete: The autocomplete attribute controls whether the browser should automatically complete the input value based on previous input or user behavior.
<input type="text" autocomplete="off">
These attributes contribute to form validation, ensuring that user input meets specific criteria or constraints. Depending on the context, different combinations of these attributes can be applied to enhance the validation process. You can find more validation flags here.
You can verify the validity of values entered into input fields using the checkValidity() function. This function examines whether the input field adheres to the validation criteria specified in the HTML (e.g., required, pattern).
Here's an example:
const isUsernameValid = await page.$eval(form.username, input => input.checkValidity());

if (!isUsernameValid) {
  console.error('Username is invalid. Aborting script.');
  await browser.close();
}
However, when validation is performed through JavaScript logic instead of HTML, and the validation relies on custom JavaScript executed in the browser, checkValidity() might not cover all aspects of the validation.
In cases where custom JavaScript handles client-side validation, and error messages or indicators are dynamically displayed on the page, you may need to directly search for those error messages. This is the case with our Saucedemo login form.
Navigate to the SauceDemo site, click on the submit button without entering any values, and you'll see an error message like this:
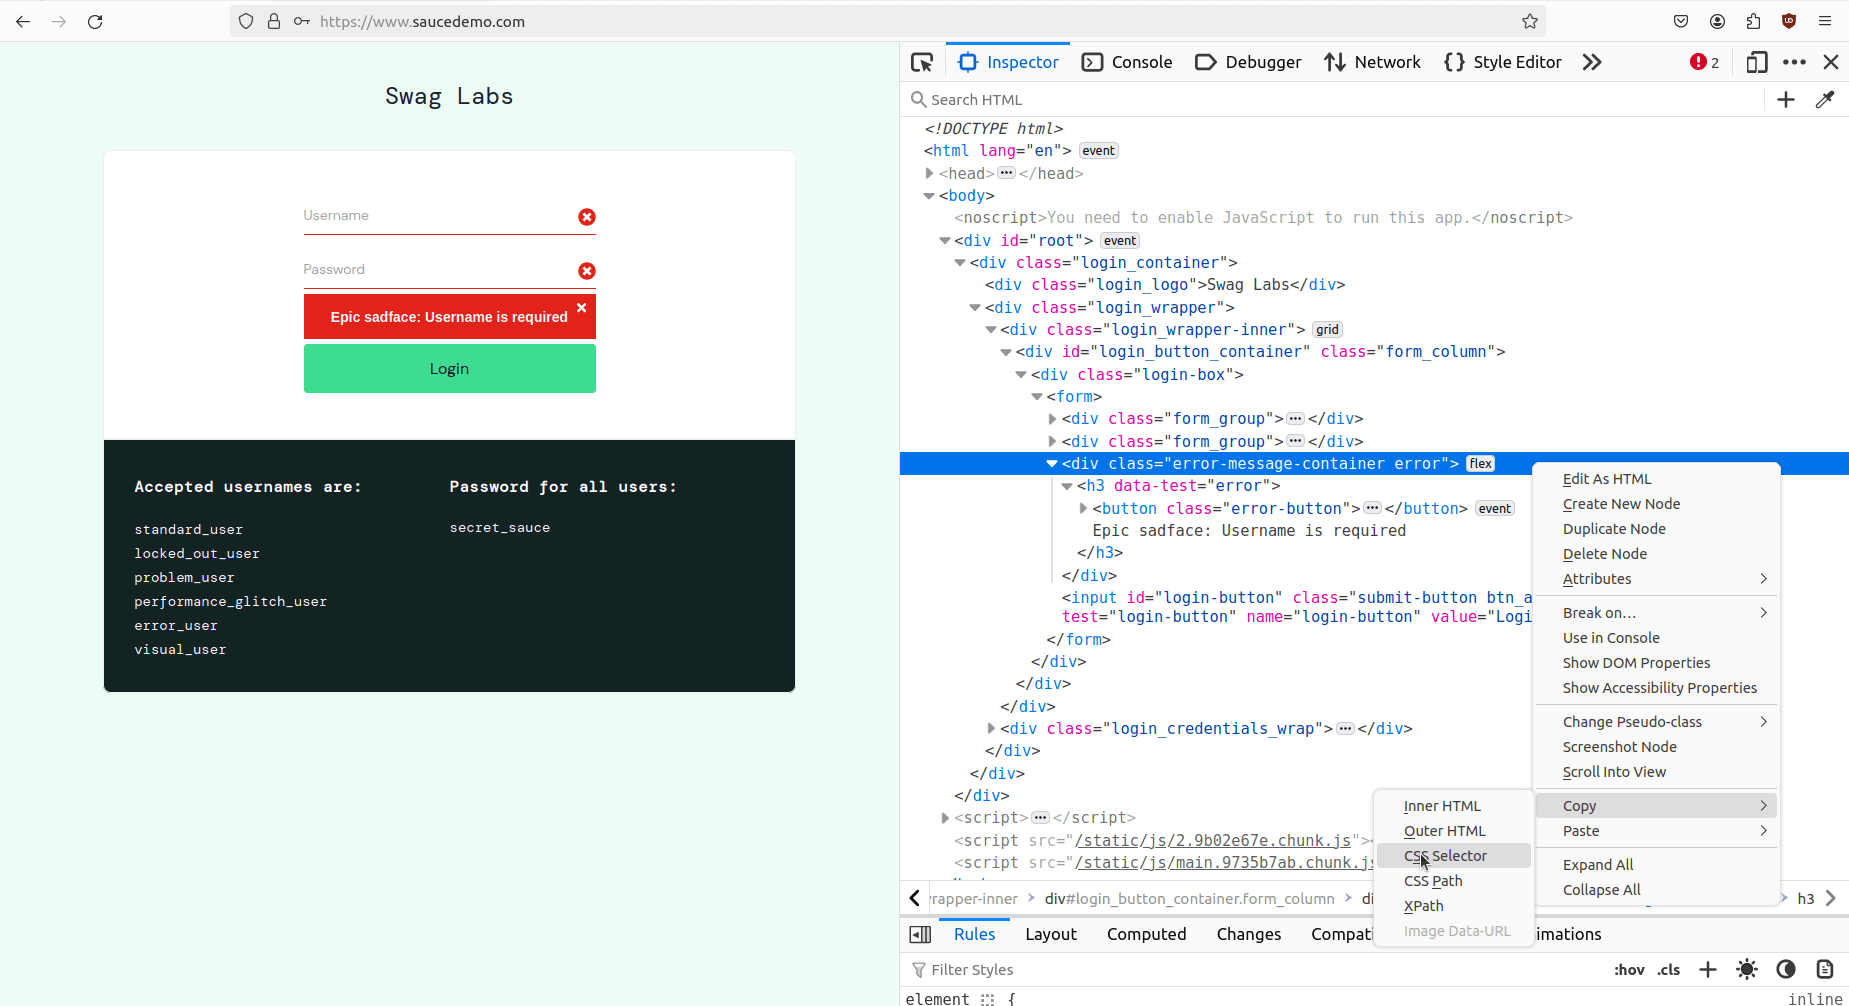
A red block appears on the form with the error message: "Epic sadface: Username is required".
To validate input values, check if the error message appears. The CSS selector for the error message div in our case is .error-message-container.
Now, let's update our previous script to identify incorrect usernames or passwords.
const puppeteer = require('puppeteer');

const form = {
  username: "#user-name",
  username_value: "standard_user",

  password: "#password",
  password_value: "secret_sauce",

  submit: "#login-button"
};

(async () => {
  const browser = await puppeteer.launch({ headless: false });

  const page = await browser.newPage();
  await page.goto("https://www.saucedemo.com/");

  await page.type(form.username, "incorrect_username");
  await page.type(form.password, "incorrect_password");
  await page.click(form.submit);

  try {
    const errorMessage = await page.$eval('.error-message-container', el => el.textContent);
    console.log(errorMessage);
  } catch (e) {
    // Handle Errors
  }

  await browser.close();
})();

// Epic sadface: Username and password do not match any user in this service
Executing this script will trigger an error message due to the insertion of incorrect values into the input fields.
We implemented a try-catch block to manage errors in case the correct input values do not cause the .error-message-container to appear on the webpage.
Step 4: Capturing and Analyzing Responses
After form submission, the server can respond in various ways.
- It may return a new HTML page for the client's browser to render.
- In the case of AJAX or Single-Page Applications (SPA), JSON or XML data might be sent for dynamic updates.
- If there are validation errors, the server may provide an error message, prompting users to correct their input.
We've previously discussed handling validation errors. For our specific scenario with the Saucedemo site, a successful form submission results in navigating to a new URL. Let's update our existing script to check for login success:
(async () => {
  const browser = await puppeteer.launch({ headless: false });

  const page = await browser.newPage();
  await page.goto("https://www.saucedemo.com/");

  await page.type(form.username, form.username_value);
  await page.type(form.password, form.password_value);
  await page.click(form.submit)

  try {
    const errorMessage = await page.$eval('.error-message-container', el => el.textContent);
    console.log(errorMessage);
  } catch (error) {
    // No error message found, indicating successful submission
    if (page.url().includes("inventory.html")) {
      console.log("Login Successful, New Page: ", page.url())
    }
  }
  await browser.close();
})();

// Login Successful, New Page:  https://www.saucedemo.com/inventory.html
This updated script includes handling for successful submissions, where it outputs the new page URL after login.
Handling Form Elements With Puppeteer
Having automated textual inputs such as usernames and passwords, it's time to explore various other common input types outlined in the initial table.
Text Inputs
Text inputs encompass a range of input types like text, password, email, url, tel, or search. While they all require textual data, email, url, and tel have specific formatting requirements.
Utilizing the page.type() method proves effective for entering data across these text input types.
Let's delve into an example with the email input type for a good understanding:
await page.type("#email_field", "jon_doe@gmail.com");
Remember, if you input an email in the wrong format (without '@' and '.'), an error will be triggered. Automating other input types like url and tel also works in the same way.
Buttons
In HTML, input elements with the type="submit" attribute serve a crucial role in form submissions. Here's a typical syntax example:
<form action="/action.php" method="post">
  <!-- Other form elements -->
  <input type="submit" value="Submit Form">
</form>
These input elements are rendered on web pages as buttons and possess a singular event - they respond to clicks, triggering the submission of the associated form.
Let's explore three different methods to simulate a button click using Puppeteer:
// Method 1:
await page.click('//*[@id="login-button"]');

// Method 2:
await page.keyboard.press("Enter");

// Method 3:
await page.$eval("#login-form", form => form.submit());
These methods offer flexibility in interacting with buttons, whether through direct clicks, keyboard events, or form submissions.
Checkboxes
Checkboxes in HTML provide a mechanism for users to select multiple options in a form. Here's an example of the syntax:
<form>
  <!-- Other form elements -->
  <input type="checkbox" id="subscribe" name="subscribe" value="yes">
  <label for="subscribe">Subscribe to Newsletter</label>
</form>
Checkboxes, once selected, can be used to submit specific data along with the form. Understanding their behavior is crucial for effective form interactions in web automation. This is how we can automatically select the above checkbox with the puppeteer:
// Check the checkbox
await page.click('#subscribe');
Radio Buttons
Radio buttons, unlike checkboxes, allow users to select only one option from a group. They are typically used when a single choice is required. Here's an example:
<form>
  <!-- Other form elements -->
  <input type="radio" id="male" name="gender" value="male">
  <label for="male">Male</label>

  <input type="radio" id="female" name="gender" value="female">
  <label for="female">Female</label>
</form>
Understanding how radio buttons work within a group is essential for handling exclusive choices in web automation. The following code snippet demonstrates how to select a specific radio button in the above HTML:
// Select the female option
await page.click('input[name=gender][value=female]');
Sliders (Range Inputs)
A slider is an input element that allows users to select a value within a specified range. It typically consists of a draggable handle or thumb that can be moved horizontally or vertically along a track
The purpose of a slider is to enable users to input numeric values or make selections within a predefined range. Sliders are commonly used for settings like volume controls, brightness adjustments, or any scenario where a continuous range of values needs to be adjusted.
In HTML, creating a slider involves employing the <input> element with type="range" and specifying the range's minimum (min) and maximum (max) values. Here's a basic HTML example:
<form>
  <!-- Other form elements -->
  <label for="volume">Volume:</label>
  <input type="range" id="volume" name="volume" min="0" max="100">
</form>
Let's delve into a practical example of automating a slider using Puppeteer. Consider the slider on this website as an illustration.
By inspecting the element, we identified its CSS selector to be .range-slider. Below is the Puppeteer script for automating and capturing the slider's screenshot:
const puppeteer = require('puppeteer');

(async () => {
  const browser = await puppeteer.launch({ headless: false });

  const page = await browser.newPage();
  await page.goto("https://demoqa.com/slider");

  await page.$eval('.range-slider', (slider, value) => {
    slider.value = value;
  }, 85);

  const slider = await page.$(".range-slider");
  await slider.screenshot({ path: 'slider.png' });
  await browser.close();
})();
In this script, the slider's value is dynamically set to 85%, and a screenshot is taken to visualize the slider's appearance after the adjustment using page.screenshot() method.

Drop-Down Menus
A drop-down or pull-down input element is like a list of choices that appears when you click on it, showing various options for you to pick from.
Drop-down menus are great for saving space and presenting a tidy way to display lists, especially when there are lots of options. They use the <select> tag and can hold numerous <option> elements inside.
Here's a simple HTML example:
<select>
  <option value="option1">Option 1</option>
  <option value="option2">Option 2</option>
  <option value="option3">Option 3</option>
</select>
We'll use a select menu on this website to illustrate how to automate the process. The select menu allows you to pick one country from a list of 248.
Since there's only one select element in the entire HTML page, we can simply use its tag name 'select' as the CSS selector. In the initial script, we'll demonstrate how to generate an array containing all the <option> elements within the select menu.
Here's the code:
const puppeteer = require('puppeteer');

(async () => {
  const browser = await puppeteer.launch({ headless: false });

  const page = await browser.newPage();
  await page.goto("https://www.globalsqa.com/demo-site/select-dropdown-menu/");

  const selectMenuSelector = 'select';

  const options = await page.evaluate((selectSelector) => {
    const selectElement = document.querySelector(selectSelector);

    const optionElements = Array.from(selectElement.options);

    const optionsArray = optionElements.map((option) => ({
      text: option.text,
      value: option.value,
    }));

    return optionsArray;
  }, selectMenuSelector);

  console.log(options);

  await browser.close();
})();

// [
//   { text: 'Afghanistan', value: 'AFG' },
//   { text: 'Åland Islands', value: 'ALA' },
//   { text: 'Albania', value: 'ALB' },
//   { text: 'Algeria', value: 'DZA' },
//   ... 244 more items
// ]
In this script:
- The
page.evaluate()method allows for the execution of JavaScript code within the context of the page. - the
document.querySelector()method is utilized to select the dropdown menu element with the tag name 'select'. - The
selectElement.optionsgetter is employed to retrieve a collection of<option>elements contained within the selected<select>element. This collection is then transformed into an array, and each option's text and value properties are extracted.
The resulting optionsArray contains objects representing each option's text and value, providing a convenient way to work with the dropdown menu options programmatically.
Let's create another script to choose one option from our drop-down menu using Puppeteer. Puppeteer provides a convenient method, page.select(selector, value), which allows us to select a specific value from a selector. Here's the script:
const puppeteer = require('puppeteer');

(async () => {
  const browser = await puppeteer.launch({ headless: false });

  const page = await browser.newPage();
  await page.goto("https://www.globalsqa.com/demo-site/select-dropdown-menu/");

  const selectMenuSelector = 'select';
  await page.select(selectMenuSelector, 'AUS');

  const selectMenu = await page.$(selectMenuSelector);
  await selectMenu.screenshot({path: 'select-menu.png'});

  await browser.close();
})();
In this script:
- We use
page.select(selectMenuSelector, 'AUS')to choose 'AUS' (Australia) from the list. Note that you need to provide thevalueattribute of the<option>element, not the innerText. - Afterwards, we utilized the
page.$()method to target the updated drop-down menu, now prominently displaying Australia at the forefront. - Finally, we capture a screenshot of the updated select menu using
selectMenu.screenshot(). The resulting screenshot looks like this:

It's essential to note that select menus can be configured to allow the selection of multiple options by using the multiple attributes in the opening tag, like this:
<select multiple>
  <!-- Options here -->
</select>
In such cases, you can employ the same page.select() method to choose multiple values by providing an array of options:
await page.select("#multiple-seletor", ['AUS', 'FRA', 'BHR']);
If the select menu has multiple attributes, this line will choose Australia, France, and Bahrain.
Date & Calender Inputs
The input element with type="date" functions as a date input, triggering a calendar popup for users to select a date upon clicking. Similar to other input types like type="email", the page.type() method in Puppeteer is suitable for interacting with date pickers. However, it's important to be mindful of the specific format required for entering dates.
The commonly used format is "MM-DD-YYYY", and that's what we'll utilize in our example.
If your application adopts a different date format, it's necessary to adjust the script to align with the expected format.
We will use the Data-Picker on this website for our example. The CSS selector for this particualar Data-Picker is "#datepicker2":
const puppeteer = require('puppeteer');

(async () => {
  const browser = await puppeteer.launch({ headless: false });

  const page = await browser.newPage();
  await page.goto("https://demo.automationtesting.in/Datepicker.html");

  await page.type("#datepicker2", "01-26-2024");

  const datePicker = await page.$("#datepicker2");
  await datePicker.screenshot({path: "date-picker.png"});

  await browser.close();
})();
Upon running this code, you'll obtain a screenshot of the updated date picker like this:

Certain websites opt to design custom date pickers, taking control of their UI by using custom HTML instead of relying on the standard input type="date". It is crucial to understand how to interact with and update such calendars.
Automating custom calendar elements typically involves clicking on the next or previous buttons to navigate through the calendar months and years and then selecting a date from it.
Content Editable Fields (Like Rich Text Editors):
You may encounter rich text editors that offer formatting options similar to those in Microsoft Word. Writing text to them programmatically is relatively straightforward, but the challenge arises when these text editors are embedded within iframes. Therefore, it is crucial to manage iframes before automating the text editor.
Let's examine a code example for handling a text editor on this website.
const puppeteer = require('puppeteer');

(async () => {
  const browser = await puppeteer.launch({ headless: false });
  const page = await browser.newPage();

  await page.goto("https://ckeditor.com/ckeditor-4/demo/", {
    waitUntil: "networkidle2"
  });

  // Wait for the iframe to be available
  const iframeSelector = '.cke_wysiwyg_frame';
  await page.waitForSelector(iframeSelector);

  const iframeElementHandle = await page.$(iframeSelector);
  const iframe = await iframeElementHandle.contentFrame();

  // Wait for the editable field to be available inside the iframe
  const editableFieldSelector = 'body';
  await iframe.waitForSelector(editableFieldSelector);

  const editableField = await iframe.$(editableFieldSelector);

  const textToSet = `
    <h1>ScrapeOps:</h1>
    <p>Your Complete Toolbox for Web Scraping</p>

    <p>Schedule your scraping jobs, monitor their performance & scrape with proxies from the ScrapeOps Dashboard.</p>
  `;

  await editableField.evaluate((field, text) => {
    field.innerHTML = text;
  }, textToSet);

  const textEditor = await page.$(".b-page-content");
  await textEditor.screenshot({ path: "text-editor.png" });

  await browser.close();
})();
Here is the breakdown of the above code:
-
We navigated to the website containing our text editor using the
page.goto()method. Notably, we used the flagnetworkidle2within the goto() method to ensure that the page is fully loaded before further actions. -
Then, we utilized the
waitForSelector()method to pause execution until the iframe containing our text editor became available. The method was provided with the CSS selector ".cke_wysiwyg_frame", representing the iframe. -
Once the iframe appeared on the screen, we used the
page.$()method to select it and then applied thecontentFrame()method to access its content for further operations. -
With the iframe content accessible, the subsequent steps involved selecting the editable area where the text was intended to be written. We modified its
innerTextproperty, assigning it the value of ourtextToSet. -
To capture the entire state of the text editor, including controls and other elements, we used the
page.screenshot()method to take its screenshot.
This screenshot illustrates how our text editor appears after the desired text has been successfully written to it.

Handling File Uploads & Attachments
File uploads are a common requirement in web forms, such as registration forms that ask for a profile picture or job application forms requesting a CV upload.
Puppeteer simplifies the process of handling file uploads through the uploadElement.uploadFile(filePath) method, which is specifically designed for interacting with input type="file" elements.
Let's explore a practical example demonstrating how to automate file uploads before submitting a form. In this demonstration, we'll use the file upload element on website, identified by the CSS selector #uploadFile.
You can find this selector through inspection using DevTools. Here's the script:
const puppeteer = require('puppeteer');

(async () => {
  const browser = await puppeteer.launch({ headless: false });
  const page = await browser.newPage();

  await page.goto("https://demoqa.com/upload-download");

  const uploadElement = await page.$("#uploadFile");

  await uploadElement.uploadFile("./profile-pic.png");

  await uploadElement.screenshot({ path: "upload-form-input.png" });

  await browser.close();
})();
Ensure that an image named "profile-pic.png" is present in the working directory for the script to execute successfully. It's essential to note that the uploadFile() method does not validate whether the file paths exist. If a path is relative, it is resolved against the current working directory. For local scripts connecting to remote Chrome environments, paths must be absolute.
Executing the script above will produce the following screenshot:

The screenshot displays the successful upload and attachment of "profile-pic.png" to the form.
Handling Confirmation Dialog Box:
At times, after inputting data into all the form fields and attempting to submit the form, a dialog box appears with a message like "Confirm form submission" or similar, prompting a review of the entered information. Let's explore how to automatically handle such pop-ups or dialog boxes using Puppeteer.
First, we'll manually create a form with this dialog box behavior, and then we'll automate it with Puppeteer.
Create an "index.html" file with the following HTML code:
<form onsubmit="return confirm('Are you sure?')" novalidate>
  <label for="name">Name:</label>
  <input type="text" id="name" name="name" required><br>

  <label for="email">Email:</label>
  <input type="email" id="email" name="email" required><br>

  <input type="submit" />
</form>
The novalidate attribute allows form submission even if the name and email fields are empty. Open this "index.html" file in your browser and click the submit button to see the dialog box:

Browsers handle and display the dialog box using the "dialog" event, which we can intercept with Puppeteer's page.on("dialog") method.
Puppeteer's page has various events, such as "domcontentloaded", "popup", or "pageerror". The "dialog" event is used specifically for handling dialog events and provides methods like dialog.accept(), dialog.dismiss(), and dialog.message().
Now, let's write a Puppeteer script to accept the dialog box:
const puppeteer = require('puppeteer');
const path = require('path');

(async () => {
  const browser = await puppeteer.launch({ headless: false });
  const page = await browser.newPage();

  const filePath = path.resolve(__dirname, "./index.html");

  await page.goto(`file://${filePath}`);

  page.on('dialog', async (dialog) => {
    console.log('Dialog Message:', dialog.message());

    await page.waitForTimeout(500);

    await dialog.accept();
  });

  await page.click('input[type=submit]');

  await page.waitForTimeout(500);

  await browser.close();
})();

// Dialog Message: Are you sure?
In this script, we listen for the "dialog" event using page.on("dialog") and accept the dialog upon clicking the submit button. The page.goto() method is given the absolute path to the "index.html" file.
The waitForTimeout(500) is not necessary but provides a slight delay for better visibility of the dialog box. The dialog message is logged to the console. For further details on handling dialog boxes or pop-ups, refer to the Official Puppeteer Documentation.
Handling Captchas:
Nowadays, when you're filling out a form online, you often come across reCAPTCHA or hCaptcha challenges before hitting submit.
These captchas are in place to prevent bots from submitting forms with fake information. While automating captcha solving is no easy task, it can be accomplished with the puppeteer-extra-plugin-recaptcha, coupled with paid services like 2captcha.com, where real individuals are hired to tackle them.
To employ the ReCaptcha plugin, you'll need to install it along with another package called puppeteer-extra. This serves as a drop-in replacement for puppeteer while enhancing it with plugin capabilities.
Use the following npm code to install both packages:
npm install puppeteer-extra puppeteer-extra-plugin-recaptcha
Once installed, enable the recaptcha plugin using puppeteer-extra's use() method. Here's an example:
const puppeteer = require('puppeteer-extra');
const RecaptchaPlugin = require('puppeteer-extra-plugin-recaptcha');

puppeteer.use(
  RecaptchaPlugin({
    provider: {
      id: '2captcha',
      token: 'XXXXXXX' // Replace this with your own 2captcha API key ⚡
    },
    visualFeedback: true // colorize reCAPTCHAs (violet = detected, green = solved)
  })
);

(async () => {
  const browser = await puppeteer.launch({ headless: false });

  const page = await browser.newPage();
  await page.goto("https://example.com");

  await page.solveRecaptchas();

  await page.screenshot({path: "snap.png"});
  await browser.close();
})();
- Require the ReCaptcha plugin, integrate it using the
use()method, and pass the required parameters. In the above example, we're using the 2captcha API tokens that you can purchase here. - Add a simple one-liner
page.solveRecaptchas()in your puppeteer script after navigating to a page, and the captchas will be automatically resolved.
Best Practices
By following these best practices, you can effectively automate form submissions with Puppeteer while ensuring reliability and robustness in your automation scripts.
- Avoiding Bot Detection:
Using hidden fields (<input type="hidden">) in forms as a bot detection technique, known as a "honeypot" or "hidden CAPTCHA," involves adding a hidden input field to the form.
This field should remain empty during human interactions but might be filled by a bot. If the hidden field is populated, the submission is likely automated, and the form can be rejected. During inspection, thoroughly examine the HTML of the form for hidden input fields, and be mindful of this when writing your automation script.
- Handling Errors on Form Submission Failure:
In scenarios where a form fails to submit due to empty input fields, incorrect email formats, or invalid usernames and passwords, it is crucial to design your Puppeteer script to detect and manage these errors.
- Overwriting Text in Input Fields:
Dealing with pre-filled text in input fields is a common challenge. Employ page.click({ clickCount: 3 }) to select existing text within input fields, highlighting it for removal. Subsequently, when utilizing page.type(), this allows for the seamless overwrite of the selected text with the desired input.
- Multi-Step forms:
For forms spread across multiple pages, leverage Puppeteer’s navigation events and the waitForNavigation() method to adeptly handle each step of the form submission process.
- Debugging Mode:
During development, employ Puppeteer’s built-in debugging features, such as headless: false or slowMo, to observe the automation process step by step. However, before deploying your code to production, ensure that you replace these settings with headless: "new" for all browser instances
Troubleshooting
Let's delve into common issues that may arise in your script while automating forms and explore how to debug and resolve them. Here are some frequently encountered problems:
Issue #1: Element Not Found
A prevalent error is "Error: No element found for selector: #selector", which occurs when the element you are interacting with in your Puppeteer script is not present in the DOM tree.
Solution:
-
To address this issue, thoroughly inspect and ensure that the element is indeed present in the HTML. Verify that the CSS selector, CSS path, or XPath expression you are using to locate it is accurate and up-to-date.
-
In cases where elements load asynchronously, as seen in single-page applications (SPAs), your script may fail to locate them in time. To resolve this, employ various waiting strategies, as demonstrated in our code examples, to make the script wait until the element becomes visible on the screen or is at least present in the DOM.
await page.goto(url, {
  waitUntil: "networkidle2"
});

await page.waitForSelector(selector);
- For a detailed exploration of different waiting strategies, check our Waiting For Page or Element To Load Puppeteer guide.
Issue #2: Element Not Interactable
Even if the element is present in the DOM, attempting to interact with it, such as using page.click(btn), may result in an error indicating that the element is not interactable. This issue may arise if the element is not yet visible or enabled on the web page, is obscured by another element, or is located within an iframe.
Solution:
- To address this problem, employ various waiting strategies to ensure the element becomes visible on the screen. One such waiting strategy is to use
waitForSelector()with thevisibleflag set totrue, as demonstrated below:
await page.waitForSelector(selector, {
  visible: true;
})
For an in-depth guide on waiting for elements, refer to this guide.
- If the element is located within an iframe, first handle the iframe by selecting it and then retrieve its content using the
ElementHandle.contentFrame()method. We also handled an iframe in one of our code examples. A general example is provided below:
await page.waitForSelector(iframeSelector);
const iframeHandle = await page.$(iframeSelector);
await iframe = await iframeHandle.contentFrame();

// Now locate the elements within the iframe like this:
const elementInsideIframe = await iframe.$(elementSelector);
Issue #3: Incorrect Element Interactions
Actions such as clicking, getting, or setting the inner content of an element or other type of interactions may not produce the intended effect using standard Puppeteer methods.
Solution:
In such cases, after confirming that the selector for the element is correct, you can leverage Puppeteer's page.evaluate() method to execute JavaScript in the context of the document object. Consider the following example:
const options = await page.evaluate((selectMenuSelector) => {
  const selectMenu = document.querySelector(selectMenuSelector);

  const optionElements = Array.from(selectMenu.options);

  const optionsArray = optionElements.map((option) => ({
    text: option.text,
    value: option.value,
  }));

  return optionsArray;
}, selectMenuSelector);
This script utilizes JavaScript to select a dropdown menu using querySelector() (same as puppeteer's page.$() method) and retrieves all its options' inner text and value attributes.
By employing this technique, you can interact with the elements effectively, achieving the desired results without relying solely on Puppeteer's standard methods.
Issue #4: Form Not Submitting
The form may fail to submit even after filling out fields and clicking the submit button.
Solution:
-
Examine if JavaScript validation is hindering submission. Manually attempt to submit the form with the same values provided in your script and check for any validation errors. If errors occur, handle them accordingly.
-
Verify that all mandatory fields are correctly filled. Mandatory fields often have a
requiredattribute, indicating that they can not be left empty. -
Experiment with alternative form submission methods instead of using
page.click()on the submit button. For instance, try triggering submission with pressing the "ENTER" key or using JavaScript submission:
await page.keyboard.press("Enter");
// OR
await page.$eval("#login-form", form => form.submit());
Issue #5: Handling Alerts and Pop-ups
While automating forms, unexpected pop-ups or alerts may appear.
Solution:
Employ Puppeteer's event handling mechanism, like the page.on('dialog') event, to manage alerts and pop-ups by accepting, dismissing, or logging text. An example is provided below:
page.on('dialog', dialog => {
  console.log(dialog.message());
  dialog.dismiss();
})
You can find more info on handling alerts and pop-ups on Puppeteer's Official Docs
Issue #6: Dynamic Content Issues
When dealing with dynamic sites or single-page applications (SPAs) that load content through AJAX, complete loading may not occur.
Solution:
Implement explicit waits to account for specific conditions or elements. Puppeteer offers various waiting strategies for waiting for a particular API request/response to be resolved:
// Start monitoring network traffic
await page.setRequestInterception(true);

await page.waitForResponse(apiEndPoint)
For a comprehensive understanding of waiting methods, refer to this guide. Customize waiting strategies as needed for your specific scenario.
Issue #7: iFrame Handling
You may be unable to interact with elements inside an iframe.
Solution:
Resolve this by switching the context from page to iframe using the iframeElement.contentFrame() method before engaging with its elements. Have a look at the following example:
const iframeHandle = await page.$(iframeSelector);
const iframe = await iframeHandle.contentFrame();

const element = await iframe.$(elementSelector);
Adjust the selectors as needed for your specific scenario.
Issue #8: Browser Compatibility Issues
Puppeteer scripts designed for one browser may encounter issues when configured for a different browser.
Solution:
By default, Puppeteer uses Chromium, a reliable choice. However, if you opt for a different browser like Firefox, ensure your script adapts to its environment.
Application of Forms
Websites employ forms for various purposes, and understanding the function of a form and the type of data it requires is essential. Here are some typical uses of forms:
-
User Registration and Sign-Up: Forms are fundamental for user onboarding, allowing individuals to register and create accounts on websites or applications. This process typically involves capturing essential user details, such as username, email, and password.
-
User Authentication and Sign-In: Forms play a critical role in user authentication, providing a secure way for individuals to sign in to their accounts. This involves verifying credentials entered through a sign-in form, ensuring access to personalized content and features.
-
Contact Forms: Web developers commonly implement contact forms to facilitate communication between users and website owners. These forms enable users to submit inquiries, feedback, or specific requests directly to the website administrators.
-
Search and Filtering: In web applications, forms are utilized for advanced search and filtering functionalities, enabling users to refine and tailor their searches based on specific criteria.
-
Account Settings and Preferences: Forms play a crucial role in allowing users to customize their account settings and preferences, providing a personalized and user-friendly experience.
-
Opinion Polls and Surveys: Forms can be leveraged to conduct polls or surveys, gathering opinions and data on specific topics. This interactive approach helps in understanding user perspectives and preferences. Google Forms can be used to collect data and allows users to create and share online surveys, questionnaires, quizzes, and forms. Key features of Google Forms include the ability to create various question types (multiple-choice, short answer, etc.), add images or videos, and customize the form's appearance. Responses are automatically collected and can be viewed in real time through summary charts and graphs.
Conclusion
Puppeteer is a strong tool that can help automate tasks like filling out forms on websites. However, keep in mind that for a web scraper to work well, you need to be careful not to overwhelm the server by submitting too many forms too quickly.
If you do, you might get blocked. Be aware of bot detectors and adjust your script accordingly. If you're thinking of using Puppeteer for web scraping, it's a good idea to read their official documentation.
More Puppeteer Web Scraping Guides
If you would like to learn more about Web Scraping with Puppeteer, then be sure to check out The Puppeteer Web Scraping Playbook.
Check out our suggested articles for a more detailed guide on using Puppeteer: