Web Scraping Part 3 - Storing Data in AWS S3, MySQL & Postgres DBs
In this third installment of our beginner-friendly web scraping series, we shift focus from data extraction and cleaning to data persistence. Reliable storage is a critical piece of any scraping pipeline: it ensures your hard-won data survives beyond a single run and can be easily queried, shared, or backed up.
Throughout this guide, you’ll learn how to extend the ProductDataPipeline class to save scraped data in multiple formats and backends—ranging from simple JSON files to cloud storage with AWS S3, and onto relational databases like MySQL and PostgreSQL. We’ll cover the rationale behind each option, walk through hands-on code samples, and discuss the pros, cons, and ideal use cases for each storage method.
- Python Requests + BeautifulSoup
- Python Selenium
- Node.js Puppeteer
- Node.js Playwright

Python Requests/BS4 Beginners Series Part 3: Storing Data
In Part 1 and Part 2 of this Python Requests/BeautifulSoup 6-Part Beginner Series, we learned how to build a basic web scraper and extract data from websites, as well as how to clean the scraped data.
In Part 3, we'll explore various methods for saving the data in formats suitable for common use cases. We'll cover saving data to JSON files, as well as storing the data in databases or AWS S3 buckets.
- Saving Data to a JSON File
- Saving Data to Amazon S3 Storage
- Saving Data to MySQL Database
- Saving Data to Postgres Database
- Complete Code
- Next Steps
If you prefer to follow along with a video then check out the video tutorial version here:
Need help scraping the web?
Then check out ScrapeOps, the complete toolkit for web scraping.


Python Requests/BeautifulSoup 6-Part Beginner Series
-
Part 1: Basic Python Requests/BeautifulSoup Scraper - We'll go over the basics of scraping with Python, and build our first Python scraper. (Part 1)
-
Part 2: Cleaning Dirty Data & Dealing With Edge Cases - Web data can be messy, unstructured, and have lots of edge cases. In this tutorial we'll make our scraper robust to these edge cases, using data classes and data cleaning pipelines. (Part 2)
-
Part 3: Storing Data in AWS S3, MySQL & Postgres DBs - There are many different ways we can store the data that we scrape from databases, CSV files to JSON format, and S3 buckets. We'll explore several different ways we can store the data and talk about their pros, and cons and in which situations you would use them. (Part 3)
-
Part 4: Managing Retries & Concurrency - Make our scraper more robust and scalable by handling failed requests and using concurrency. (Part 4)
-
Part 5: Faking User-Agents & Browser Headers - Make our scraper production ready by using fake user agents & browser headers to make our scrapers look more like real users. (Part 5)
-
Part 6: Using Proxies To Avoid Getting Blocked - Explore how to use proxies to bypass anti-bot systems by hiding your real IP address and location. (Part 6)
The code for this project is available on GitHub.
Saving Data to a JSON File
💡Note: All methods for storing data in JSON files, databases, or S3 buckets will be implemented within the ProductDataPipeline class, which was created in Part 2 of this series.
To save data to the JSON file, we’ll create a method called save_to_json(). The method performs the following actions.
It iterates over each product in the products_to_save list. For each product, it calls the asdict() function to convert it into a dictionary. The resulting dictionaries are appended to a list called json_data.
Open the JSON file specified by self.json_filename in read mode. If the file exists, it uses json.load() to load the existing data into the existing_data list. Otherwise, it initializes existing_data as an empty list.
The json_data list containing the newly converted dictionaries is appended to the end of the existing_data list, combining both datasets.
Finally, the method opens the JSON file in write mode and uses json.dump() to write the combined data (now stored in existing_data) back to the file.
import os
import json
from dataclasses import dataclass, field, fields, InitVar, asdict

class ProductDataPipeline:
    """
    Previous code
    """

    def save_to_json(self):
        products_to_save = []
        json_data = []
        products_to_save.extend(self.storage_queue)

        if not products_to_save:
            return
        for product in products_to_save:
            json_data.append(asdict(product))
        try:
            with open(self.json_filename, mode="r", encoding="utf-8") as output_file:
                existing_data = json.load(output_file)
        except FileNotFoundError:
            existing_data = []
        existing_data.extend(json_data)

        with open(self.json_filename, mode="w", encoding="utf-8") as output_file:
            json.dump(existing_data, output_file, indent=2)
Here’s the JSON file:

Saving Data to Amazon S3 Storage
We've already covered how to export the data to a CSV file in Part 2 of this series. Nonetheless, we've also included the code for that, which you can find in the last section. Now, let's save the created CSV file directly to an Amazon S3 bucket (you'll need to have one set up already).
If you don't have a bucket yet, you can follow the instructions on how to set one up.
Once you’ve a bucket, we'll start by installing Boto3, an external Python library created by Amazon to help with connecting to your S3 bucket.
pip install boto3
To get started, set up the necessary credentials to connect to Amazon S3. Next, the method creates an S3 client using the Boto3 library. It then uses the put_object method of the S3 client to upload the file "product_data.csv" to the specified S3 bucket (self.aws_s3_bucket) with the Key "chocolate_data.csv".
Within the bucket, the Key serves as the file name that would be used in the Amazon S3. The data to be uploaded is defined in the Body parameter.
In this case, Body=open("product_data.csv", "rb") opens the file in read-binary mode and sends its contents to S3. After the upload, the code checks the status of the operation to ensure success.
import boto3

class ProductDataPipeline:
    """
    Previous code
    """

    def save_to_s3_bucket(self):
        aws_access_key_id = "YOUR_ACCESS_KEY"
        aws_secret_access_key = "YOUR_SECRET_KEY"

        s3_client = boto3.client(
            "s3",
            aws_access_key_id=aws_access_key_id,
            aws_secret_access_key=aws_secret_access_key,
        )

        response = s3_client.put_object(
            Bucket=self.aws_s3_bucket,
            Key="chocolate_data.csv",
            Body=open("product_data.csv", "rb"),
        )

        status = response.get("ResponseMetadata", {}).get("HTTPStatusCode")

        if status == 200:
            print(f"Successfully put on S3 bucket!")
        else:
            print(f"Unsuccessful operation: Status - {status}")
Obviously, you’ll need to replace the aws_key and aws_secret with your own Amazon Key and Secret. Also, pass your bucket name and correct file path.
Here’s the snapshot showing that the file has been uploaded successfully:

Note: When saving data to AWS S3, employ delayed file uploads. This means that the file is first temporarily saved locally on the machine running the scraper, and then uploaded to AWS S3 once the scraper's job is complete.
Saving Data to MySQL Database
Here, we'll show you how to save data to MySQL databases. To follow along, we assume you already have a database named chocolatedb set up.
Downloading MySQL
For setting up a MySQL database, check out the following resources:
Creating MySQL Table
We assume you already have a database set up and a table called chocolate_products in your database. If not, you can log in to your database and run the following command to create the table:
CREATE TABLE IF NOT EXISTS chocolate_products (
    id INT AUTO_INCREMENT PRIMARY KEY,
    name VARCHAR(255),
    price_gb VARCHAR(255),
    price_usd VARCHAR(255),
    url TEXT
);
Connecting Scraper To MySQL Database
The first step is to establish a connection to your MySQL database and the specific table where you'll store the scraped data. To interact with your MySQL database from Python, you'll need the appropriate MySQL connector. You can easily install it using pip:
pip install mysql-connector-python
To establish a connection with a MySQL server, you'll need the connect() function from the mysql.connector module. This function takes parameters such as host, user, and password, and it returns a MySQLConnection object, which is stored in a variable called connection. This variable will be used to interact with your MySQL server.
Since you already have a database and just need to connect to it, you can pass an additional parameter called database to the connect() function.
import mysql.connector
from dataclasses import dataclass, field, fields, InitVar, asdict

class ProductDataPipeline:
    """
    Previous code
    """

    def save_to_mysql(self):
        products_to_save = []
        products_to_save.extend(self.storage_queue)

        if not products_to_save:
            return
        self.connection = mysql.connector.connect(
            host="localhost",
            user="root",
            password="Admin123@",
            database=self.mysql_db_name,
        )

        # Create cursor object
        with self.connection.cursor() as cursor:
            for product in products_to_save:
                item = asdict(product)
                cursor.execute(
                    """ insert into chocolate_products ( name, price_gb, price_usd, url)  values (%s,%s,%s,%s)""",
                    (item["name"], item["price_gb"], item["price_usd"], item["url"]),
                )
                self.connection.commit()
To insert data into the chocolate_products table, you'll need to write an INSERT INTO query as a string and pass it to the cursor.execute() method. This method accepts MySQL queries and executes them on the connected database.
Notice the connection.commit() statement at the end of the code. By default, the MySQL connector does not automatically commit transactions. In MySQL, modifications made within a transaction are only applied to the database when you explicitly use a COMMIT command. Remember to call this method after each transaction to ensure that your changes are reflected in the actual table.
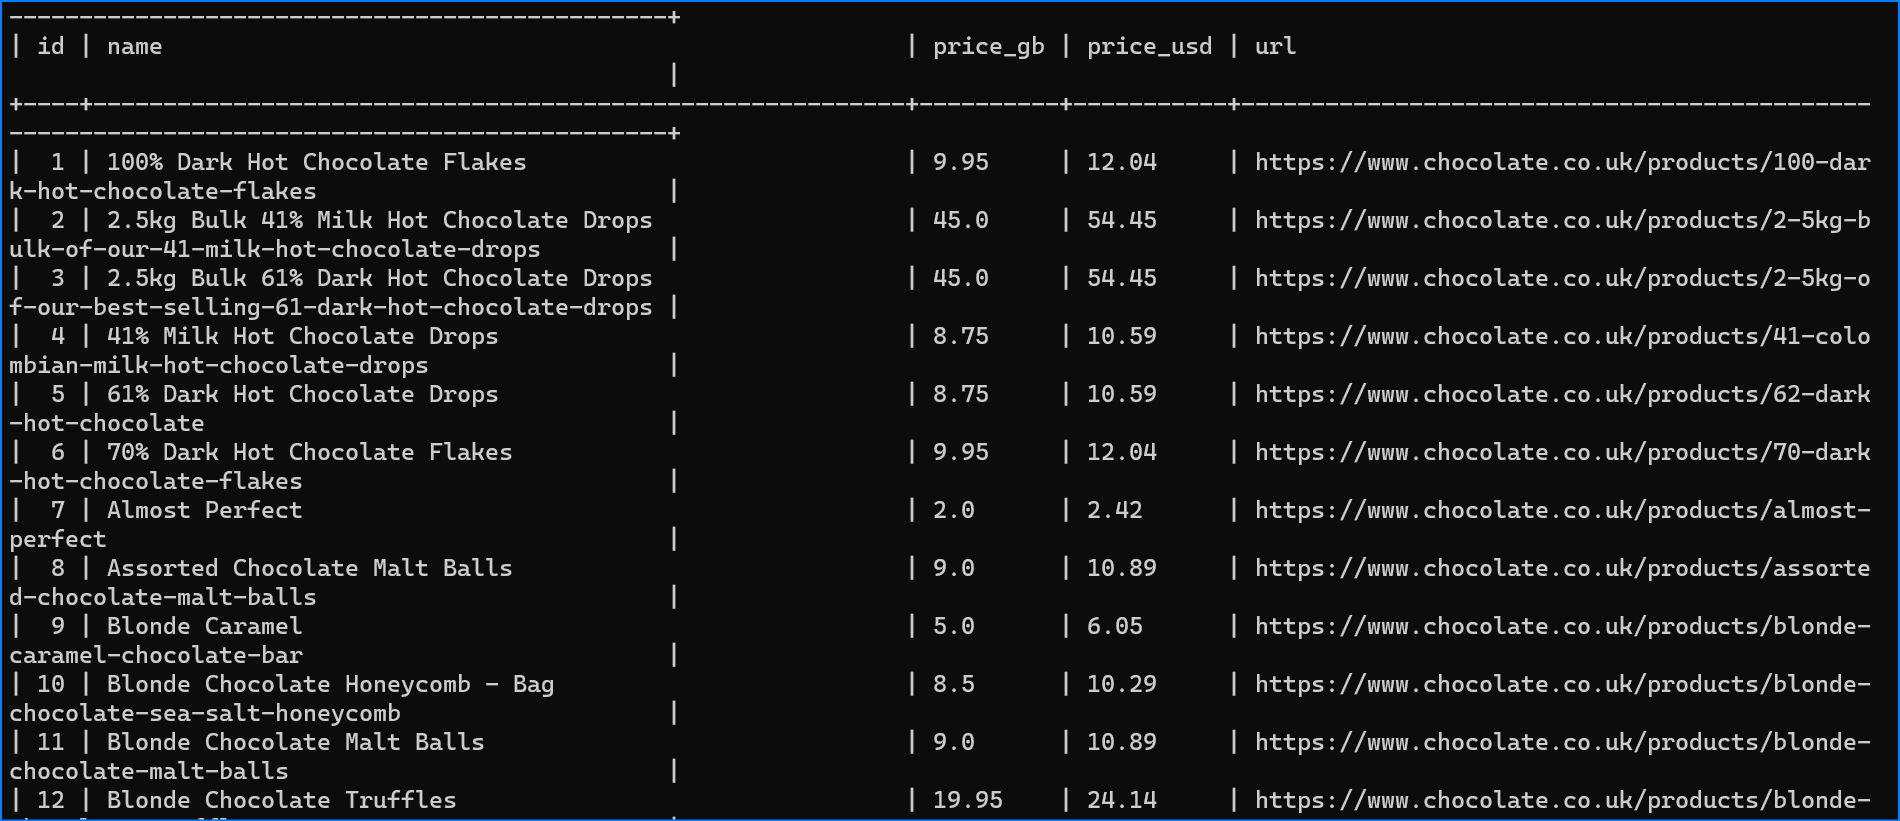
Here’s the snapshot of the data stored in the MySQL database:
Saving Data to Postgres Database
Here, we'll show you how to save data to Postgres databases. To follow along, we assume you already have a database named chocolatedb set up.
Downloading Postgres
For setting up a Postgres database, check out the following resources:
Creating Postgres Table
As mentioned earlier, we're assuming you’ve a Postgres database set up and a table named chocolate_products already exists in your database. If not, please log in to your Postgres database and execute the following command to create the table:
CREATE TABLE IF NOT EXISTS chocolate_products (
    id SERIAL PRIMARY KEY,
    name VARCHAR(255),
    price_gb VARCHAR(255),
	price_usd VARCHAR(255)
    url TEXT
);
Connecting Scraper To Postgres Database
To save data to a PostgreSQL database, the primary step is to update how the connection is created. To do so we’ll install the Python package psycopg2.
pip install psycopg2
And update the connect function.
import psycopg2
from dataclasses import dataclass, field, fields, InitVar, asdict

class ProductDataPipeline:
    """
    Previous code
    """

    def save_to_postgresql(self):
        products_to_save = []
        products_to_save.extend(self.storage_queue)

        if not products_to_save:
            return
        self.connection = psycopg2.connect(
            host="localhost",
            database=self.postgre_db_name,
            user="postgres",
            password="mypass@123",
        )

        with self.connection.cursor() as cursor:
            for product in products_to_save:
                item = asdict(product)
                cursor.execute(
                    """ insert into chocolate_products ( name, price_gb, price_usd, url)  values (%s,%s,%s,%s)""",
                    (item["name"], item["price_gb"], item["price_usd"], item["url"]),
                )
                self.connection.commit()
Here’s the snapshot of the data stored in the PostgreSQL database:

Complete Code
When you execute the code, it will create two files, product_data.csv and product_data.json. It will then store the data in MySQL, PostgreSQL, and the Amazon S3 bucket.
Execute the following command to see the data in your MySQL and PostgreSQL databases:
select * from chocolate_products;
Here’s the complete code:
import os
import csv
import json
import time
import requests
import boto3
import psycopg2
import mysql.connector
from bs4 import BeautifulSoup
from dataclasses import dataclass, field, fields, InitVar, asdict

@dataclass
class Product:
    name: str = ""
    price_string: InitVar[str] = ""
    price_gb: float = field(init=False)
    price_usd: float = field(init=False)
    url: str = ""

    def __post_init__(self, price_string):
        self.name = self.clean_name()
        self.price_gb = self.clean_price(price_string)
        self.price_usd = self.convert_price_to_usd()
        self.url = self.create_absolute_url()

    def clean_name(self):
        if self.name == "":
            return "missing"
        return self.name.strip()

    def clean_price(self, price_string):
        price_string = price_string.strip()
        price_string = price_string.replace("Sale price£", "")
        price_string = price_string.replace("Sale priceFrom £", "")
        if price_string == "":
            return 0.0
        return float(price_string)

    def convert_price_to_usd(self):
        return round(self.price_gb * 1.21, 2)

    def create_absolute_url(self):
        if self.url == "":
            return "missing"
        return "https://www.chocolate.co.uk" + self.url

class ProductDataPipeline:
    def __init__(
        self,
        csv_filename="",
        json_filename="",
        mysql_db_name="",
        postgre_db_name="",
        aws_s3_bucket="",
        storage_queue_limit=5,
    ):
        self.names_seen = []
        self.storage_queue = []
        self.storage_queue_limit = storage_queue_limit
        self.csv_filename = csv_filename
        self.json_filename = json_filename
        self.mysql_db_name = mysql_db_name
        self.postgre_db_name = postgre_db_name
        self.aws_s3_bucket = aws_s3_bucket

    def save_to_csv(self):
        products_to_save = []
        products_to_save.extend(self.storage_queue)
        self.storage_queue.clear()
        if not products_to_save:
            return
        keys = [field.name for field in fields(products_to_save[0])]
        file_exists = (
            os.path.isfile(self.csv_filename) and os.path.getsize(
                self.csv_filename) > 0
        )

        with open(
            self.csv_filename, mode="a", newline="", encoding="utf-8"
        ) as output_file:
            writer = csv.DictWriter(output_file, fieldnames=keys)

            if not file_exists:
                writer.writeheader()
            for product in products_to_save:
                writer.writerow(asdict(product))

    def save_to_json(self):
        products_to_save = []
        json_data = []
        products_to_save.extend(self.storage_queue)

        if not products_to_save:
            return
        for product in products_to_save:
            json_data.append(asdict(product))
        try:
            with open(self.json_filename, mode="r", encoding="utf-8") as output_file:
                existing_data = json.load(output_file)
        except FileNotFoundError:
            existing_data = []
        existing_data.extend(json_data)

        with open(self.json_filename, mode="w", encoding="utf-8") as output_file:
            json.dump(existing_data, output_file, indent=2)

    def save_to_mysql(self):
        products_to_save = []
        products_to_save.extend(self.storage_queue)

        if not products_to_save:
            return
        self.connection = mysql.connector.connect(
            host="localhost",
            user="root",
            password="mypass@123",
            database=self.mysql_db_name,
        )

        # Create cursor object

        with self.connection.cursor() as cursor:
            for product in products_to_save:
                item = asdict(product)
                cursor.execute(
                    """ insert into chocolate_products ( name, price_gb, price_usd, url)  values (%s,%s,%s,%s)""",
                    (item["name"], item["price_gb"],
                     item["price_usd"], item["url"]),
                )
                self.connection.commit()

    def save_to_postgresql(self):
        products_to_save = []
        products_to_save.extend(self.storage_queue)

        if not products_to_save:
            return
        self.connection = psycopg2.connect(
            host="localhost",
            database=self.postgre_db_name,
            user="postgres",
            password="mypass@123",
        )

        with self.connection.cursor() as cursor:
            for product in products_to_save:
                item = asdict(product)
                cursor.execute(
                    """ insert into chocolate_products ( name, price_gb, price_usd, url)  values (%s,%s,%s,%s)""",
                    (item["name"], item["price_gb"],
                     item["price_usd"], item["url"]),
                )
                self.connection.commit()

    def save_to_s3_bucket(self):
        aws_access_key_id = "YOUR_ACCESS_KEY"
        aws_secret_access_key = "YOUR_SECRET_KEY"

        s3_client = boto3.client(
            "s3",
            aws_access_key_id=aws_access_key_id,
            aws_secret_access_key=aws_secret_access_key,
        )

        response = s3_client.put_object(
            Bucket=self.aws_s3_bucket,
            Key="chocolate_data.csv",
            Body=open("product_data.csv", "rb"),
        )

        status = response.get("ResponseMetadata", {}).get("HTTPStatusCode")

        if status == 200:
            print(f"Successfully put on S3 bucket!")
        else:
            print(f"Unsuccessful operation: Status - {status}")

    def clean_raw_product(self, scraped_data):
        return Product(
            name=scraped_data.get("name", ""),
            price_string=scraped_data.get("price", ""),
            url=scraped_data.get("url", ""),
        )

    def is_duplicate(self, product_data):
        if product_data.name in self.names_seen:
            print(f"Duplicate item found: {product_data.name}. Item dropped.")
            return True
        self.names_seen.append(product_data.name)
        return False

    def add_product(self, scraped_data):
        product = self.clean_raw_product(scraped_data)
        if self.is_duplicate(product) == False:
            self.storage_queue.append(product)
            if len(self.storage_queue) >= self.storage_queue_limit:
                self.save_to_json()
                self.save_to_mysql()
                self.save_to_postgresql()
                self.save_to_csv()

    def close_pipeline(self):
        if len(self.storage_queue) > 0:
            self.save_to_json()
            self.save_to_mysql()
            self.save_to_postgresql()
            self.save_to_csv()

list_of_urls = [
    "https://www.chocolate.co.uk/collections/all",
]

def start_scrape():

    # Loop Through a List of URLs

    for url in list_of_urls:

        # Send Request

        response = requests.get(url)

        if response.status_code == 200:

            # Parse Data

            soup = BeautifulSoup(response.content, "html.parser")
            products = soup.select("product-item")
            for product in products:
                name = product.select(
                    "a.product-item-meta__title")[0].get_text()
                price = (
                    product.select("span.price")[0]
                    .get_text()
                    .replace("\nSale price£", "")
                )
                url = product.select("div.product-item-meta a")[0]["href"]

                # Add To Data Pipeline

                data_pipeline.add_product(
                    {"name": name, "price": price, "url": url})
            # Next Page

            next_page = soup.select('a[rel="next"]')
            if len(next_page) > 0:
                list_of_urls.append(
                    "https://www.chocolate.co.uk" + next_page[0]["href"]
                )

if __name__ == "__main__":
    data_pipeline = ProductDataPipeline(
        csv_filename="product_data.csv",
        json_filename="product_data.json",
        mysql_db_name="chocolatedb",
        postgre_db_name="chocolatedb",
        aws_s3_bucket="chocolate-products",
    )
    start_scrape()
    data_pipeline.close_pipeline()
    print("Congratulations! Data saved successfully on MySQL, PostgreSQL, and JSON.")
    time.sleep(3)
    data_pipeline.save_to_s3_bucket()
Python Selenium Beginners Series Part 3: Storing Data in AWS S3, MySQL & Postgres DBs
In Part 1 and Part 2 of this Python Selenium 6-Part Beginner Series, we learned how to build a basic web scraper and extract data from websites, as well as how to clean the scraped data.
In Part 3, we'll explore various methods for saving the data in formats suitable for common use cases. We'll cover saving data to JSON files, as well as storing the data in databases or AWS S3 buckets.
- Saving Data to a JSON File
- Saving Data to Amazon S3 Storage
- Saving Data to MySQL Database
- Saving Data to Postgres Database
- Complete Code
- Next Steps
Need help scraping the web?
Then check out ScrapeOps, the complete toolkit for web scraping.
Python Selenium 6-Part Beginner Series
-
Part 1: Basic Python Selenium Scraper - We'll go over the basics of scraping with Python, and build our first Python scraper. Part 1
-
Part 2: Cleaning Dirty Data & Dealing With Edge Cases - Web data can be messy, unstructured, and have lots of edge cases. In this tutorial we'll make our scraper robust to these edge cases, using data classes and data cleaning pipelines. Part 2
-
Part 3: Storing Data in AWS S3, MySQL & Postgres DBs - There are many different ways we can store the data that we scrape from databases, CSV files to JSON format, and S3 buckets. We'll explore several different ways we can store the data and talk about their pros, and cons and in which situations you would use them. Part 3
-
Part 4: Managing Retries & Concurrency - Make our scraper more robust and scalable by handling failed requests and using concurrency. Part 4
-
Part 5: Faking User-Agents & Browser Headers - Make our scraper production ready by using fake user agents & browser headers to make our scrapers look more like real users. (Coming Soon)
-
Part 6: Using Proxies To Avoid Getting Blocked - Explore how to use proxies to bypass anti-bot systems by hiding your real IP address and location. (Coming Soon)
Saving Data to a JSON File
💡Note: All methods for storing data in JSON files, databases, or S3 buckets will be implemented within the ProductDataPipeline class, which was created in Part 2 of this series.
To save data to the JSON file, we’ll create a method called save_to_json(). The method performs the following actions.
It iterates over each product in the products_to_save list. For each product, it calls the asdict() function to convert it into a dictionary. The resulting dictionaries are appended to a list called json_data.
Open the JSON file specified by self.json_filename in read mode. If the file exists, it uses json.load() to load the existing data into the existing_data list. Otherwise, it initializes existing_data as an empty list.
The json_data list containing the newly converted dictionaries is appended to the end of the existing_data list, combining both datasets.
Finally, the method opens the JSON file in write mode and uses json.dump() to write the combined data (now stored in existing_data) back to the file.
import os
import json
from dataclasses import dataclass, field, fields, InitVar, asdict

class ProductDataPipeline:
    """
    Previous code
    """

    def save_to_json(self):
        products_to_save = []
        json_data = []
        products_to_save.extend(self.storage_queue)

        if not products_to_save:
            return
        for product in products_to_save:
            json_data.append(asdict(product))
        try:
            with open(self.json_filename, mode="r", encoding="utf-8") as output_file:
                existing_data = json.load(output_file)
        except FileNotFoundError:
            existing_data = []
        existing_data.extend(json_data)

        with open(self.json_filename, mode="w", encoding="utf-8") as output_file:
            json.dump(existing_data, output_file, indent=2)
Here’s the JSON file:

Saving Data to Amazon S3 Storage
We've already covered how to export the data to a CSV file in Part 2 of this series. Nonetheless, we've also included the code for that, which you can find in the last section. Now, let's save the created CSV file directly to an Amazon S3 bucket (you'll need to have one set up already).
If you don't have a bucket yet, you can follow the instructions on how to set one up.
Once you’ve a bucket, we'll start by installing Boto3, an external Python library created by Amazon to help with connecting to your S3 bucket.
pip install boto3
To get started, set up the necessary credentials to connect to Amazon S3. Next, the method creates an S3 client using the Boto3 library. It then uses the put_object method of the S3 client to upload the file "product_data.csv" to the specified S3 bucket (self.aws_s3_bucket) with the Key "chocolate_data.csv".
Within the bucket, the Key serves as the file name that would be used in the Amazon S3. The data to be uploaded is defined in the Body parameter.
In this case, Body=open("product_data.csv", "rb") opens the file in read-binary mode and sends its contents to S3. After the upload, the code checks the status of the operation to ensure success.
import boto3

class ProductDataPipeline:
    """
    Previous code
    """

    def save_to_s3_bucket(self):
        aws_access_key_id = "YOUR_ACCESS_KEY"
        aws_secret_access_key = "YOUR_SECRET_KEY"

        s3_client = boto3.client(
            "s3",
            aws_access_key_id=aws_access_key_id,
            aws_secret_access_key=aws_secret_access_key,
        )

        response = s3_client.put_object(
            Bucket=self.aws_s3_bucket,
            Key="chocolate_data.csv",
            Body=open("product_data.csv", "rb"),
        )

        status = response.get("ResponseMetadata", {}).get("HTTPStatusCode")

        if status == 200:
            print(f"Successfully put on S3 bucket!")
        else:
            print(f"Unsuccessful operation: Status - {status}")
Obviously, you’ll need to replace the aws_key and aws_secret with your own Amazon Key and Secret. Also, pass your bucket name and correct file path.
Here’s the snapshot showing that the file has been uploaded successfully:

Note: When saving data to AWS S3, employ delayed file uploads. This means that the file is first temporarily saved locally on the machine running the scraper, and then uploaded to AWS S3 once the scraper's job is complete.
Saving Data to MySQL Database
Here, we'll show you how to save data to MySQL databases. To follow along, we assume you already have a database named chocolatedb set up.
Downloading MySQL
For setting up a MySQL database, check out the following resources:
Creating MySQL Table
We assume you already have a database set up and a table called chocolate_products in your database. If not, you can log in to your database and run the following command to create the table:
CREATE TABLE IF NOT EXISTS chocolate_products (
    id INT AUTO_INCREMENT PRIMARY KEY,
    name VARCHAR(255),
    price_gb VARCHAR(255),
    price_usd VARCHAR(255),
    url TEXT
);
Connecting Scraper To MySQL Database
The first step is to establish a connection to your MySQL database and the specific table where you'll store the scraped data. To interact with your MySQL database from Python, you'll need the appropriate MySQL connector. You can easily install it using pip:
pip install mysql-connector-python
To establish a connection with a MySQL server, you'll need the connect() function from the mysql.connector module. This function takes parameters such as host, user, and password, and it returns a MySQLConnection object, which is stored in a variable called connection. This variable will be used to interact with your MySQL server.
Since you already have a database and just need to connect to it, you can pass an additional parameter called database to the connect() function.
import mysql.connector
from dataclasses import dataclass, field, fields, InitVar, asdict

class ProductDataPipeline:
    """
    Previous code
    """

    def save_to_mysql(self):
        products_to_save = []
        products_to_save.extend(self.storage_queue)

        if not products_to_save:
            return
        self.connection = mysql.connector.connect(
            host="localhost",
            user="root",
            password="mypass@654",
            database=self.mysql_db_name,
        )

        # Create cursor object
        with self.connection.cursor() as cursor:
            for product in products_to_save:
                item = asdict(product)
                cursor.execute(
                    """ insert into chocolate_products ( name, price_gb, price_usd, url)  values (%s,%s,%s,%s)""",
                    (item["name"], item["price_gb"], item["price_usd"], item["url"]),
                )
                self.connection.commit()
To insert data into the chocolate_products table, you'll need to write an INSERT INTO query as a string and pass it to the cursor.execute() method. This method accepts MySQL queries and executes them on the connected database.
Notice the connection.commit() statement at the end of the code. By default, the MySQL connector does not automatically commit transactions. In MySQL, modifications made within a transaction are only applied to the database when you explicitly use a COMMIT command. Remember to call this method after each transaction to ensure that your changes are reflected in the actual table.
Here’s the snapshot of the data stored in the MySQL database:

Saving Data to Postgres Database
Here, we'll show you how to save data to Postgres databases. To follow along, we assume you already have a database named chocolatedb set up.
Downloading Postgres
For setting up a Postgres database, check out the following resources:
Creating Postgres Table
As mentioned earlier, we're assuming you’ve a Postgres database set up and a table named chocolate_products already exists in your database. If not, please log in to your Postgres database and execute the following command to create the table:
CREATE TABLE IF NOT EXISTS chocolate_products (
    id SERIAL PRIMARY KEY,
    name VARCHAR(255),
    price_gb VARCHAR(255),
    price_usd VARCHAR(255),
    url TEXT
);
Connecting Scraper To Postgres Database
To save data to a PostgreSQL database, the primary step is to update how the connection is created. To do so we’ll install the Python package psycopg2.
pip install psycopg2
And update the connect function.
import psycopg2
from dataclasses import dataclass, field, fields, InitVar, asdict

class ProductDataPipeline:
    """
    Previous code
    """

    def save_to_postgresql(self):
        products_to_save = []
        products_to_save.extend(self.storage_queue)

        if not products_to_save:
            return
        self.connection = psycopg2.connect(
            host="localhost",
            database=self.postgre_db_name,
            user="postgres",
            password="mypass@654",
        )

        with self.connection.cursor() as cursor:
            for product in products_to_save:
                item = asdict(product)
                cursor.execute(
                    """ insert into chocolate_products ( name, price_gb, price_usd, url)  values (%s,%s,%s,%s)""",
                    (item["name"], item["price_gb"], item["price_usd"], item["url"]),
                )
                self.connection.commit()
Here’s the snapshot of the data stored in the PostgreSQL database:

Complete Code
When you execute the code, it will create two files, product_data.csv and product_data.json. It will then store the data in MySQL, PostgreSQL, and the Amazon S3 bucket.
Execute the following command to see the data in your MySQL and PostgreSQL databases:
select * from chocolate_products;
Here’s the complete code:
from selenium import webdriver
from selenium.webdriver.common.by import By
from webdriver_manager.chrome import ChromeDriverManager
from selenium.webdriver.chrome.service import Service
from selenium.webdriver.chrome.options import Options
from dataclasses import dataclass, field, fields, InitVar, asdict
import csv
import json
import time
import os
import boto3
import psycopg2
import mysql.connector


@dataclass
class Product:
    name: str = ""
    price_string: InitVar[str] = ""
    price_gb: float = field(init=False)
    price_usd: float = field(init=False)
    url: str = ""

    def __post_init__(self, price_string):
        self.name = self.clean_name()
        self.price_gb = self.clean_price(price_string)
        self.price_usd = self.convert_price_to_usd()
        self.url = self.create_absolute_url()

    def clean_name(self):
        if self.name == "":
            return "missing"
        return self.name.strip()

    def clean_price(self, price_string):
        price_string = price_string.strip()
        price_string = price_string.replace("Sale price\n£", "")
        price_string = price_string.replace("Sale price\nFrom £", "")
        if price_string == "":
            return 0.0
        return float(price_string)

    def convert_price_to_usd(self):
        return round(self.price_gb * 1.21, 2)

    def create_absolute_url(self):
        if self.url == "":
            return "missing"
        return self.url


class ProductDataPipeline:
    def __init__(
        self,
        csv_filename="",
        json_filename="",
        mysql_db_name="",
        postgre_db_name="",
        aws_s3_bucket="",
        storage_queue_limit=5,
    ):
        self.names_seen = []
        self.storage_queue = []
        self.storage_queue_limit = storage_queue_limit
        self.csv_filename = csv_filename
        self.json_filename = json_filename
        self.mysql_db_name = mysql_db_name
        self.postgre_db_name = postgre_db_name
        self.aws_s3_bucket = aws_s3_bucket
        self.data_stored = False  # Flag to track if data is stored

    def save_to_csv(self):
        products_to_save = []
        products_to_save.extend(self.storage_queue)
        self.storage_queue.clear()
        if not products_to_save:
            return
        keys = [field.name for field in fields(products_to_save[0])]
        file_exists = (
            os.path.isfile(self.csv_filename) and os.path.getsize(
                self.csv_filename) > 0
        )

        with open(
            self.csv_filename, mode="a", newline="", encoding="utf-8"
        ) as output_file:
            writer = csv.DictWriter(output_file, fieldnames=keys)

            if not file_exists:
                writer.writeheader()
            for product in products_to_save:
                writer.writerow(asdict(product))

    def save_to_json(self):
        products_to_save = []
        json_data = []
        products_to_save.extend(self.storage_queue)

        if not products_to_save:
            return
        for product in products_to_save:
            json_data.append(asdict(product))
        try:
            with open(self.json_filename, mode="r", encoding="utf-8") as output_file:
                existing_data = json.load(output_file)
        except FileNotFoundError:
            existing_data = []
        existing_data.extend(json_data)

        with open(self.json_filename, mode="w", encoding="utf-8") as output_file:
            json.dump(existing_data, output_file, indent=2)

    def save_to_mysql(self):
        products_to_save = []
        products_to_save.extend(self.storage_queue)

        if not products_to_save:
            return
        self.connection = mysql.connector.connect(
            host="localhost",
            user="root",
            port="3306",
            password="mypass@654",
            database=self.mysql_db_name,
        )

        # Create cursor object
        with self.connection.cursor() as cursor:
            for product in products_to_save:
                item = asdict(product)
                cursor.execute(
                    """ insert into chocolate_products ( name, price_gb, price_usd, url)  values (%s,%s,%s,%s)""",
                    (item["name"], item["price_gb"],
                     item["price_usd"], item["url"]),
                )
                self.connection.commit()

    def save_to_postgresql(self):
        products_to_save = []
        products_to_save.extend(self.storage_queue)

        if not products_to_save:
            return
        self.connection = psycopg2.connect(
            host="localhost",
            database=self.postgre_db_name,
            user="postgres",
            password="mypass@654",
        )

        with self.connection.cursor() as cursor:
            for product in products_to_save:
                item = asdict(product)
                cursor.execute(
                    """ insert into chocolate_products ( name, price_gb, price_usd, url)  values (%s,%s,%s,%s)""",
                    (item["name"], item["price_gb"],
                     item["price_usd"], item["url"]),
                )
                self.connection.commit()

    def save_to_s3_bucket(self):
        aws_access_key_id = "YOUR_ACCESS_KEY"
        aws_secret_access_key = "YOUR_SECRET_KEY"

        s3_client = boto3.client(
            "s3",
            aws_access_key_id=aws_access_key_id,
            aws_secret_access_key=aws_secret_access_key,
        )

        response = s3_client.put_object(
            Bucket=self.aws_s3_bucket,
            Key="chocolate_data.csv",
            Body=open("product_data.csv", "rb"),
        )

        status = response.get("ResponseMetadata", {}).get("HTTPStatusCode")

        if status == 200:
            print("Successfully uploaded data to S3 bucket!")
        else:
            print(f"Failed to upload data to S3 bucket. Status code: {status}")

    def clean_raw_product(self, scraped_data):
        return Product(
            name=scraped_data.get("name", ""),
            price_string=scraped_data.get("price", ""),
            url=scraped_data.get("url", ""),
        )

    def is_duplicate(self, product_data):
        if product_data.name in self.names_seen:
            print(f"Duplicate item found: {product_data.name}. Item dropped.")
            return True
        self.names_seen.append(product_data.name)
        return False

    def add_product(self, scraped_data):
        product = self.clean_raw_product(scraped_data)
        if self.is_duplicate(product) == False:
            self.storage_queue.append(product)
            if len(self.storage_queue) >= self.storage_queue_limit:
                self.save_to_json()
                self.save_to_mysql()
                self.save_to_postgresql()
                self.save_to_csv()
                self.data_stored = True  # Set flag to True when data is stored

    def close_pipeline(self):
        if len(self.storage_queue) > 0:
            self.save_to_json()
            self.save_to_mysql()
            self.save_to_postgresql()
            self.save_to_csv()
            if self.data_stored:  # Check if data is stored before printing
                print("Data pipeline closed. Saved data to files and databases.")
            else:
                print("No data to save. Closing data pipeline.")
        else:
            print("No data to save. Closing data pipeline.")


list_of_urls = [
    "https://www.chocolate.co.uk/collections/all",
]


def start_scrape():
    for url in list_of_urls:
        driver.get(url)
        products = driver.find_elements(By.CLASS_NAME, "product-item")
        for product in products:
            name = product.find_element(
                By.CLASS_NAME, "product-item-meta__title").text
            price = product.find_element(
                By.CLASS_NAME, "price").text
            url = product.find_element(
                By.CLASS_NAME, "product-item-meta__title"
            ).get_attribute("href")
            data_pipeline.add_product(
                {"name": name, "price": price, "url": url})
        try:
            next_page = driver.find_element(By.CSS_SELECTOR, "a[rel='next']")
            if next_page:
                list_of_urls.append(next_page.get_attribute("href"))
                print("Scraped page", len(list_of_urls), "...")
                time.sleep(1)
        except:
            print("No more pages found!")


if __name__ == "__main__":
    options = Options()
    options.add_argument("--headless")  # Enables headless mode
    # Using ChromedriverManager to automatically download and install Chromedriver
    driver = webdriver.Chrome(
        options=options, service=Service(ChromeDriverManager().install())
    )
    data_pipeline = ProductDataPipeline(
        csv_filename="product_data.csv",
        json_filename="product_data.json",
        mysql_db_name="chocolatedb",
        postgre_db_name="chocolatedb",
        aws_s3_bucket="chocolate-products",
    )
    start_scrape()
    data_pipeline.close_pipeline()
    print("Congratulations! Data saved successfully on MySQL, PostgreSQL, and JSON.")
    time.sleep(3)
    data_pipeline.save_to_s3_bucket()
    driver.quit()  # Close the browser window after finishing
    print("Scraping completed successfully. Browser closed.")
NodeJS Puppeteer Beginners Series Part 3: Storing Data
In Part 1 and Part 2 of this Node.js Puppeteer 6-Part Beginner Series, we learned how to build a basic web scraper and extract data from websites, as well as how to clean the scraped data.
In Part 3, we will cover various methods for saving the data scraped using Puppeteer. We'll implement these methods within the ProductDataPipeline class, which we created in Part 2 of this series.
Specifically, we'll explore saving data to a JSON file, Amazon S3 storage, a MySQL database, and a PostgreSQL database.
- Saving Data to a JSON File
- Saving Data to Amazon S3 Storage
- Saving Data to MySQL Database
- Saving Data to PostgreSQL Database
- Complete Code
- Next Steps
Node.js Puppeteer 6-Part Beginner Series
-
Part 1: Basic Node.js Puppeteer Scraper - We'll learn the fundamentals of web scraping with Node.js and build your first scraper using NpdeJS Puppeteer. (Part 1)
-
Part 2: Cleaning Unruly Data & Handling Edge Cases - Web data can be messy and unpredictable. In this part, we'll create a robust scraper using data structures and cleaning techniques to handle these challenges. (Part 2)
-
Part 3: Storing Scraped Data in AWS S3, MySQL & Postgres DBs - Explore various options for storing your scraped data, including databases like MySQL or Postgres, cloud storage like AWS S3, and file formats like CSV and JSON. We'll discuss their pros, cons, and suitable use cases. Part 3
-
Part 4: Managing Retries & Concurrency - Enhance your scraper's reliability and scalability by handling failed requests and utilizing concurrency. (Part 4)
-
Part 5: Faking User-Agents & Browser Headers - Learn how to create a production-ready scraper by simulating real users through user-agent and browser header manipulation. (Part 5)
-
Part 6: Using Proxies To Avoid Getting Blocked - Discover how to use proxies to bypass anti-bot systems by disguising your real IP address and location. (Part 6)
Need help scraping the web?
Then check out ScrapeOps, the complete toolkit for web scraping.
Saving Data to a JSON File
💡Note: All methods for storing data in JSON files, databases, or S3 buckets will be implemented within the ProductDataPipeline class, which was created in Part 2 of this series.
Saving data to a JSON file is a straightforward and widely used method for storing structured data.
JSON, or JavaScript Object Notation, is a lightweight data interchange format that's easy for humans to read and write and easy for machines to parse and generate. This format is particularly useful for web applications and APIs, making it a good choice for our web scraping project.
Storing data in a JSON file has several benefits:
- Human-Readable: JSON files are easy to read and understand, which makes them ideal for debugging and manual inspection.
- Lightweight: JSON is a lightweight data format, making it efficient for storage and transfer.
- Interoperable: JSON is widely supported across different programming languages and platforms, ensuring interoperability.
- Flexible: JSON can easily handle complex nested data structures, making it versatile for various data representation needs.
To save data to a JSON file, we will create a method called save_to_json() within the ProductDataPipeline class. This method will perform the following actions:
-
Iterate Over Each Product: The method will iterate over each product in the
products_to_savelist. -
Read Existing Data: The method will open the JSON file specified by
self.json_filenamein read mode. If the file exists, it will usejson.load()to load the existing data into theexisting_datalist. Otherwise, it will initializeexisting_dataas an empty list. -
Combine Data: The
json_datalist, containing the newly converted dictionaries, will be appended to the end of theexisting_datalist, combining both datasets. -
Write to JSON File: Finally, the method will open the JSON file in write mode and use
json.dump()to write the combined data (now stored inexisting_data) back to the file.
Here's how you can implement the save_to_json() method:
const fs = require('fs');
const path = require('path');

class ProductDataPipeline {
    constructor(csvFilename, jsonFilename, storageQueueLimit = 5) {
        this.namesSeen = [];
        this.storageQueue = [];
        this.storageQueueLimit = storageQueueLimit;
        this.csvFilename = csvFilename;
        this.jsonFilename = jsonFilename;
        this.csvFileOpen = false;
    }

    saveToJson() {
        const productsToSave = [...this.storageQueue];
        this.storageQueue = [];

        if (!productsToSave.length) return;

        let existingData = [];

        try {
            existingData = JSON.parse(fs.readFileSync(this.jsonFilename, 'utf8'));
        } catch (error) {
            if (error.code !== 'ENOENT') throw error;
        }

        existingData.push(...productsToSave);

        fs.writeFileSync(this.jsonFilename, JSON.stringify(existingData, null, 2), 'utf8');
    }
}
After running this code, the JSON file will look something like this:
[
    {
        "name": "Lovely Chocolate",
        "price_gb": 1.5,
        "price_usd": 1.82,
        "url": "https://www.chocolate.co.uk/products/100-dark-hot-chocolate-flakes"
    },
    {
        "name": "My Nice Chocolate",
        "price_gb": 4.0,
        "price_usd": 4.84,
        "url": "https://www.chocolate.co.uk/products/nice-chocolate-flakes"
    }
]
Saving Data to Amazon S3 Storage
Amazon S3 (Simple Storage Service) is a scalable, high-speed, web-based cloud storage service designed for online backup and archiving of data and applications on Amazon Web Services (AWS).
Saving your data to Amazon S3 can be particularly useful for making it accessible across multiple devices and for ensuring redundancy and durability of your data.
Storing data in Amazon S3 has several benefits:
- Scalability: S3 automatically scales storage capacity to accommodate your growing data needs.
- Durability: S3 is designed to provide 99.999999999% durability by redundantly storing objects across multiple devices in multiple facilities.
- Accessibility: Data stored in S3 can be accessed from anywhere with an internet connection, making it ideal for distributed applications.
- Security: S3 offers robust security features, including access control, encryption, and auditing capabilities.
We've already covered how to export the data to a CSV file in Part 2 of this series. Nonetheless, we've also included the code for that, which you can find in the last section.
Now, let's save the created CSV file directly to an Amazon S3 bucket (you'll need to have one set up already).
If you don't have one, you can follow the instructions on the AWS website.
To save the created CSV file directly to an Amazon S3 bucket, we will use the Boto3 library, which is the Amazon Web Services (AWS) SDK for Python. This library allows Python developers to write software that makes use of Amazon services like S3 and others.
Once you’ve a bucket, we'll start by installing Boto3 library using npm:
$ npm install aws-sdk
We will create a method called save_to_s3_bucket() within the ProductDataPipeline class. This method will perform the following actions:
- Set Up S3 Client: Create an S3 client using the aws-sdk library. This client will be used to interact with the S3 service.
- Upload File: Use the
uploadmethod of the S3 client to upload the fileproduct_data.csvto the specified S3 bucket (self.aws_s3_bucket) with the keychocolate_data.csv.
Here is the implementation:
const AWS = require('aws-sdk');

class ProductDataPipeline {
    constructor(csvFilename, jsonFilename, awsS3Bucket, storageQueueLimit = 5) {
        this.namesSeen = [];
        this.storageQueue = [];
        this.storageQueueLimit = storageQueueLimit;
        this.csvFilename = csvFilename;
        this.jsonFilename = jsonFilename;
        this.awsS3Bucket = awsS3Bucket;
    }

    saveToS3Bucket() {
        const s3 = new AWS.S3({
            accessKeyId: process.env.AWS_ACCESS_KEY_ID,
            secretAccessKey: process.env.AWS_SECRET_ACCESS_KEY
        });

        const params = {
            Bucket: this.awsS3Bucket,
            Key: 'chocolate_data.csv',
            Body: fs.createReadStream(this.csvFilename)
        };

        s3.upload(params, function(err, data) {
            if (err) {
                console.log("Error", err);
            }
            if (data) {
                console.log("Upload Success", data.Location);
            }
        });
    }
}
Obviously, you’ll need to replace the AWS_ACCESS_KEY_ID and AWS_SECRET_ACCESS_KEY with your own Amazon Key and Secret. Also, pass your bucket name and correct file path.
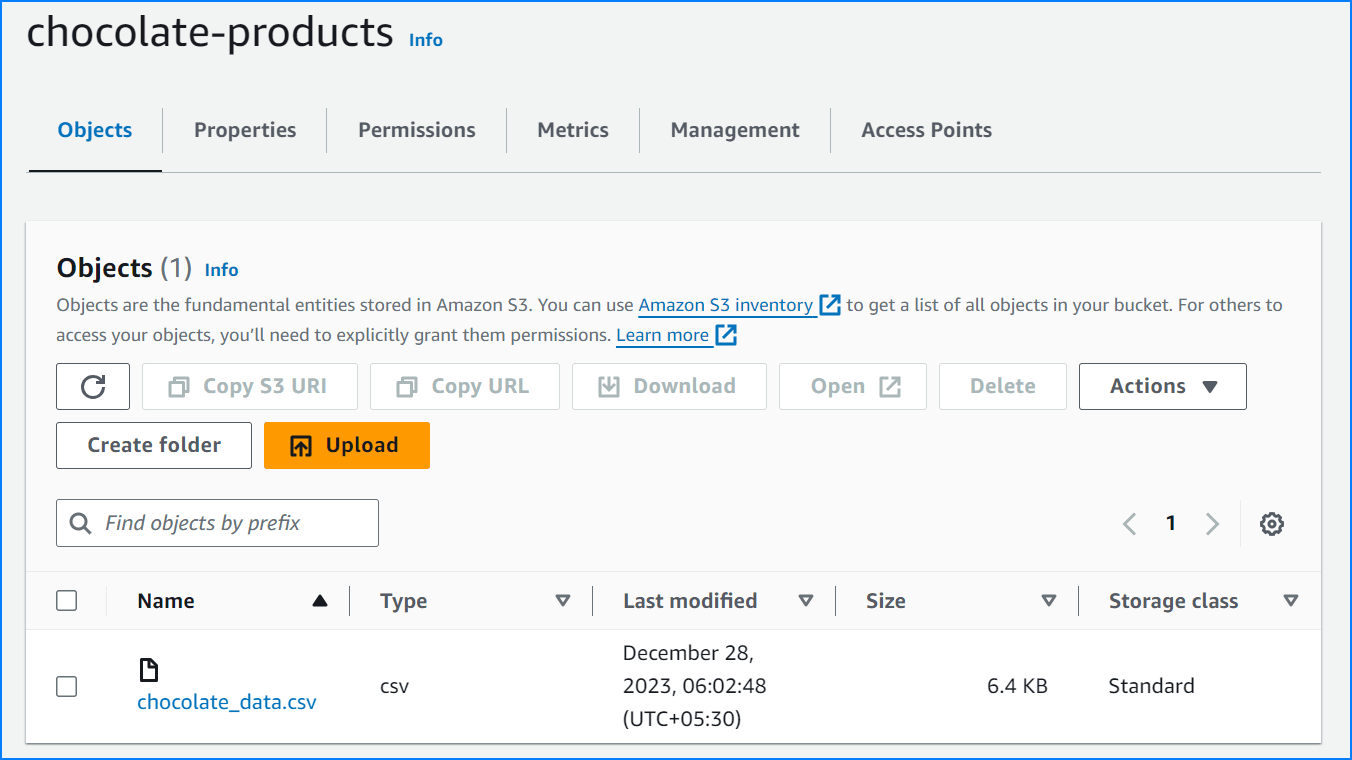
Here’s the snapshot showing that the file has been uploaded successfully:
Note: When saving data to AWS S3, employ delayed file uploads. This means that the file is first temporarily saved locally on the machine running the scraper, and then uploaded to AWS S3 once the scraper's job is complete.
Saving Data to MySQL Database
MySQL is a popular open-source relational database management system that uses structured query language (SQL).
Saving data to a MySQL database is beneficial for applications that require complex querying and data manipulation capabilities.
Storing data in a MySQL database has several benefits:
- Structured Data: MySQL uses a structured format, which is ideal for applications that require complex queries and data manipulation.
- Performance: MySQL is optimized for read-heavy operations, making it suitable for applications with high query loads.
- Flexibility: MySQL supports a wide range of data types and indexing options, providing flexibility in how data is stored and retrieved.
- Community Support: MySQL has a large and active community, offering extensive documentation, tutorials, and support resources.
Downloading MySQL Database
Ensure you have MySQL installed on your machine and have created a database. If you don't have MySQL installed, you can follow the instructions below:
Creating the MySQL Table
Ensure you have a table called chocolate_products in your database. If not, you can log in to your database and run the following command to create the table:
CREATE TABLE IF NOT EXISTS chocolate_products (
    id INT AUTO_INCREMENT PRIMARY KEY,
    name VARCHAR(255),
    price_gb DECIMAL(10, 2),
    price_usd DECIMAL(10, 2),
    url TEXT
);
Connecting Scraper To MySQL Database
To interact with your MySQL database from Node.js, you'll need the appropriate MySQL connector. You can easily install it using npm:
$ npm install mysql2
We will create a method called save_to_mysql() within the ProductDataPipeline class. This method will perform the following actions:
- Establish Connection: Establish a connection to your MySQL database.
- Insert Data: Insert the product data into the
chocolate_productstable.
Here is the implementation:
const mysql = require('mysql2/promise');

class ProductDataPipeline {
    constructor(csvFilename, jsonFilename, mysqlDbName, storageQueueLimit = 5) {
        this.namesSeen = [];
        this.storageQueue = [];
        this.storageQueueLimit = storageQueueLimit;
        this.csvFilename = csvFilename;
        this.jsonFilename = jsonFilename;
        this.mysqlDbName = mysqlDbName;
    }

    async saveToMySQL() {
        const productsToSave = [...

this.storageQueue];
        this.storageQueue = [];

        if (!productsToSave.length) return;

        const connection = await mysql.createConnection({
            host: 'localhost',
            user: 'root',
            password: 'password',
            database: this.mysqlDbName
        });

        const query = `INSERT INTO chocolate_products (name, price_gb, price_usd, url) VALUES (?, ?, ?, ?)`;

        for (const product of productsToSave) {
            await connection.execute(query, [product.name, product.priceGBP, product.priceUSD, product.url]);
        }

        await connection.end();
    }
}
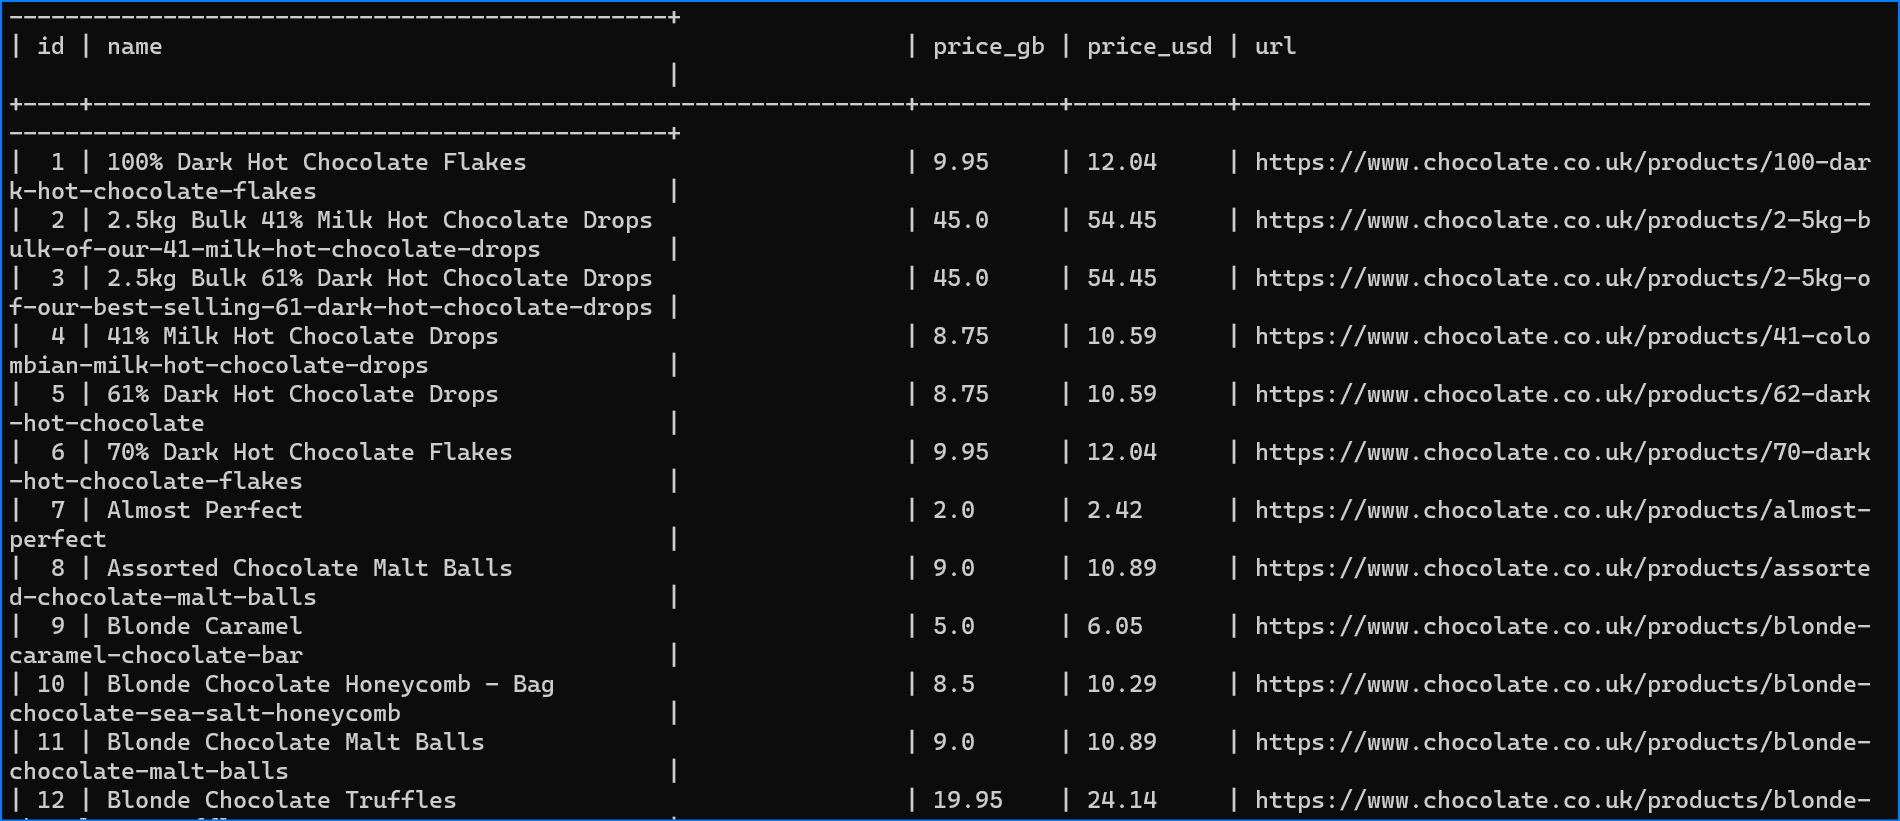
Here’s the snapshot of the data stored in the MySQL database:
Saving Data to PostgreSQL Database
PostgreSQL is a powerful, open-source relational database management system known for its robustness, extensibility, and compliance with SQL standards.
Saving data to a PostgreSQL database is beneficial for applications that require complex querying, data integrity, and support for advanced data types.
Storing data in a PostgreSQL database has several benefits:
- Advanced Features: PostgreSQL supports advanced features such as full-text search, custom data types, and complex queries.
- Data Integrity: PostgreSQL offers robust data integrity features, including foreign keys, constraints, and transactional integrity.
- Extensibility: PostgreSQL is highly extensible, allowing developers to add custom functions, operators, and data types.
- Compliance: PostgreSQL adheres closely to SQL standards, ensuring compatibility with a wide range of SQL-based applications.
Downloading PostgreSQL
Ensure you have PostgreSQL installed on your machine and have created a database. For setting up a Postgres database, check out the following resources:
Creating the PostgreSQL Table
Ensure you have a table called chocolate_products in your database. If not, you can log in to your database and run the following command to create the table:
CREATE TABLE IF NOT EXISTS chocolate_products (
    id SERIAL PRIMARY KEY,
    name VARCHAR(255),
    price_gb DECIMAL(10, 2),
    price_usd DECIMAL(10, 2),
    url TEXT
);
Installing PostgreSQL Connector
To interact with your PostgreSQL database from Node.js, you'll need the appropriate PostgreSQL connector. You can easily install it using npm:
$ npm install pg
We will create a method called save_to_postgresql() within the ProductDataPipeline class. This method will perform the following actions:
- Establish Connection: Establish a connection to your PostgreSQL database.
- Insert Data: Insert the product data into the
chocolate_productstable.
Here is the implementation:
const { Client } = require('pg');

class ProductDataPipeline {
    constructor(csvFilename, jsonFilename, postgresDbName, storageQueueLimit = 5) {
        this.namesSeen = [];
        this.storageQueue = [];
        this.storageQueueLimit = storageQueueLimit;
        this.csvFilename = csvFilename;
        this.jsonFilename = jsonFilename;
        this.postgresDbName = postgresDbName;
    }

    async saveToPostgreSQL() {
        const productsToSave = [...this.storageQueue];
        this.storageQueue = [];

        if (!productsToSave.length) return;

        const client = new Client({
            host: 'localhost',
            user: 'postgres',
            password: 'password',
            database: this.postgresDbName
        });

        await client.connect();

        const query = `INSERT INTO chocolate_products (name, price_gb, price_usd, url) VALUES ($1, $2, $3, $4)`;

        for (const product of productsToSave) {
            await client.query(query, [product.name, product.priceGBP, product.priceUSD, product.url]);
        }

        await client.end();
    }
}
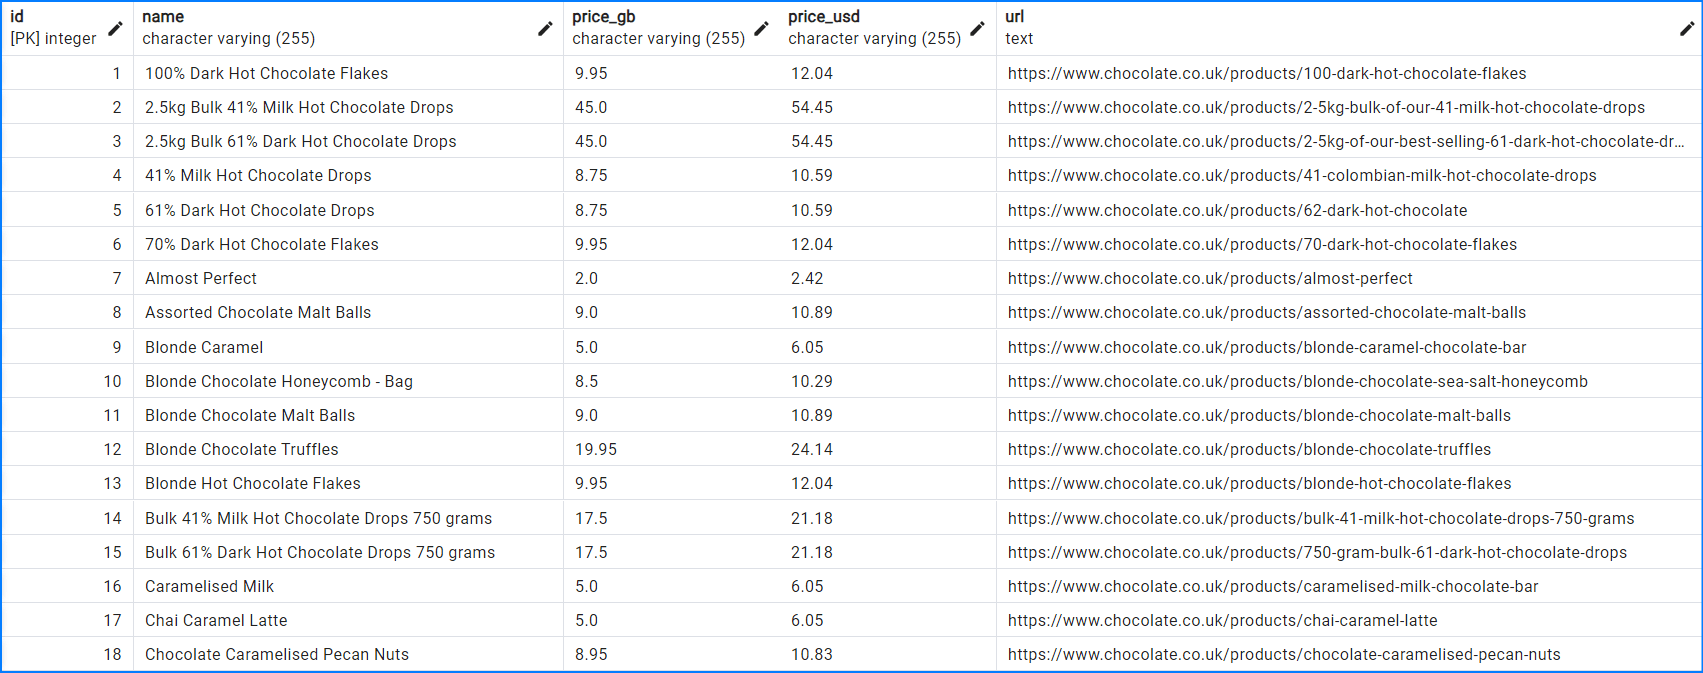
Here’s the snapshot of the data stored in the PostgreSQL database:
Complete Code
When you execute the code, it will create two files, product_data.csv and product_data.json. It will then store the data in MySQL, PostgreSQL, and the Amazon S3 bucket.
Execute the following command to see the data in your MySQL and PostgreSQL databases:
select * from chocolate_products;
Here’s the complete code integrating all the methods for saving data to different storage options:
const fs = require('fs');
const AWS = require('aws-sdk');
const mysql = require('mysql2/promise');
const { Client } = require('pg');
const puppeteer = require('puppeteer');

class Product {
    constructor(name, priceString, url) {
        this.name = this.cleanName(name);
        this.priceGBP = this.cleanPrice(priceString);
        this.priceUSD = this.convertPriceToUSD();
        this.url = this.createAbsoluteURL(url);
    }

    cleanName(name) {
        return name.trim() || "missing";
    }

    cleanPrice(priceString) {
        if (!priceString) return 0.0;
        priceString = priceString.replace(/[^0-9\.]+/g, '');
        return parseFloat(priceString) || 0.0;
    }

    convertPriceToUSD() {
        const exchangeRate = 1.21;
        return this.priceGBP * exchangeRate;
    }

    createAbsoluteURL(relativeURL) {
        const baseURL = "https://www.chocolate.co.uk";
        return relativeURL ? `${baseURL}${relativeURL}` : "missing";
    }
}

class ProductDataPipeline {
    constructor(csvFilename, jsonFilename, mysqlDbName, postgresDbName, awsS3Bucket, storageQueueLimit = 5) {
        this.namesSeen = [];
        this.storageQueue = [];
        this.storageQueueLimit = storageQueueLimit;
        this.csvFilename = csvFilename;
        this.jsonFilename = jsonFilename;
        this.mysqlDbName = mysqlDbName;
        this.postgresDbName = postgresDbName;
        this.awsS3Bucket = awsS3Bucket;
    }

    saveToCsv() {
        const productsToSave = [...this.storageQueue];
        this.storageQueue = [];

        if (!productsToSave.length) return;

        const headers = Object.keys(productsToSave[0]);
        const fileExists = fs.existsSync(this.csvFilename);

        const csvWriter = fs.createWriteStream(this.csvFilename, { flags: 'a' });
        if (!fileExists) {
            csvWriter.write(headers.join(',') + '\n');
        }

        productsToSave.forEach(product => {
            const row = headers.map(header => product[header]).join(',');
            csvWriter.write(row + '\n');
        });

        csvWriter.end();
    }

    saveToJson() {
        const productsToSave = [...this.storageQueue];
        this.storageQueue = [];

        if (!productsToSave.length) return;

        let existingData = [];

        try {
            existingData = JSON.parse(fs.readFileSync(this.jsonFilename, 'utf8'));
        } catch (error) {
            if (error.code !== 'ENOENT') throw error;
        }

        existingData.push(...productsToSave);

        fs.writeFileSync(this.jsonFilename, JSON.stringify(existingData, null, 2), 'utf8');
    }

    async saveToMySQL() {
        const productsToSave = [...this.storageQueue];
        this.storageQueue = [];

        if (!productsToSave.length) return;

        const connection = await mysql.createConnection({
            host: 'localhost',
            user: 'root',
            password: 'password',
            database: this.mysqlDbName
        });

        const query = `INSERT INTO chocolate_products (name, price_gb, price_usd, url) VALUES (?, ?, ?, ?)`;

        for (const product of productsToSave) {
            await connection.execute(query, [product.name, product.priceGBP, product.priceUSD, product.url]);
        }

        await connection.end();
    }

    async saveToPostgreSQL() {
        const productsToSave = [...this.storageQueue];
        this.storageQueue = [];

        if (!productsToSave.length) return;

        const client = new Client({
            host: 'localhost',
            user: 'postgres',
            password: 'password',
            database: this.postgresDbName
        });

        await client.connect();

        const query = `INSERT INTO chocolate_products (name, price_gb, price_usd, url) VALUES ($1, $2, $3, $4)`;

        for (const product of productsToSave) {
            await client.query(query, [product.name, product.priceGBP, product.priceUSD, product.url]);
        }

        await client.end();
    }

    saveToS3Bucket() {
        const s3 = new AWS.S3({
            accessKeyId: process.env.AWS_ACCESS_KEY_ID,
            secretAccessKey: process.env.AWS_SECRET_ACCESS_KEY
        });

        const params = {
            Bucket: this.awsS3Bucket,
            Key: 'chocolate_data.csv',
            Body: fs.createReadStream(this.csvFilename)
        };

        s3.upload(params,

 function(err, data) {
            if (err) {
                console.log("Error", err);
            }
            if (data) {
                console.log("Upload Success", data.Location);
            }
        });
    }

    cleanRawProduct(scrapedData) {
        return new Product(
            scrapedData.name || '',
            scrapedData.price || '',
            scrapedData.url || ''
        );
    }

    isDuplicate(product) {
        if (this.namesSeen.includes(product.name)) {
            console.log(`Duplicate item found: ${product.name}. Item dropped.`);
            return true;
        }
        this.namesSeen.push(product.name);
        return false;
    }

    addProduct(scrapedData) {
        const product = this.cleanRawProduct(scrapedData);
        if (!this.isDuplicate(product)) {
            this.storageQueue.push(product);
            if (this.storageQueue.length >= this.storageQueueLimit) {
                this.saveToCsv();
                this.saveToJson();
                this.saveToMySQL();
                this.saveToPostgreSQL();
            }
        }
    }

    closePipeline() {
        if (this.storageQueue.length > 0) {
            this.saveToCsv();
            this.saveToJson();
            this.saveToMySQL();
            this.saveToPostgreSQL();
        }
    }
}

const startScrape = async () => {
    const browser = await puppeteer.launch();
    const page = await browser.newPage();
    const baseURL = 'https://www.chocolate.co.uk/collections/all';
    const dataPipeline = new ProductDataPipeline('product_data.csv', 'product_data.json', 'chocolatedb', 'chocolatedb', 'chocolate-products');
    let nextPageExists = true;
    let currentPage = baseURL;

    while (nextPageExists) {
        await page.goto(currentPage, { waitUntil: 'networkidle2' });

        const products = await page.evaluate(() => {
            const items = document.querySelectorAll('.product-item');
            return Array.from(items).map(item => ({
                name: item.querySelector('.product-item-meta__title').innerText,
                price: item.querySelector('.price').innerText,
                url: item.querySelector('.product-item-meta a').getAttribute('href')
            }));
        });

        products.forEach(product => dataPipeline.addProduct(product));

        nextPageExists = await page.evaluate(() => {
            const nextPage = document.querySelector('a[rel="next"]');
            return nextPage ? nextPage.href : null;
        });

        if (nextPageExists) {
            currentPage = nextPageExists;
        }
    }

    await browser.close();
    dataPipeline.closePipeline();
    console.log("Congratulations! Data saved successfully on MySQL, PostgreSQL, JSON, and CSV.");
    dataPipeline.saveToS3Bucket();
};

startScrape();
NodeJS Playwright Beginner Series Part 3: Storing Data
In Part 1 and Part 2 of this Node.js Cheerio Beginners Series, we learned how to build a basic web scraper and extract data from websites, as well as how to clean the scraped data.
In Part 3, we'll explore various methods for saving the data in formats suitable for common use cases. We'll cover saving data to JSON files, as well as storing the data in databases or AWS S3 buckets.
- Saving Data to a JSON File
- Saving Data to Amazon S3 Storage
- Saving Data to MySQL Database
- Saving Data to PostgreSQL Database
- Complete Code
- Next Steps
Node.js Playwright 6-Part Beginner Series
-
Part 1: Basic Node.js Playwright Scraper - We'll learn the fundamentals of web scraping with Node.js and build your first scraper using Cheerio. (Part 1)
-
Part 2: Cleaning Unruly Data & Handling Edge Cases - Web data can be messy and unpredictable. In this part, we'll create a robust scraper using data structures and cleaning techniques to handle these challenges. Part 2
-
Part 3: Storing Scraped Data in AWS S3, MySQL & Postgres DBs - Explore various options for storing your scraped data, including databases like MySQL or Postgres, cloud storage like AWS S3, and file formats like CSV and JSON. We'll discuss their pros, cons, and suitable use cases. Part 3
-
Part 4: Managing Retries & Concurrency - Enhance your scraper's reliability and scalability by handling failed requests and utilizing concurrency. (Part 4)
-
Part 5: Faking User-Agents & Browser Headers - Learn how to create a production-ready scraper by simulating real users through user-agent and browser header manipulation. (Part 5)
-
Part 6: Using Proxies To Avoid Getting Blocked - Discover how to use proxies to bypass anti-bot systems by disguising your real IP address and location. (Part 6)
Need help scraping the web?
Then check out ScrapeOps, the complete toolkit for web scraping.
Saving Data to a JSON File
💡Note: All methods for storing data in JSON files, databases, or S3 buckets will be implemented within the ProductDataPipeline class, which was created in Part 2 of this series.
To save data to the JSON file, we’ll create a method called saveToJson(). The method performs the following actions.
It checks if the given jsonFileName already exists, similar to our previous saveToCsv method we don't want to overwrite existing data. If the file exists, we load the content into the existingData array.
Then we use the JavaScript spread operator (...) to merge the existing data (if there is any) with the current storageQueue values.
Finally, we write that merged array to the file with the given jsonFileName.
saveToJson() {
    if (this.storageQueue.length <= 0) {
      return;
    }

    const fileExists = fs.existsSync(this.jsonFileName);
    let existingData = [];
    if (fileExists) {
      const fileContent = fs.readFileSync(this.jsonFileName, "utf8");
      existingData = JSON.parse(fileContent);
    }

    const mergedData = [...existingData, ...this.storageQueue];
    fs.writeFileSync(this.jsonFileName, JSON.stringify(mergedData, null, 2));
  }
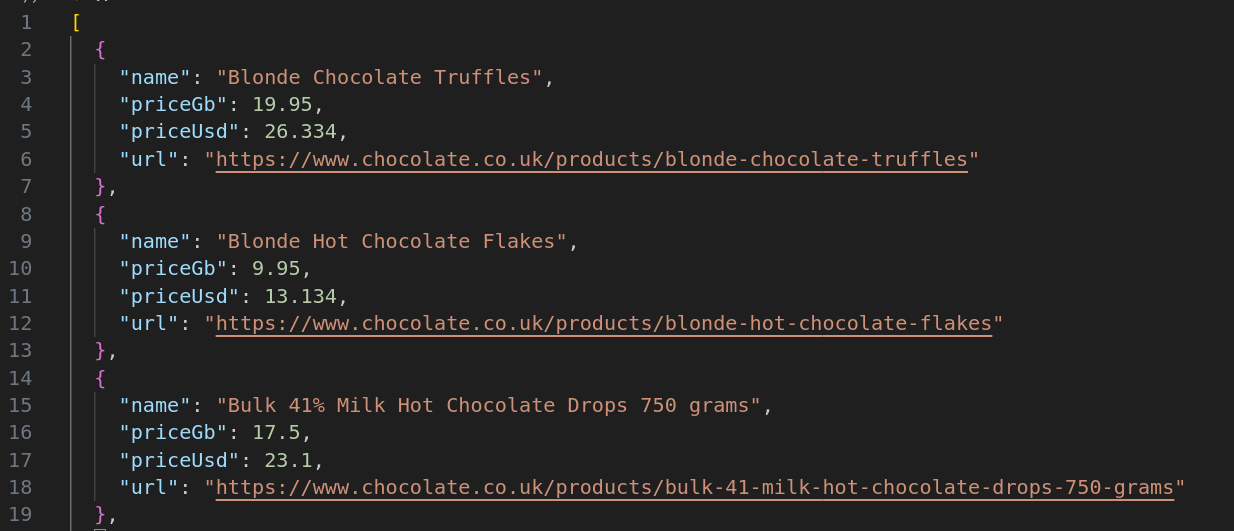
Which produces JSON like this:
Saving Data to Amazon S3 Storage
We've already covered how to export the data to a CSV file in Part 2 of this series. Nonetheless, we've also included the code for that, which you can find in the last section. Now, let's save the created CSV file directly to an Amazon S3 bucket (you'll need to have one set up already).
If you don't have a bucket yet, you can follow the instructions on how to set one up.
Once you've made a bucket, start by installing the @aws-sdk/client-s3 package to use AWS S3 from Node.js.
npm i @aws-sdk/client-s3
To get started, set up the necessary credentials to connect to Amazon S3. With these, the method creates an S3 client using the library we just installed. Then we ensure that the CSV file exists, this is because our program can execute quite quickly and due to Node's asynchronous nature we want to make sure the file has been written before trying to upload it. Then we send a PutObjectCommand with the bucket name, key and content of the CSV file.
Within the bucket, the Key serves as the file name that would be used in the Amazon S3. The data to be uploaded is defined in the Body parameter.
async saveToS3Bucket() {
    const client = new S3Client({
      region: "us-east-1",
      credentials: {
        accessKeyId: "YOUR_ACCESS_KEY_ID",
        secretAccessKey: "YOUR_SECRET_ACCESS_KEY",
      },
    });

    let retry = 3;
    while (retry > 0) {
      if (!fs.existsSync(this.csvFilename)) {
        await new Promise((resolve) => setTimeout(resolve, 1000));
      }
      retry -= 1;
    }

    const params = {
      Bucket: this.s3Bucket,
      Key: this.csvFilename,
      Body: fs.createReadStream(this.csvFilename),
    };

    await client.send(new PutObjectCommand(params));
  }
Of course, you'll need to change YOUR_ACCESS_KEY_ID and YOUR_SECRET_ACCESS_KEY to be your own credentials. As well, make sure a bucket with the given name exists.
Here’s a snapshot showing that the file has been uploaded successfully:
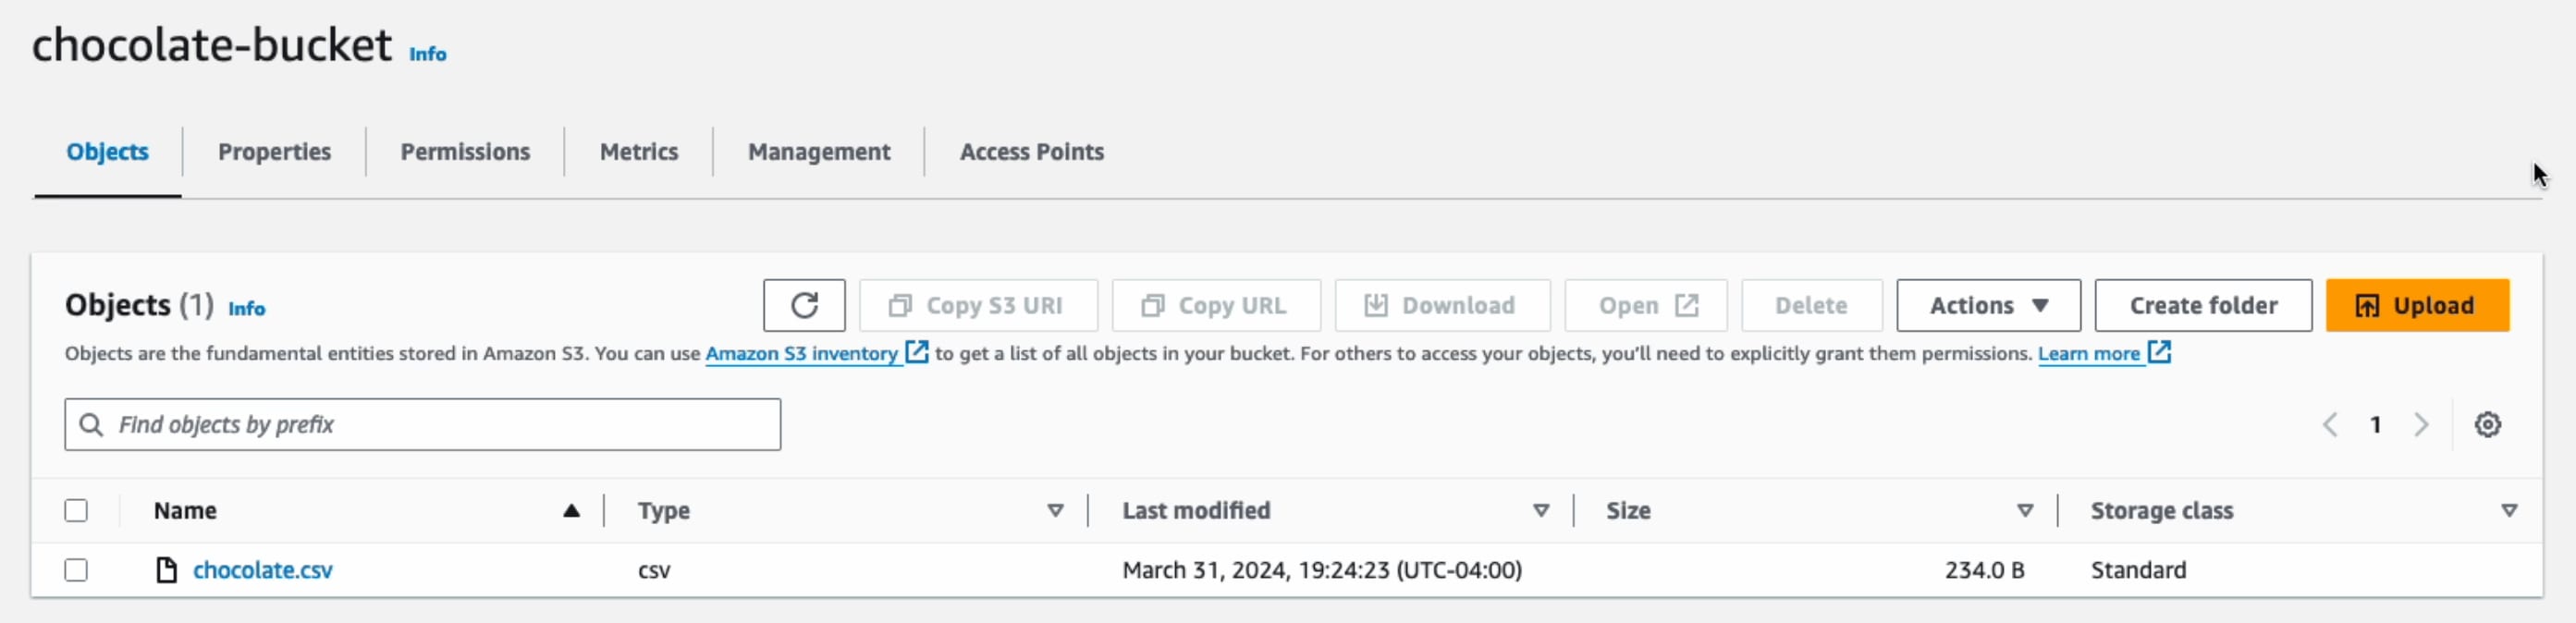
Note: When saving data to AWS S3, employ delayed file uploads. This means that the file is first temporarily saved locally on the machine running the scraper, and then uploaded to AWS S3 once the scraper's job is complete.
Saving Data to MySQL Database
Here, we'll show you how to save data to MySQL databases. To follow along, we assume you already have a database named chocolate_db set up.
Downloading MySQL
For setting up a MySQL database, check out the following resources:
Creating MySQL Table
We assume you already have a database set up and a table called chocolate_products in your database. If not, you can log in to your database and run the following command to create the table:
CREATE TABLE IF NOT EXISTS chocolate_products (
    id INT AUTO_INCREMENT PRIMARY KEY,
    name VARCHAR(255),
    price_gb VARCHAR(255),
    price_usd VARCHAR(255),
    url TEXT
);
Connecting Scraper To MySQL Database
The first step is to establish a connection to your MySQL database and the specific table where you'll store the scraped data. To interact with your MySQL database from Node, you'll need to install the mysql package.
npm i mysql
Then, to establish a connection, we use the createConnection and connect methods. When using createConnection we define the host, username, password and database name for our MySQL database. Then we create the INSERT query and use the connection.query method to execute it. You may have noticed, the entire operation is wrapped in a Promise return statement. This is because the mysql package unfortunately does not support async/await or Promises so our method returns its own promise to make it compatible with our other code.
if (this.storageQueue.length <= 0) {
  return;
}

return new Promise((resolve, reject) => {
  const connection = mysql.createConnection({
    host: "localhost",
    user: "root",
    password: "password",
    database: this.mysqlDbName,
  });

  connection.connect((err) => {
    if (err) {
      console.error("Error connecting to database: ", err);
      reject(err);
      return;
    }

    const query =
      "INSERT INTO chocolate_products (name, price_gb, price_usd, url) VALUES ?";
    const values = this.storageQueue.map((product) => [
      product.name,
      product.priceGb,
      product.priceUsd,
      product.url,
    ]);
    connection.query(query, [values], (err, results) => {
      if (err) {
        console.error("Error inserting data into database: ", err);
        connection.end();
        reject(err);
      } else {
        connection.end();
        resolve(results);
      }
    });
  });
});
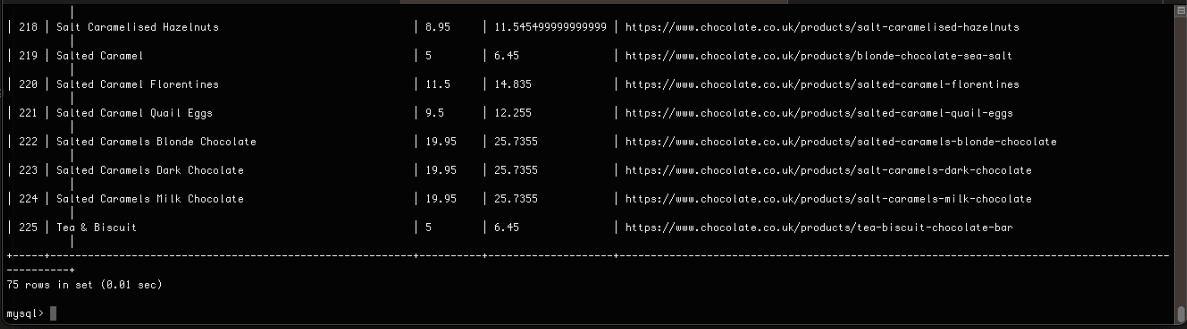
Here’s the snapshot of the data stored in the MySQL database:
Saving Data to Postgres Database
Saving Data to Postgres Database
Here, we'll show you how to save data to Postgres databases. To follow along, we assume you already have a database named chocolate_db set up.
Downloading Postgres
For setting up a Postgres database, check out the following resources:
Creating Postgres Table
As mentioned earlier, we're assuming you’ve a Postgres database set up and a table named chocolate_products already exists in your database. If not, please log in to your Postgres database and execute the following command to create the table:
CREATE TABLE IF NOT EXISTS chocolate_products (
    id SERIAL PRIMARY KEY,
    name VARCHAR(255),
    price_gb VARCHAR(255),
    price_usd VARCHAR(255),
    url TEXT
);
Connecting Scraper To Postgres Database
To save data to the Postgres database, we can use the pg package.
npm i pg
This function will look a little bit different than the MySQL function. Primarily because pg supports async/await. We create the connection using the Client object and client.connect() then we create the query string and finally we iterate through the storageQueue to execute the query for each object using client.query. We have to do this because pg does not support bulk inserts.
async saveToPostgres() {
    if (this.storageQueue.length <= 0) {
      return;
    }

    const client = new Client({
      user: "postgres",
      host: "localhost",
      database: this.pgDbName,
      password: "mysecretpassword",
      port: 5432,
    });

    try {
      await client.connect();
      const query =
        "INSERT INTO chocolate_products (name, price_gb, price_usd, url) VALUES ($1, $2, $3, $4)";
      for (const product of this.storageQueue) {
        await client.query(query, [
          product.name,
          product.priceGb,
          product.priceUsd,
          product.url,
        ]);
      }
    } catch (error) {
    } finally {
      await client.end();
    }
  }
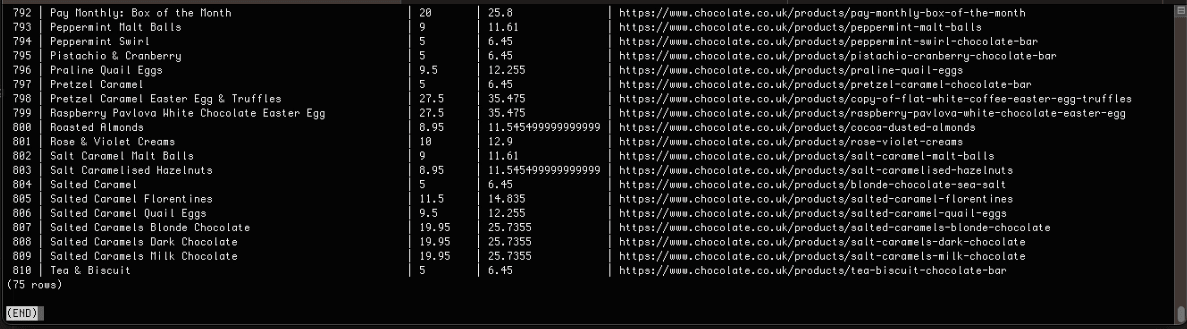
Here’s the snapshot of the data stored in the PostgreSQL database:
Complete Code
When you execute the code, it will create two files, chocolate.csv and chocolate.json. It will then store the data in MySQL, PostgreSQL, and the Amazon S3 bucket.
const axios = require("axios");
const cheerio = require("cheerio");
const fs = require("fs");
const { S3Client, PutObjectCommand } = require("@aws-sdk/client-s3");
const mysql = require("mysql");
const { Client } = require("pg");

class Product {
  constructor(name, priceStr, url) {
    this.name = this.cleanName(name);
    this.priceGb = this.cleanPrice(priceStr);
    this.priceUsd = this.convertPriceToUsd(this.priceGb);
    this.url = this.createAbsoluteUrl(url);
  }

  cleanName(name) {
    if (name == " " || name == "" || name == null) {
      return "missing";
    }
    return name.trim();
  }

  cleanPrice(priceStr) {
    priceStr = priceStr.trim();
    priceStr = priceStr.replace("Sale price£", "");
    priceStr = priceStr.replace("Sale priceFrom £", "");
    if (priceStr == "") {
      return 0.0;
    }
    return parseFloat(priceStr);
  }

  convertPriceToUsd(priceGb) {
    return priceGb * 1.29;
  }

  createAbsoluteUrl(url) {
    if (url == "" || url == null) {
      return "missing";
    }
    return "https://www.chocolate.co.uk" + url;
  }
}

class ProductDataPipeline {
  constructor(
    csvFilename = "",
    jsonFileName = "",
    s3Bucket = "",
    mysqlDbName = "",
    pgDbName = "",
    storageQueueLimit = 5
  ) {
    this.seenProducts = new Set();
    this.storageQueue = [];
    this.csvFilename = csvFilename;
    this.csvFileOpen = false;
    this.jsonFileName = jsonFileName;
    this.s3Bucket = s3Bucket;
    this.mysqlDbName = mysqlDbName;
    this.pgDbName = pgDbName;
    this.storageQueueLimit = storageQueueLimit;
  }

  saveToCsv() {
    this.csvFileOpen = true;
    const fileExists = fs.existsSync(this.csvFilename);
    const file = fs.createWriteStream(this.csvFilename, { flags: "a" });
    if (!fileExists) {
      file.write("name,priceGb,priceUsd,url\n");
    }
    for (const product of this.storageQueue) {
      file.write(
        `${product.name},${product.priceGb},${product.priceUsd},${product.url}\n`
      );
    }
    file.end();
    this.csvFileOpen = false;
  }

  saveToJson() {
    if (this.storageQueue.length <= 0) {
      return;
    }

    const fileExists = fs.existsSync(this.jsonFileName);
    let existingData = [];
    if (fileExists) {
      const fileContent = fs.readFileSync(this.jsonFileName, "utf8");
      existingData = JSON.parse(fileContent);
    }

    const mergedData = [...existingData, ...this.storageQueue];
    fs.writeFileSync(this.jsonFileName, JSON.stringify(mergedData, null, 2));
  }

  async saveToS3Bucket() {
    const client = new S3Client({
      region: "us-east-1",
      credentials: {
        accessKeyId: "YOUR_ACCESS_KEY_ID",
        secretAccessKey: "YOUR_SECRET_ACCESS_KEY",
      },
    });

    let retry = 3;
    while (retry > 0) {
      if (!fs.existsSync(this.csvFilename)) {
        await new Promise((resolve) => setTimeout(resolve, 1000));
      }
      retry -= 1;
    }

    const params = {
      Bucket: this.s3Bucket,
      Key: this.csvFilename,
      Body: fs.createReadStream(this.csvFilename),
    };

    await client.send(new PutObjectCommand(params));
  }

  saveToMysql() {
    if (this.storageQueue.length <= 0) {
      return;
    }

    return new Promise((resolve, reject) => {
      const connection = mysql.createConnection({
        host: "localhost",
        user: "root",
        password: "password",
        database: this.mysqlDbName,
      });

      connection.connect((err) => {
        if (err) {
          console.error("Error connecting to database: ", err);
          reject(err);
          return;
        }

        const query =
          "INSERT INTO chocolate_products (name, price_gb, price_usd, url) VALUES ?";
        const values = this.storageQueue.map((product) => [
          product.name,
          product.priceGb,
          product.priceUsd,
          product.url,
        ]);
        connection.query(query, [values], (err, results) => {
          if (err) {
            console.error("Error inserting data into database: ", err);
            connection.end();
            reject(err);
          } else {
            connection.end();
            resolve(results);
          }
        });
      });
    });
  }

  async saveToPostgres() {
    if (this.storageQueue.length <= 0) {
      return;
    }

    const client = new Client({
      user: "postgres",
      host: "localhost",
      database: this.pgDbName,
      password: "mysecretpassword",
      port: 5432,
    });

    try {
      await client.connect();
      const query =
        "INSERT INTO chocolate_products (name, price_gb, price_usd, url) VALUES ($1, $2, $3, $4)";
      for (const product of this.storageQueue) {
        await client.query(query, [
          product.name,
          product.priceGb,
          product.priceUsd,
          product.url,
        ]);
      }
    } catch (error) {
    } finally {
      await client.end();
    }
  }

  cleanRawProduct(rawProduct) {
    return new Product(rawProduct.name, rawProduct.price, rawProduct.url);
  }

  isDuplicateProduct(product) {
    if (!this.seenProducts.has(product.url)) {
      this.seenProducts.add(product.url);
      return false;
    }
    return true;
  }

  async addProduct(rawProduct) {
    const product = this.cleanRawProduct(rawProduct);
    if (!this.isDuplicateProduct(product)) {
      this.storageQueue.push(product);
      if (
        this.storageQueue.length >= this.storageQueueLimit &&
        !this.csvFileOpen
      ) {
        this.saveToCsv();
        this.saveToJson();
        await this.saveToMysql();
        await this.saveToPostgres();
        this.storageQueue = [];
      }
    }
  }

  async close() {
    while (this.csvFileOpen) {
      // Wait for the file to be written
      await new Promise((resolve) => setTimeout(resolve, 100));
    }
    if (this.storageQueue.length > 0) {
      this.saveToCsv();
    }
  }
}

const listOfUrls = ["https://www.chocolate.co.uk/collections/all"];

async function scrape() {
  const pipeline = new ProductDataPipeline(
    "chocolate.csv",
    "chocolate.json",
    "chocolate-bucket",
    "chocolate_db",
    "chocolate_db",
    5
  );
  for (const url of listOfUrls) {
    const response = await axios.get(url);

    if (response.status == 200) {
      const html = response.data;
      const $ = cheerio.load(html);
      const productItems = $("product-item");

      for (const productItem of productItems) {
        const title = $(productItem).find(".product-item-meta__title").text();

        const price = $(productItem).find(".price").first().text();
        const url = $(productItem)
          .find(".product-item-meta__title")
          .attr("href");

        await pipeline.addProduct({ name: title, price: price, url: url });
      }

      const nextPage = $("a[rel='next']").attr("href");
      if (nextPage) {
        listOfUrls.push("https://www.chocolate.co.uk" + nextPage);
      }
    }
  }
  await pipeline.close();
  await pipeline.saveToS3Bucket();
}

(async () => {
  await scrape();
})();
Next Steps
We hope you now have a good understanding of how to save the data you've scraped into the file or database you need! If you’ve any questions, leave them in the comments below and we'll do our best to help out!
If you would like the code from this example please check out on GitHub here!
The next tutorial covers how to make our scraper more robust and scalable by handling failed requests and using concurrency.