
Python Selenium Guide - Using Fake User Agents
Staying undetected and mimicking real user behavior becomes paramount in web scraping. This is where the strategic use of fake user agents comes into play.
In this article, we'll explore the fake user agents, their implementation in Selenium scripts and provide practical insights to elevate your web scraping endeavors.
- What is a User-agent
- What Are Fake User-Agents
- How To Use Fake User-Agents In Selenium
- Obtaining User Agent Strings
- Troubleshooting and Best Practices
- More Selenium Web Scraping Guides
If you prefer to follow along with a video then check out the video tutorial version here:
Need help scraping the web?
Then check out ScrapeOps, the complete toolkit for web scraping.
What is a User-Agent?
A user agent is a string containing information about your browser. If you are using Firefox on Ubuntu, you'll have a user agent string similar to the one below.
'User-Agent': 'Mozilla/5.0 (X11; Ubuntu; Linux x86_64; rv:109.0) Gecko/20100101 Firefox/119.0'
Here is a similar user agent but this time, for Chrome instead of Firefox.
'User-Agent': 'Mozilla/5.0 (X11; Linux x86_64) AppleWebKit/537.36 (KHTML, like Gecko) Chrome/119.0.0.0 Safari/537.36'
As you can see in the examples above, each string contains information about the operating system, on Firefox we have Ubuntu and on Chrome, it doesn't specify which distro, but it does contain Linux.
Each of the user agents above also mentions the browser and version. On FireFox, we have Firefox/119.0 to specify Firefox version 119.0. On Chrome, we have Google Chrome with a version number of 119.0.0.0.
Now that we know what a user agent is, let's dive deeper into what are fake user-agents and why we would want to use them.
What Are Fake User-Agents
Fake user agents, as the name suggests, involve simulating a different, often randomized, user agent string than the one associated with the actual browser being used.
Using fake user agents is a strategic approach in web development and web scraping for several compelling reasons:
Mimicking Human Behavior:
- Websites often analyze user agent strings to distinguish between human visitors and automated bots.
- By using fake user agents, you can emulate the behavior of real users, reducing the likelihood of being flagged as a bot and improving your chances of accessing the desired data without interference.
Avoiding Detection and Blocks:
- Many websites employ anti-scraping measures to protect their data.
- Fake user agents help you evade detection by presenting a browser identification that appears genuine, making it more challenging for websites to differentiate between automated and human traffic.
Circumventing Access Restrictions:
- Imagine you're trying to run in-depth unit tests on a website that would take hours to do manually.
- With Selenium and user agents, you can automate multiple tests from multiple clients on the same machine.
Targeted Content Access and User Simulation:
- Perhaps you want to view content that is only on a mobile version of a site. Or perhaps you wish to simulate many different users from many different devices and compare the results.
- By mimicking a mobile user agent, you can navigate through responsive designs and extract data specific to the mobile interface.
Preserving Privacy:
- Fake user agents contribute to preserving the privacy of the scraper by preventing websites from accurately identifying the actual browser and device details.
- This is particularly relevant when scraping sensitive or personal data.
There really is an endless list of reasons that you may want to set fake user agents.
How To Use Fake User-Agents In Selenium
To run Chrome with custom options in Selenium, we use the ChromeOptions() method. Take a look at the example below:
from selenium import webdriver
from time import sleep
#create a ChromeOptions instance
options = webdriver.ChromeOptions()
#set the user-agent
user_agent_string = 'Mozilla/5.0 (Windows NT 10.0; Win64; x64) AppleWebKit/537.36 (KHTML, like Gecko) Chrome/119.0.0.0 Safari/537.36'
options.add_argument(f"user-agent={user_agent_string}")
#initialize the Chrome WebDriver with the specified options
driver = webdriver.Chrome(options=options)
#navigate to a webpage
driver.get("https://www.whatismybrowser.com")
#sleep for 5 seconds so you can see the useragent on the page
sleep(5)
driver.save_screenshot("fake-os.png")
#close the browser
driver.quit()
In the example above, we manually set a fake user agent in Chrome by announcing that we're on Windows 10 instead of Linux. To a degree, this can work, but most sites will detect you.
Take a look at the screenshot at the end of the script.

We're detected pretty much immediately, as you can see at the top, "Your web browser looks like Chrome 119 on Linux". This is what we're telling the site in our string.
If you look at the next part of the screenshot, "But it's announcing that it is Chrome 119 on Windows 10".
While this method of manually changing the string does work to tell sites that we're using something different than we actually are, websites are able to figure this out.
For the rest of this guide, we will explore other methods of setting fake user agents.
Use Random User-Agent for Each Session With fake_useragent Library
With python and pip we can even install a custom library built entirely for fake user agents!
Run the following command to install the fake_useragent module:
pip install fake-useragent
After installing, we can use the code similar to the example below.
from selenium import webdriver
from fake_useragent import UserAgent
from time import sleep
#create a UserAgent instance
user_agent = UserAgent()
#create a ChromeOptions instance
options = webdriver.ChromeOptions()
#add a random user agent to our options
options.add_argument(f'user-agent={user_agent.random}')
#start chrome with our custom options
driver = webdriver.Chrome(options=options)
#navigate to a webpage
driver.get("https://whatismybrowser.com")
#sleep 5 seconds so we can see the site
sleep(5)
#take a screenshot
driver.save_screenshot("random-fake.png")
#close the browser
driver.quit()
In the code above, we:
- Create an instance of
UserAgent() - Create an instance of
ChromeOptions - Start Chrome with our custom options,
webdriver.Chrome(options=options) sleep()so we can view the page before it closes- Take a screenshot with
driver.save_screenshot()
You can view an example screenshot from this script below:

As you can see, while using Chrome (Selenium), we generated a random user agent of Firefox 116.
Use Selenium Undetected Chromedriver
Now that you know how to set fake user agents with regular Chromedriver, let's do it with Undetected Chromedriver.
To install Undetected Chromedriver, you can run the following command:
pip install undetected-chromedriver
You can use Undetected Chromedriver the same way that you'd use normal Selenium:
import undetected_chromedriver as uc
from time import sleep
#open chrome
driver = uc.Chrome()
#navigate to a site
driver.get("https://whatismybrowser.com")
#take a screenshot
driver.save_screenshot("undetected.png")
#close the browser
driver.quit()
As you can see in the image below, it runs and takes screenshots just like Selenium.

Now, let's set a fake user agent with it:
import undetected_chromedriver as uc
from fake_useragent import UserAgent
#create a UserAgent instance
user_agent = UserAgent()
#get a random user agent
user_string = user_agent.random
#set Chrome options
options = uc.ChromeOptions()
#set the user agent... make sure to use '--' to flag the args
options.add_argument(f'--user-agent={user_string}')
#open chrome
driver = uc.Chrome(options=options)
#navigate to a site
driver.get("https://whatismybrowser.com")
#take a screenshot
driver.save_screenshot("undetected-fake.png")
#close the browser
driver.quit()
In this example, we:
- Create an instance of
UserAgent() - Save a random user agent with
user_agent.random - Create an instance of
ChromeOptions() - Add our user agent with
options.add_argument(f'--user-agent={user_string}') - Navigate to the site
- Take a screenshot with
save_screenshot()
Take a look at the screenshot from this script:
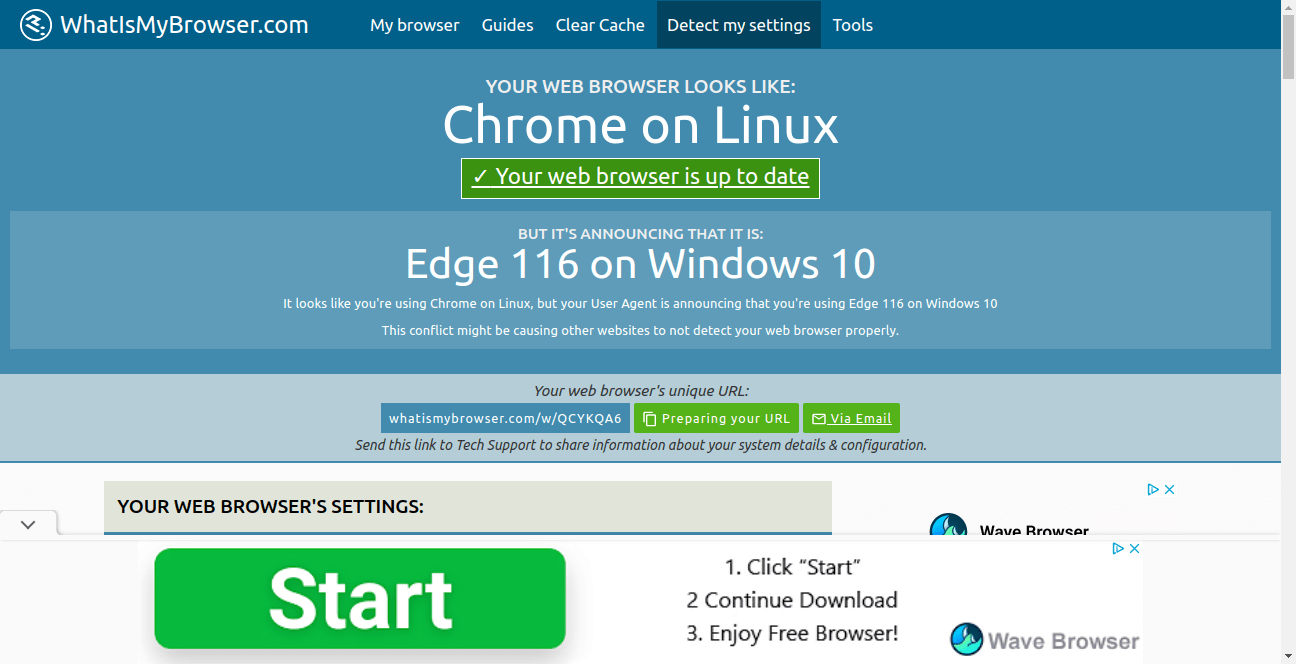
As you can see, our browser appears to be "Chrome on Linux" but it is telling the site that it is "Edge 116 on Windows 10".
Obtaining User Agent Strings
In several examples thus far, we've used random agents from the fake-useragent library. If you wish to manually obtain your own user agent strings, you can head over to useragentstring.com and choose manually from a rather large list.
As you've done throughout this tutorial, you can view your user agents at www.whatismybrowser.com.
A more convenient way to manage your user agents is through the ScrapeOps Fake User Agent API. We'll be using the requests module to fetch user agents from the API.
from selenium import webdriver
import requests
from random import randint
#scrapeops api key
API_KEY= "YOUR-SUPER-SECRET-API-KEY"
#send a get request for a list of agents
response = requests.get(f"http://headers.scrapeops.io/v1/user-agents?api_key={API_KEY}")
#save the results list
results_list = response.json()["result"]
#choose a random number between 0 and the last index
random_index = randint(0, len(results_list)-1)
#use the random number to pick a random agent
random_agent = results_list[random_index]
#create a ChromeOptions instance
options = webdriver.ChromeOptions()
#add the user agent to options
options.add_argument(f"user-agent={random_agent}")
#start Chrome with custom options
driver = webdriver.Chrome(options=options)
#navigate to the page
driver.get("https://www.whatismybrowser.com")
#take a screenshot
driver.save_screenshot("user-agents-api.png")
#close the browser
driver.quit()
In the code above, we do the following:
- Save our API key as a variable
- Make a
GETrequest to the ScrapeOps API for a list of fake agents - Choose a random number and use that to pick a random agent from the list
- Create a new
ChromeOptions()instance - Use the
add_argument()method to add our user agent to our options - Start Chrome with custom options using
webdriver.Chrome(options=options) - Navigate to the site
- Take a screenshot
Here is the screenshot:

As you can see, once again, we look like "Chrome on Linux", but we're broadcasting as a different browser, "Safari 14 on macOS".
Troubleshooting and Best Practices
As you probably noticed in most of these tutorials, our fake user agents were detected by the website. These examples were used so you can clearly see that we're changing the user agent from what it actually is.
To properly avoid detection, always make sure that your user agent matches your browser! If you are using Chrome, choose a user agent that specifies Chrome. If you are using Firefox, choose a user agent that specifies Firefox.
This way, it looks like you're using Chrome, and you actually are using Chrome so there is no descrepancy for the site to detect!
More Selenium Web Scraping Guides
You've made it to the end of the article! You should now have a solid understanding of how user agents work, how to set custom user agents. and how to obtain custom user agents.
- To learn more about Selenium, take a look at their official documentation
Want to learn more but don't know where to start? Click on one of the articles below!